Jekyll2026-06-30T21:27:09-04:00https://mrblahhhh.github.io/feed.xmlGarage & CodeAutomotive tuning, embedded telemetry, and custom fabrication.
mrblahhhhR53 Mini ECU Cover — Printable Replacement2026-06-30T00:00:00-04:002026-06-30T00:00:00-04:00https://mrblahhhh.github.io/car/tech/2026/06/30/r53-mini-ecu-cover
I broke another ECU cover retainer clip while testing an ECU for a customer — another JCW VIN change and immobilizer delete. Same story every time: pull the cover, hear the snap, clip’s gone.
I sell plug-and-play unlocked R53 ECUs with VIN changed and S, JCW, or GP1 software on Facebook Marketplace and NAM. The STL is on Cults3D if you want to print your own.
2001–2007 R53 Minis and R52 Cooper S models share a plastic ECU cover over the fuse box in the engine bay. The OEM clips are brittle — they snap off when you remove the cover for the first time, or the next time, or the time after that. Once the clips are gone the cover rattles and the wiring underneath is exposed.
Scanning the OEM cover
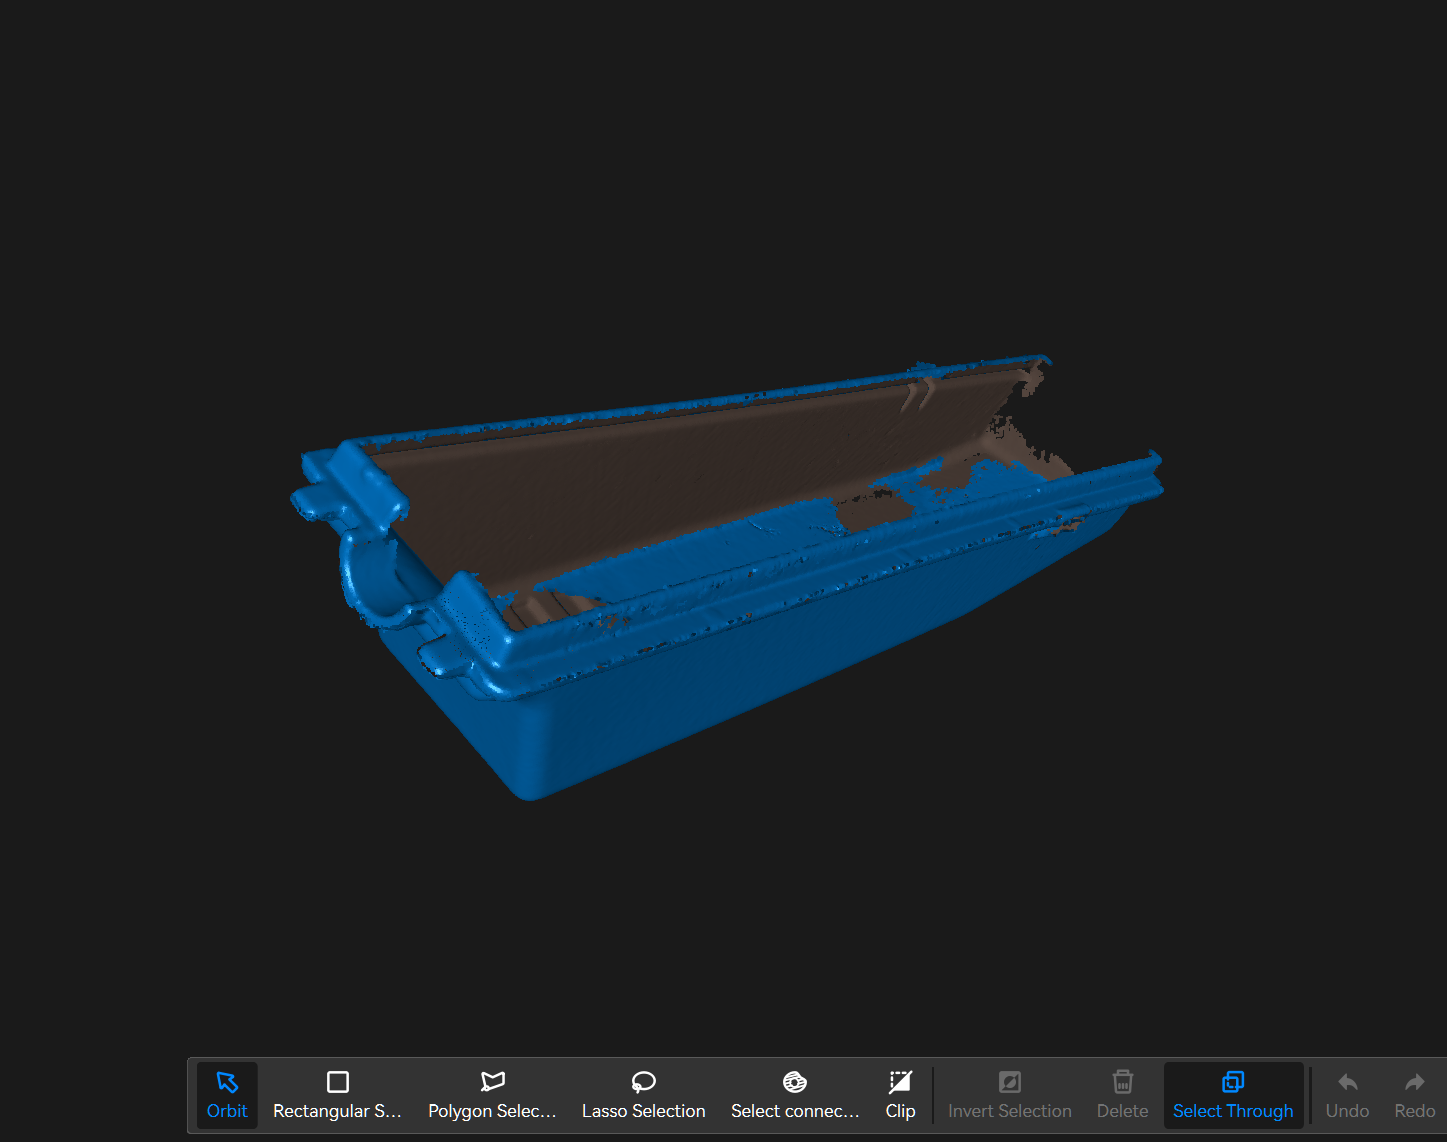
First time using my Pop 4 scanner, and first time in blue laser mode.
First scan with the Pop 4 — blue laser mode. Not a closed mesh, but enough to trace the cover.
Didn’t get a fully solid mesh — holes along the bottom edge and incomplete clip geometry — but it was good enough to sketch the replacement around in Fusion 360.
Imported mesh in Fusion — r53_ecu_cover and r53_ecu_cover_Edited bodies, solid ecu-cover sketched on top.
Printed in ASA and put the STL on Cults3D.
The part
One piece — ecu-cover.stl — with integrated snap clips on the sides and a clip on the bottom edge that hooks the fuse box housing. Same overall shape as the factory cover so it drops in without modifying the car.
Clip geometry on the long edge — modeled to match the OEM latch points.
Top surface and bottom-edge clip — same footprint as the factory cover.
Installed
Snaps into the existing fuse box and ECU harness routing. No zip ties, no tape, no hoping the old broken clips still sort of work.
Replacement cover clipped in — red intake plumbing and fuse box unchanged.
Bottom-edge clip engaged on the fuse box lip.
How to print it
Print standing up so the clip layers run the full length of each tab — much stronger than printing flat where the clips are built from short layer bonds. ASA works and handles under-hood heat; nylon would be better for clip flex and long-term fatigue if you have it.
Setting
Notes
Material
ASA (what I used) or nylon (preferred for the clips)
Orientation
Vertical — clips along Z, not across layer lines
Size
62 × 54 × 218 mm — check your bed before you slice
The 135i track build runs an LS BTR valve cover with an AN-12 ORB oil fill port. Off-the-shelf funnels for that fitting basically do not exist — and the port sits at an angle in a crowded bay, so a straight drop-in funnel is awkward to use anyway.
I mocked up a two-piece funnel in Fusion 360, printed it in ASA, and it works well enough that I put the STLs up on Cults3D.
Two parts, one swivel joint
The funnel splits into a basin (oilfillfunnel.stl) and a threaded base (oilfillbase.stl). They lock together with a small interference lip — enough to stay assembled, not enough to spin on their own. You can hold the funnel still while you thread the base into the port, or spin the base independently once it is seated.
Wide basin, offset neck, and a separate AN-12 ORB base — modeled around the LS BTR valve cover fill location.
Snap-fit joint
The retention geometry is a simple groove-and-lip with chamfered lead-ins. Press the two halves together until they snap; the lip rides in the groove with a small clearance gap so the parts rotate freely but cannot pull apart vertically.
Section view of the interference lip — captive joint with enough clearance for independent rotation.
In the engine bay
Printed in black ASA and installed on the red valve cover — the offset neck keeps the wide opening level even though the port is angled. No more balancing a cut bottle or a generic funnel that does not seal to ORB threads.
Two-piece funnel on the fill port — basin stays put while the base threads in.
Download the STLs
The files are free or pay what you want on Cults3D:
ASA recommended — holds up to under-hood heat better than PLA or PETG
Two separate prints, then snap the base into the funnel neck
No supports needed on either part if you orient the base threads down and the funnel basin opening up
Designed for the LS BTR valve cover AN-12 ORB fill. If your port location or angle differs, measure before you commit filament.
]]>mrblahhhhTPMS Monitor — My Own Android App for Cheap BLE Sensors2026-06-21T00:00:00-04:002026-06-21T00:00:00-04:00https://mrblahhhh.github.io/car/tech/2026/06/21/tpms-monitor-app
Cheap BLE valve-stem TPMS sensors are everywhere now — Tesla-style 401 MHz units that broadcast pressure, temperature, and battery over Bluetooth Low Energy. They wake on motion or a few PSI of change, so you get live readings without a dedicated receiver box.
The hardware is fine. The bundled Android apps are not — clunky UIs, questionable permissions, and the usual “Chinese app store” feel. I already decode these sensors in TrackDayPyrometerHelper for cold/hot PSI on the 135i, but I wanted a dedicated monitor that runs in the background, alerts on pressure drops, and handles the layouts I actually drive: a car, a truck, an RV with dually rear wheels, and trailers with different wheel counts.
TPMS Monitor is that app. Source is private for now; Play Store release is on the someday list.
Live dashboard
Pick a vehicle from the garage and the main screen shows every bound corner — pressure, temperature, battery, and how fresh the reading is.
JCW profile — 33.9 / 34.7 / 34.5 / 34.0 psi, all live. Color dots match the paint marks on each valve stem.
Each tire card goes green when pressure is in range, and the header shows how many sensors are bound vs. expected for the current layout.
Scan and bind
Pairing is a three-step flow so you are not guessing which MAC address is which tire:
Mark the sensor — dab the valve stem with a paint color (red, blue, green, etc.).
Pick the wheel position — FL, FR, RL, RR, or the RV/trailer slots below.
Tap the sensor — hold the phone near the marked sensor while it is broadcasting. Wake it with motion or roughly 4 psi of pressure change if it is asleep.
Only unbound sensors show up. Bound ones stay out of the list so you can pair one tire at a time without confusion.
Broad scan is there when the filtered list is empty — useful if a sensor is broadcasting under a name the narrow filter missed.
Garage — vehicle and trailer profiles
Bindings are saved per tow vehicle and per trailer, not as one giant list. Swap the F-150 for the RV on Monday and the same carhauler trailer keeps its four sensor assignments.
JCW (car, 4 sensors), wini (RV, 6 sensors), f150 (truck, 4 sensors) — plus trailers from none up to a 4-wheel carhauler or 2-wheel ATV hauler.
Each profile stores its own layout type and sensor map. Add, rename, or delete vehicles and trailers from here.
RV plus trailer layout
The RV profile is a 6-wheel motorhome — front axle plus dually rear (FL, FR, RL, RR, inner left, inner right) — with a 4-wheel trailer hung off the back. Ten positions total on one screen.
RV-FL through RV-IR up top, T-FL through T-RR on the trailer. Positions show “Unassigned” until each sensor is bound.
Truck plus small trailer
Not every haul is ten wheels. The F-150 plus ATV trailer profile is four truck corners and two trailer tires — same app, different layout template.
TK-FL/FR/RL/RR for the truck, T-FL/FR for the trailer.
Background monitoring and alerts
The part that makes this worth running daily: a foreground service keeps scanning while you drive. A persistent notification shows summary status — all tires OK, or which corner dropped.
Silent ongoing notification — no sound unless something is wrong.
Expand it for per-corner PSI and temperature without opening the app.
34 / 35 / 35 / 34 psi at a glance from the shade.
When pressure falls below your threshold, the notification escalates — you get a PSI drop alert even if the app is not in the foreground. That is the whole point of TPMS on a tow rig.
What is not tested yet
Layout and binding logic are done. Sensor range on a long RV-plus-trailer haul is not. BLE is short-range by design; the phone sits in the cab while trailer sensors can be 30+ feet back. I have verified binding and live reads in the driveway and on short trips. A full highway tow with all ten sensors reporting reliably is still on the to-do list — repeater placement, phone mount location, and whether the sensors rebroadcast often enough at highway speed all need real miles.
What is next
Play Store submission when the range question is answered and I am happy with alert tuning. Until then it is my daily driver for anything with color-tagged BLE sensors on the stems.
If you are running the same cheap sensors, the paint-and-position bind flow is the workflow — mark one, assign one, move on. No MAC-address spreadsheet required.
]]>mrblahhhhPip-Boy Check Engine Display — Haltech CAN Warnings2026-06-19T00:00:00-04:002026-06-19T00:00:00-04:00https://mrblahhhh.github.io/car/tech/2026/06/19/pipboy-check-engine-display
The 135i track build runs a Haltech Rebel LS with the factory BMW dash still in place — speed, temps, and the usual cluster stuff all work fine. What it does not show are Haltech-side warnings: high oil temp, low oil pressure, and other fault states the ECU knows about but never forwards to the BMW cluster.
This is a small Pip-Boy-style display mounted in the driver-side vent as a second readout, fed from the Haltech CAN bus over WiFi. Same car, two dashes — factory cluster for driving, Pip-Boy for the stuff Haltech won’t put on the BMW screen.
How it works
A RaceCapture ESP32-CAN-X2 (Autosport Labs) sits on the Haltech CAN network, reads the channels I care about, and sends updates wirelessly to the display module. The screen is a separate Waveshare ESP32-S3-Touch-AMOLED-2.41 — 2.41″ square AMOLED at 600×450, capacitive touch, WiFi/BLE — running a Pip-Boy boot sequence and alert UI.
On track, if oil pressure or oil temp crosses a limit, the display flashes the warning immediately.
Boot sequence and normal operation — Pip-Boy aesthetic, real Haltech data behind it.
Display hardware
Waveshare 2.41″ AMOLED in the vent gauge pod — USB power routed through the mount.
The dev board is a Waveshare ESP32-S3-Touch-AMOLED-2.41: RM690B0 AMOLED over QSPI, FT6336 capacitive touch on I2C, QMI8658 IMU and RTC on board. USB-C for power and programming.
Dash mount
Bracket modeled around the 2.41″ AMOLED module — replaces the vent louver section and keeps airflow slots.
Square gauge pod bracket — snap-fit geometry for the E82 driver-side vent.
Separate RAM-ball adapter if you want an adjustable arm instead of the fixed pod.
Both mounts fit the E82/128i/135i driver-side top vent. RAM ball for phone or secondary gauge; pod bracket for the Pip-Boy screen.
Two 3D-printed parts, both PETG or ASA minimum for in-car heat:
Part
Link
Price
E82 vent gauge square gauge pod bracket (LCD mount)
The free bracket is sized for the Waveshare 2.41″ AMOLED module. The RAM mount is a vent insert with a standard RAM ball — useful on its own or combined with the pod above it.
Standard 1″ RAM components if using the RAM vent mount
]]>mrblahhhhBMW prop/driveshaft seal replacement2026-06-18T00:00:00-04:002026-06-18T00:00:00-04:00https://mrblahhhh.github.io/car/2026/06/18/bmw-prop-driveshaft-seal-replacementThe rear CV seal on a BMW prop shaft is normally not serviceable. I found a replacement seal — BMW part 11553453300 — and ordered a few from Shem Group in Ukraine.
Removing the old seal
The old seal is press-clamped onto the shaft. I pick every bit of the old rubber out of the lip before installing the new one. Clean the lip thoroughly, then clean it again.
Repacking the joint
I repack the CV joint with a syringe before installing the seal:
Grease inside the joint first
A dab on each ball on the outside
Don’t overdo the grease — if it gets on the glue surface the seal won’t bond.
Grease loaded in a syringe for repacking.
Grease inside the joint and a dab on each ball.
The new seal
Replacement seal from Shem Group, part 11553453300.
Shem Group sells the seal under part number 11553453300. It includes a ring for the inner lip — I remove that ring and use safety wire instead, because with the ring in place it’s too hard to get the seal on fast enough once the adhesive is applied.
Installing the seal
3M Black Super Weatherstrip and Gasket Adhesive (08008).
I use 3M Black Super Weatherstrip and Gasket Adhesive (08008). It dries fast — have everything ready before you open the tube.
Order of operations:
Clean and grease the joint (no adhesive yet)
Run a bead of 08008 on the shaft outer lip, inner lip, and the seal outer lip
Press the seal on quickly — it will resist the whole way
If it leaks, it’ll be at the outer lip. That joint is somewhat serviceable if you’re careful on the next attempt.
]]>mrblahhhhMy First Android App, TrackDayPyrometerHelper2026-06-18T00:00:00-04:002026-06-18T00:00:00-04:00https://mrblahhhh.github.io/car/tech/2026/06/18/trackday-pyrometer-helper
TrackDayPyrometerHelper is my first Android app. The main focus is tire temps — a custom BLE pyrometer to replace my broken gun, synced into the app for OUT/MID/IN sessions on all four corners. It grew from there into TPMS for hot and cold pressures, and ProForm corner scales over Bluetooth. Everything lives in one place for the LS3 135i.
The Android source is private for now; I’m aiming for the Play Store next month. The ESP32 pyrometer firmware is public: MrBlahhhh/PyroTC.
Tire temps
While a basic tire pressure gauge just tells you how much air is inside, a pyrometer — a highly accurate temperature probe — shows you the physical stress the tire is actually experiencing. By measuring the heat at three distinct points across the tire’s surface (the inside edge, the middle, and the outside edge), a driver can see exactly how the car is planting its weight onto the pavement. Those three temperature readings act like a diagnostic report, revealing flaws in how the car’s suspension is adjusted that even an experienced driver might not feel from behind the wheel.
Sessions are timestamped and tagged by compound — slick, R-Comp, RE-71RS, etc.
OUT / MID / IN per corner, plus sync from the pyrometer and from TPMS for cold and hot PSI.
The TIRES tab records OUT, MID, and IN for all four corners. Static camber per corner feeds setup notes. Aim for the lowest hot pressure that doesn’t roll the outer shoulder — outer-edge heat or graining is the rollover signal. Take temps right after coming in; they fade fast.
SYNC FROM PYROMETER pulls live readings from PyroTC over BLE — tap record on the gun, hit sync in the app, and cells fill.
PyroTC — custom BLE pyrometer
My old tire pyrometer died. Rather than buy another standalone gun, I built PyroTC: a handheld K-type reader on the Waveshare round ESP32-S3 touch LCD, in a 3D-printed enclosure.
Head, handle, faceplate, and screw-on battery cap — designed around the round display module and an 18650 in the grip.
The device owns all twelve readings (four corners × OUT/MID/IN). On the SELECT screen you pick LF/RF/LR/RR; on RECORD you see live probe temp, the three slots, and big RECORD / CLEAR / BACK buttons. A short beep confirms a capture — no hardwired trigger.
Tap a corner, record OUT → MID → IN, hit SYNC FROM PYROMETER in the app — cells fill live over BLE.
Firmware is a single main.cpp (~450 lines), PlatformIO, NimBLE-Arduino 2.x, and a MAX6675 on software SPI. Full source: github.com/MrBlahhhh/PyroTC.
The app (PyroSync.kt) and firmware share a fixed GATT layout — change either side without updating the other and things break silently.
Item
Value
Device name
PyroTC
Service
a1b20001-7a9c-4b1e-9d3a-2f6c8e5d4c30
TEMP…0002
READ + NOTIFY ~4 Hz — float32 LE °C + uint8 fault (live probe)
STATE…0003
READ + NOTIFY on change — 24 bytes, 12 × int16 LE deci-°C in order LF[O,M,I], RF[O,M,I], LR[O,M,I], RR[O,M,I]; -32768 = empty
pio run -t upload
pio device monitor -b 115200
TPMS sensors
Tag each sensor by valve-stem color, map colors to corners. Rotate tires — re-point colors, not MAC addresses.
TPMS decoding lives in the app, not the pyrometer firmware. Scan finds nearby sensors (they only broadcast while rolling or just stopped), you tag each one with a color on the valve stem, then assign colors to LF/RF/LR/RR. Saved sets cover different wheel/tire combos.
SYNC COLD PSI and SYNC HOT PSI on the tire temp screen fill pressures from mapped sensors. Ambient temperature comes from a one-shot Open-Meteo lookup so the app can flag cold tires.
ProForm corner scales
What started as a side project — I wanted live weights from my ProForm wireless scale pads on my phone instead of juggling the factory display. Reverse-engineering the BLE protocol got the four pads waking, mapping to FL/FR/RL/RR, and streaming live weights.
Wake each pad over BLE, map to a corner, calibrate, then zero with the car off the pads.
Live mode streams all four corners. Manual entry works when you only have corner numbers from somewhere else.
The scales screen handles the painful parts: waking sleepy pads by MAC, per-corner calibration, and ZERO ALL with the car off the pads.
Corner balance
Manual entry still gives you cross weight, diagonal totals, and whether to adjust perches.
Example: 44.83% cross on 2,904 lb — move 150 lb onto the RF+LR diagonal to hit 50%.
The BALANCE tab shows FL/FR/RL/RR weights, total, front/rear and left/right split, and cross weight against a target (I run 50.00%). When cross is off, the app tells you how much weight to move onto the RF+LR diagonal and whether to raise RF/LR or lower LF/RR. Optional perch-turn calibration converts pounds into turns.
Parts list
PyroTC pyrometer
Part
Notes
Waveshare ESP32-S3-Touch-LCD-1.28
GC9A01 round LCD + CST816S touch; display, touch, IMU, and battery ADC are onboard
Android device with BLE — app targets Play Store release soon
What’s next
Play Store submission is the immediate goal. The pyrometer hardware and firmware are done enough for track weekends; the app already replaced my paper log for cross, temps, and pressures on the 135i.
If you build a PyroTC, start with nRF Connect: confirm TEMP tracks the probe and STATE updates when you tap RECORD. Flip TOUCH_FLIP_X / TOUCH_FLIP_Y in firmware if corner buttons land wrong on your panel.
]]>mrblahhhh2009 BMW 135i — L92 Track Build2025-10-15T10:00:00-04:002025-10-15T10:00:00-04:00https://mrblahhhh.github.io/car/2025/10/15/135i-l92-track-build
Drivetrain
Factory six-speed manual, kept behind the L92 with an MC Motorsport Stage 1 adapter — S1-LS-HGU-952 (Chevrolet LS to BMW M57N HGU / N54, 240 mm / 9.45″). LSE9X engine and transmission mounts for the swap.
Engine
L92 in the 135i bay — heat-wrapped intake, 3D-printed ducting, catch can plumbing.
The N54 had spun a rod bearing. It had index 12 injectors, a baffled oil pan, and a full refresh roughly a year before failure — factory turbos, rod bearings, gaskets, coil packs, spark plugs, and a new power steering cooler. Full records came with the car.
The L92 has a DOD & VVT delete, Summit 8711R3 cam, LS3 intake, and LSE9X long-tube headers. LS7 lifters and trays, BTR trunnion upgrade, BTR valve covers, ARP hardware throughout. Valve cover breathers run -12AN vent lines to a 3D-printed catch can. Continental flex-fuel sensor on the Haltech Rebel LS ECU, with an ESP32 CAN bus translator for BMW chassis integration.
Cooling and oiling
Remote oil cooler with a Bosch combined temp/oil-pressure sensor. The dual parallel oil coolers were replaced with a single E90 M3 oil cooler and 3D-printed ducting routed for the LS. Moroso 3 qt oil accumulator, Haltech-controlled — pre-oils and dumps back into the pan when oil pressure drops below 25 psi. Exhaust: 3″ to 2.5″ to single 3.5″ to Berk street muffler.
MCS 2WNR two-way adjustable dampers (2022). 650 lb/in front and 900 lb/in rear Hypercoil springs. Front: 60 mm helper springs, Torrington bearings, Turner upper control arms and bushings, Vorshlag camber plates, M3 strut tower braces, upgraded sway bar links. Rear: Ground Control articulating spring perches, M3 subframe bushings, M3 camber link conversion, adjustable camber and toe arms, UUC anti-roll bar.
Wheels and safety
Clenched fender flares clearing up to 10.5” wheels. Square setup: 18×10 with 275 tires. Autopower bolt-in roll bar, omp halo seats.
 First scan with the Pop 4 — blue laser mode. Not a closed mesh, but enough to trace the cover.
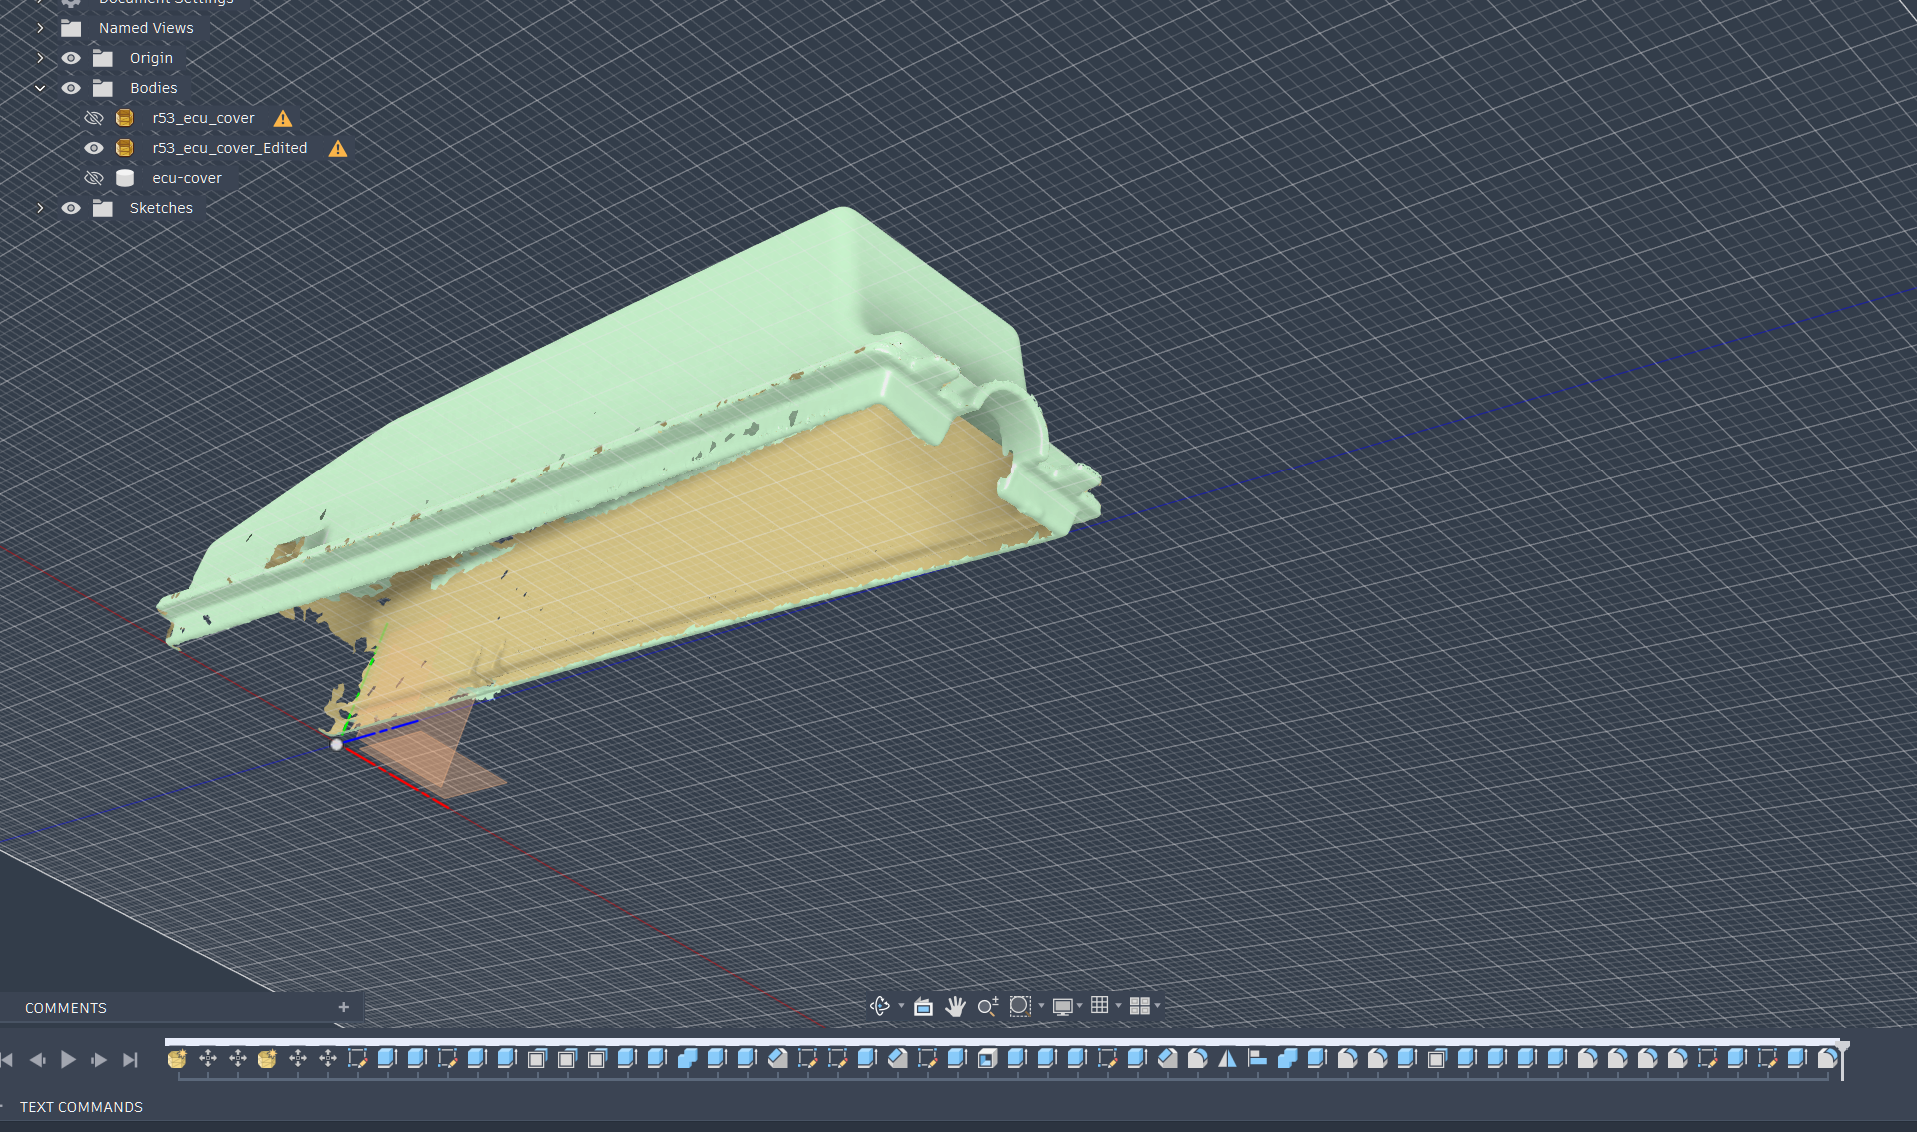 Imported mesh in Fusion —
 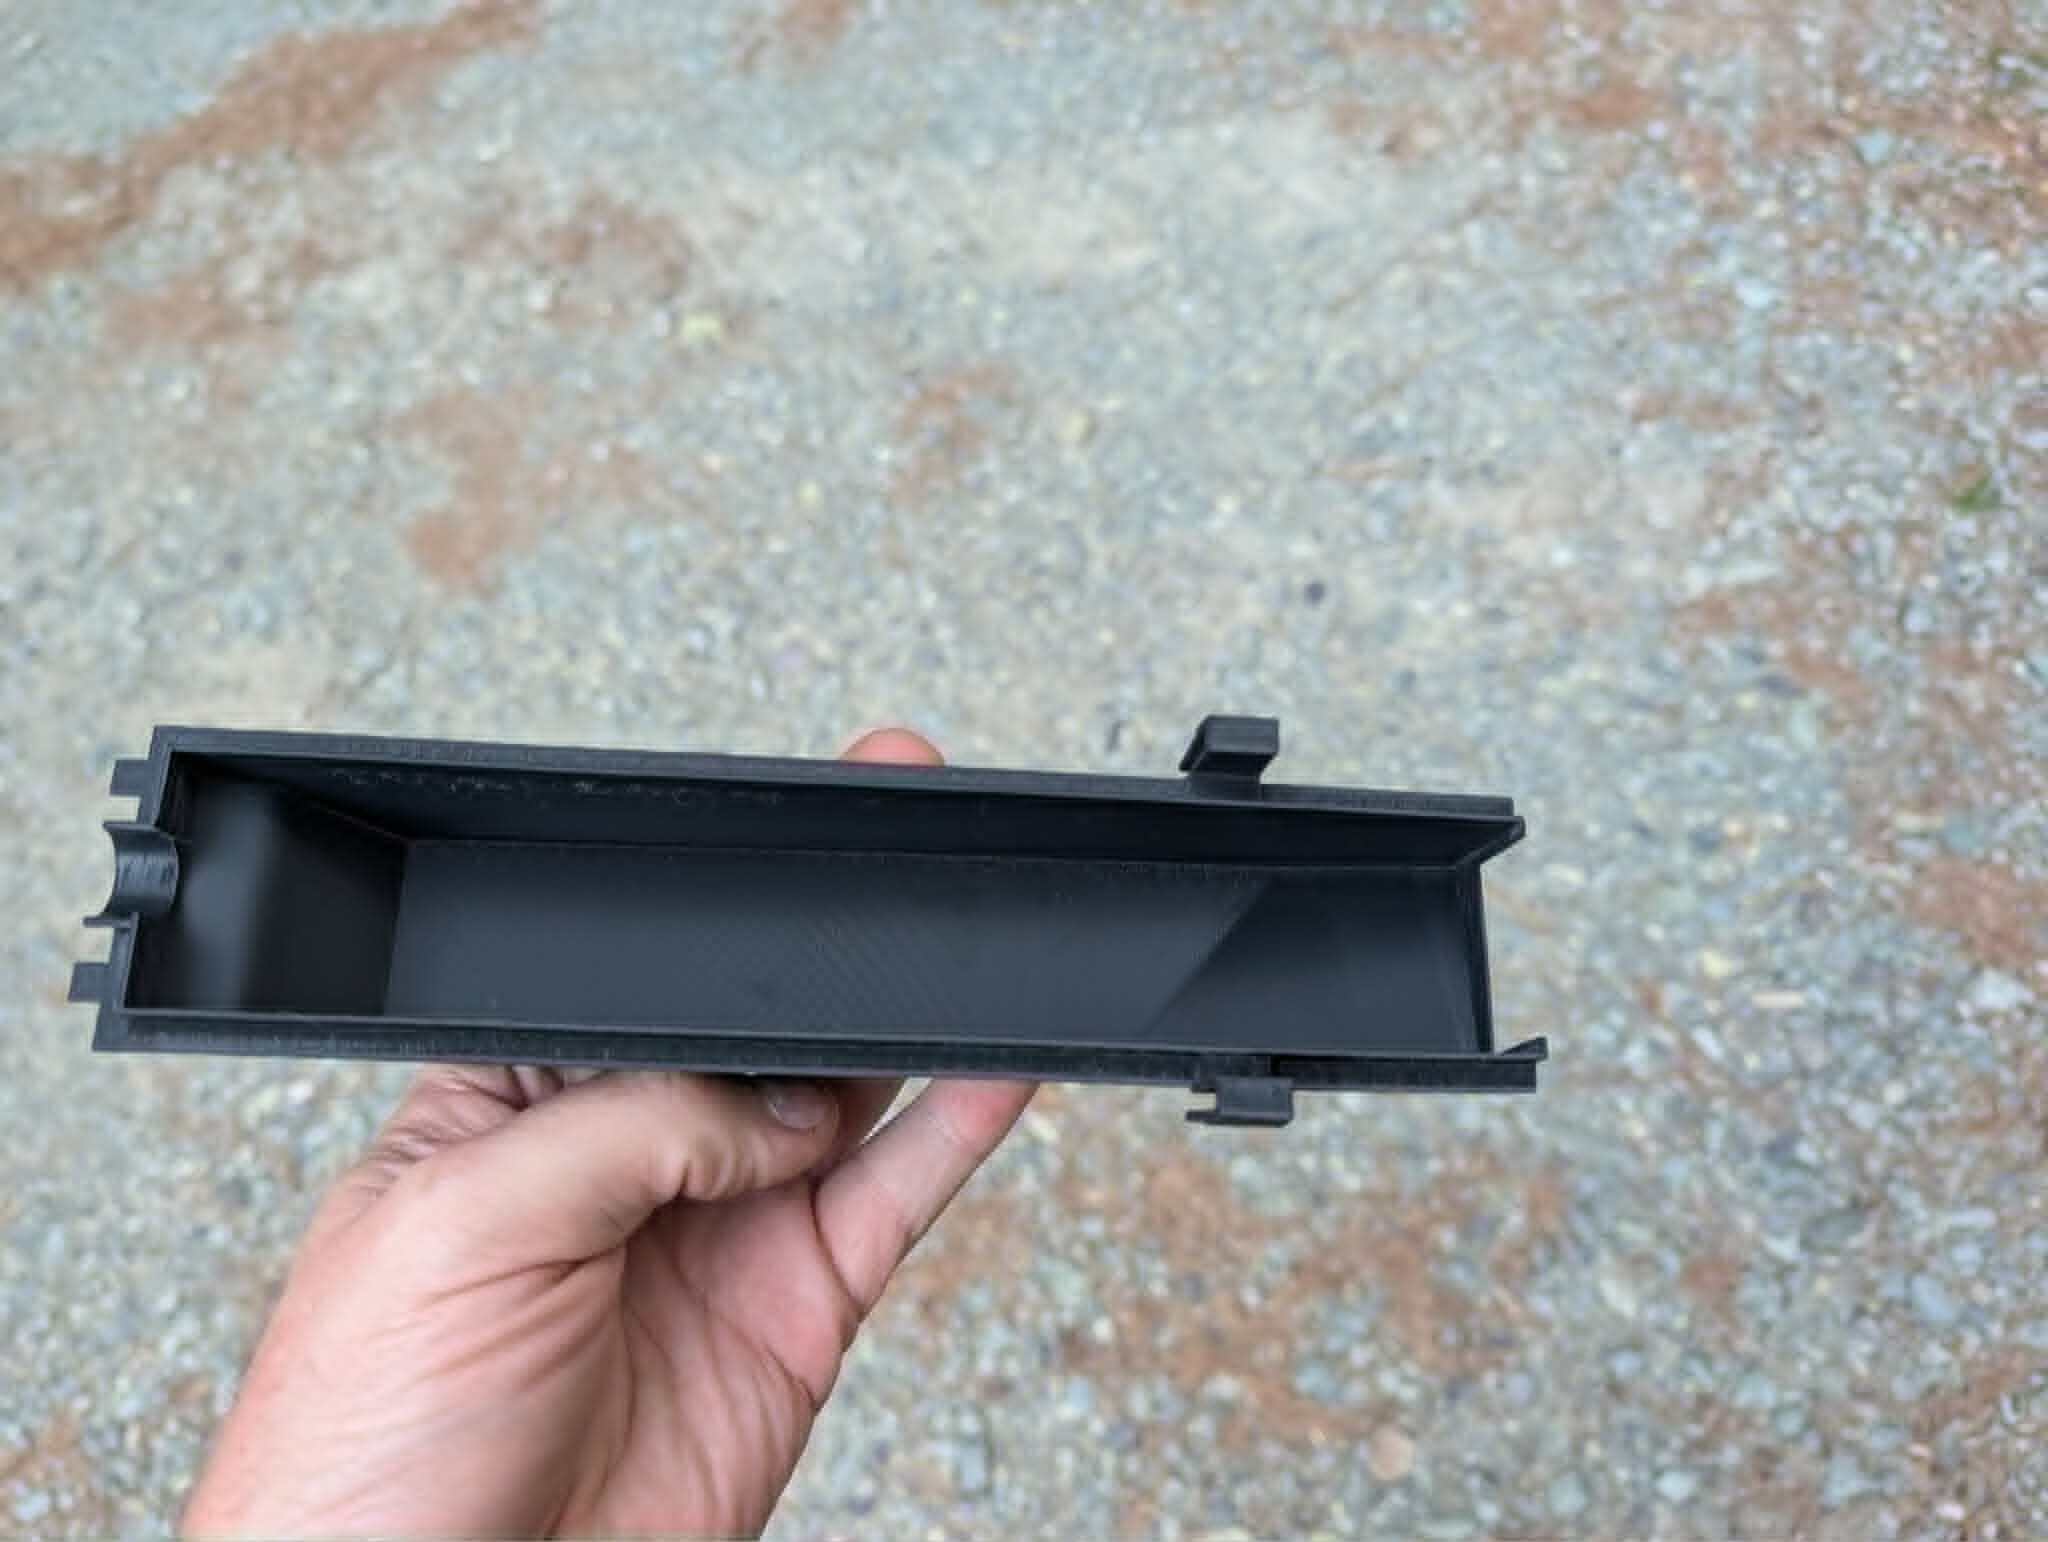 Clip geometry on the long edge — modeled to match the OEM latch points.
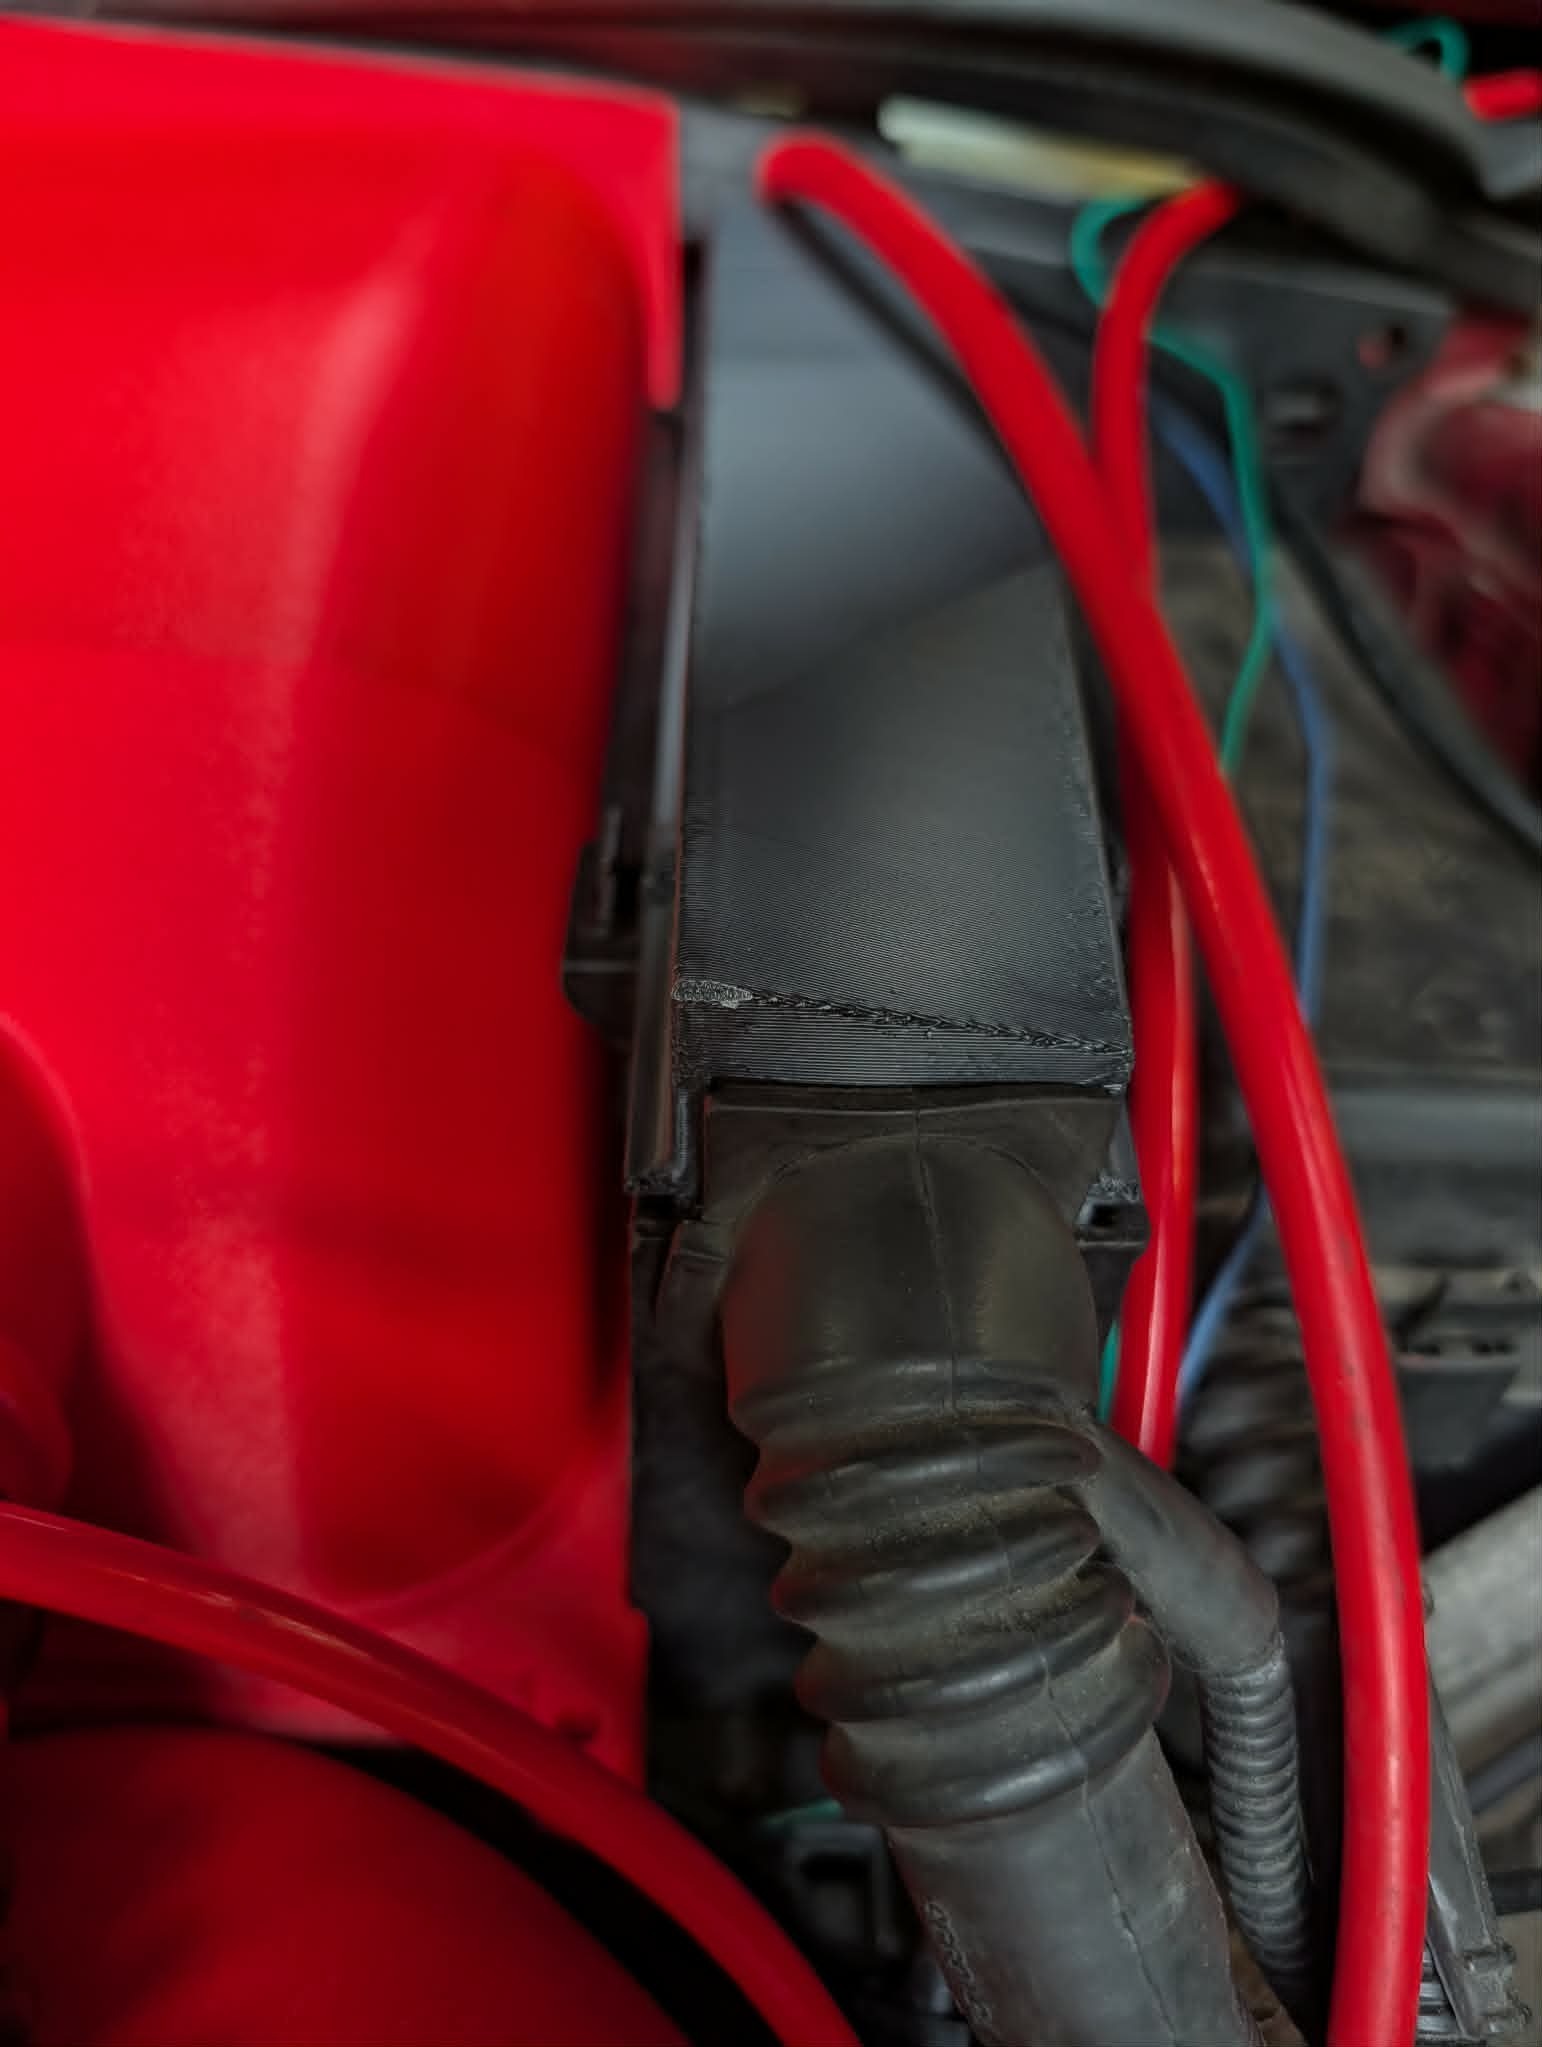 Top surface and bottom-edge clip — same footprint as the factory cover.
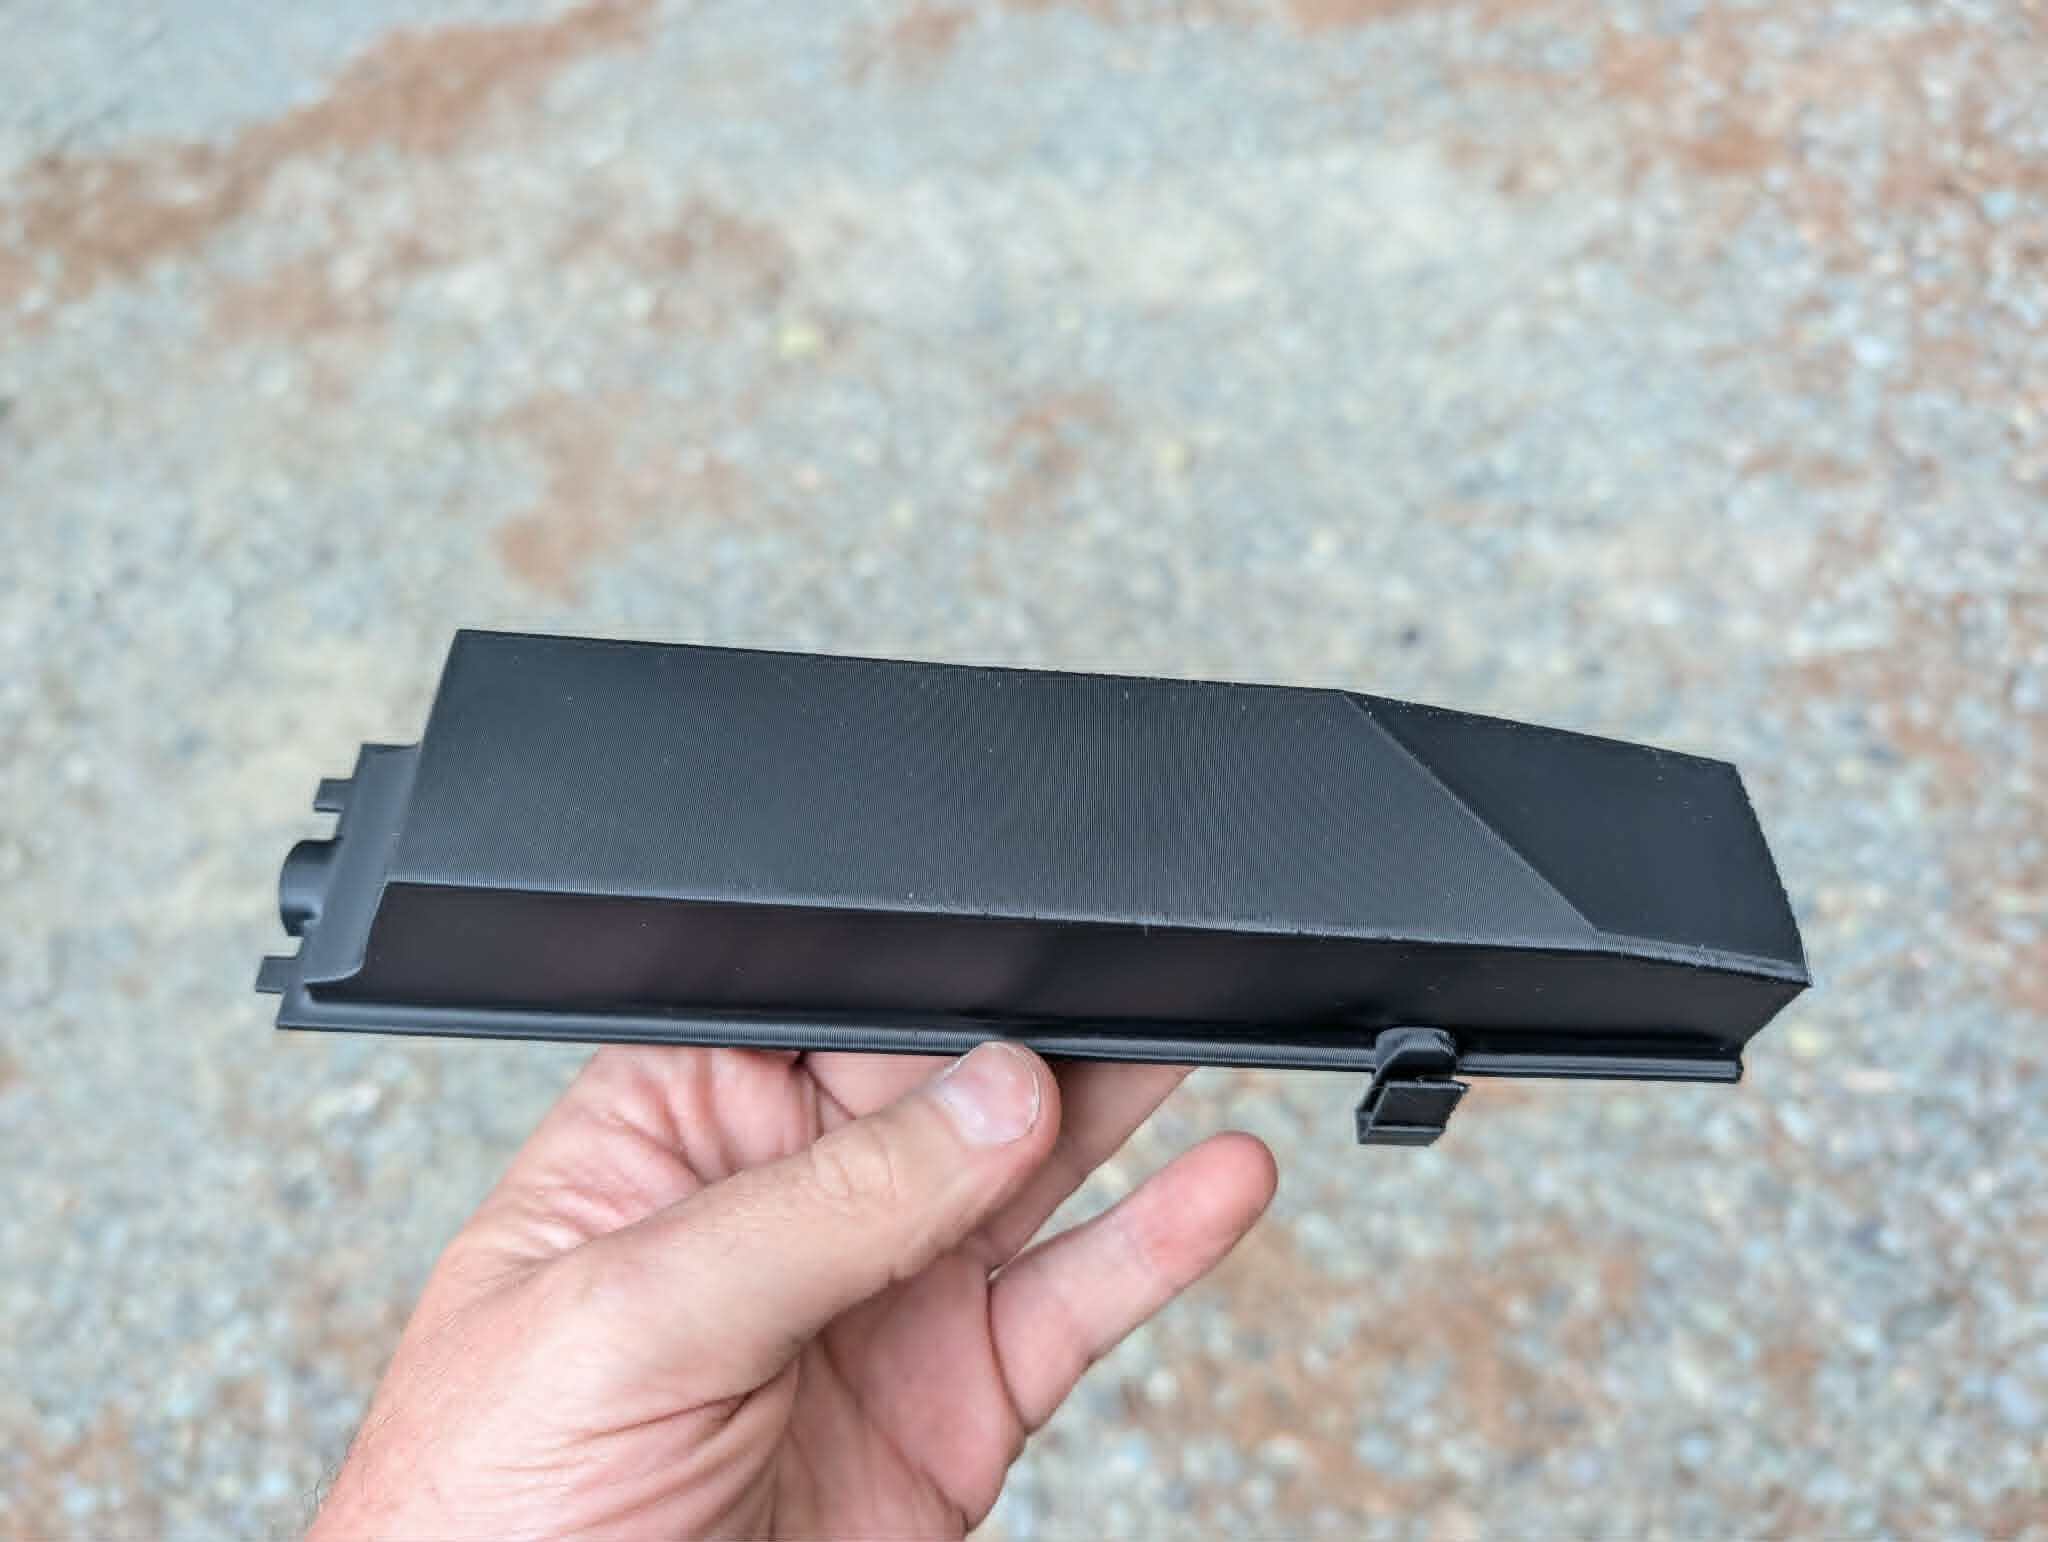 Replacement cover clipped in — red intake plumbing and fuse box unchanged.
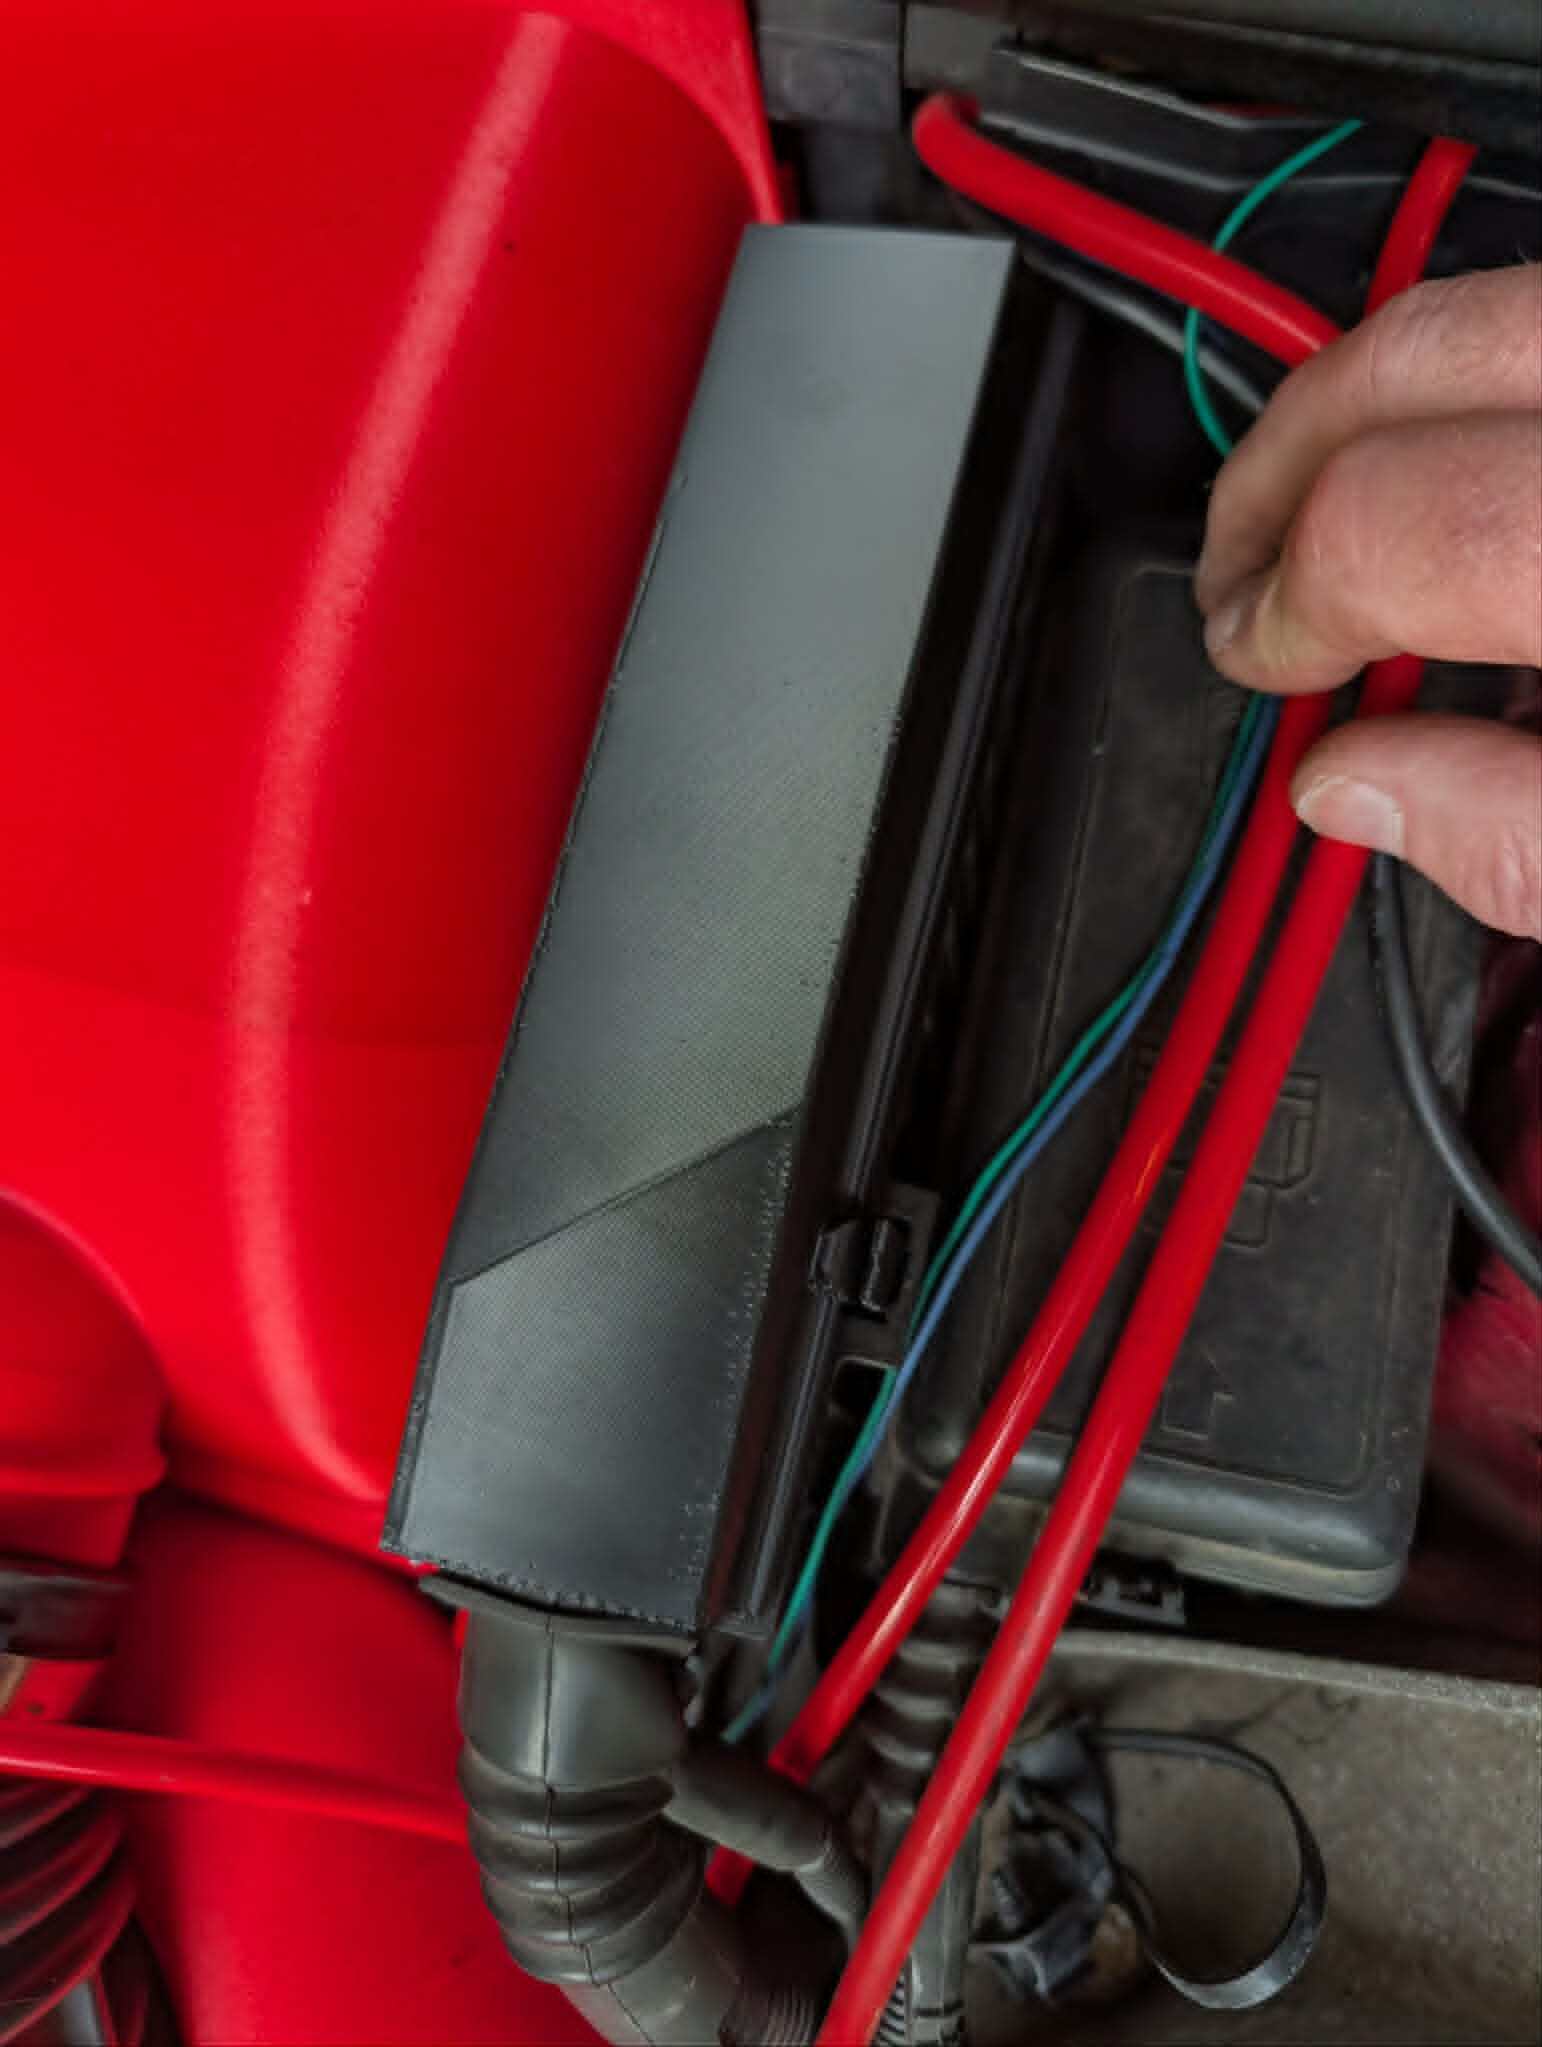 Bottom-edge clip engaged on the fuse box lip.
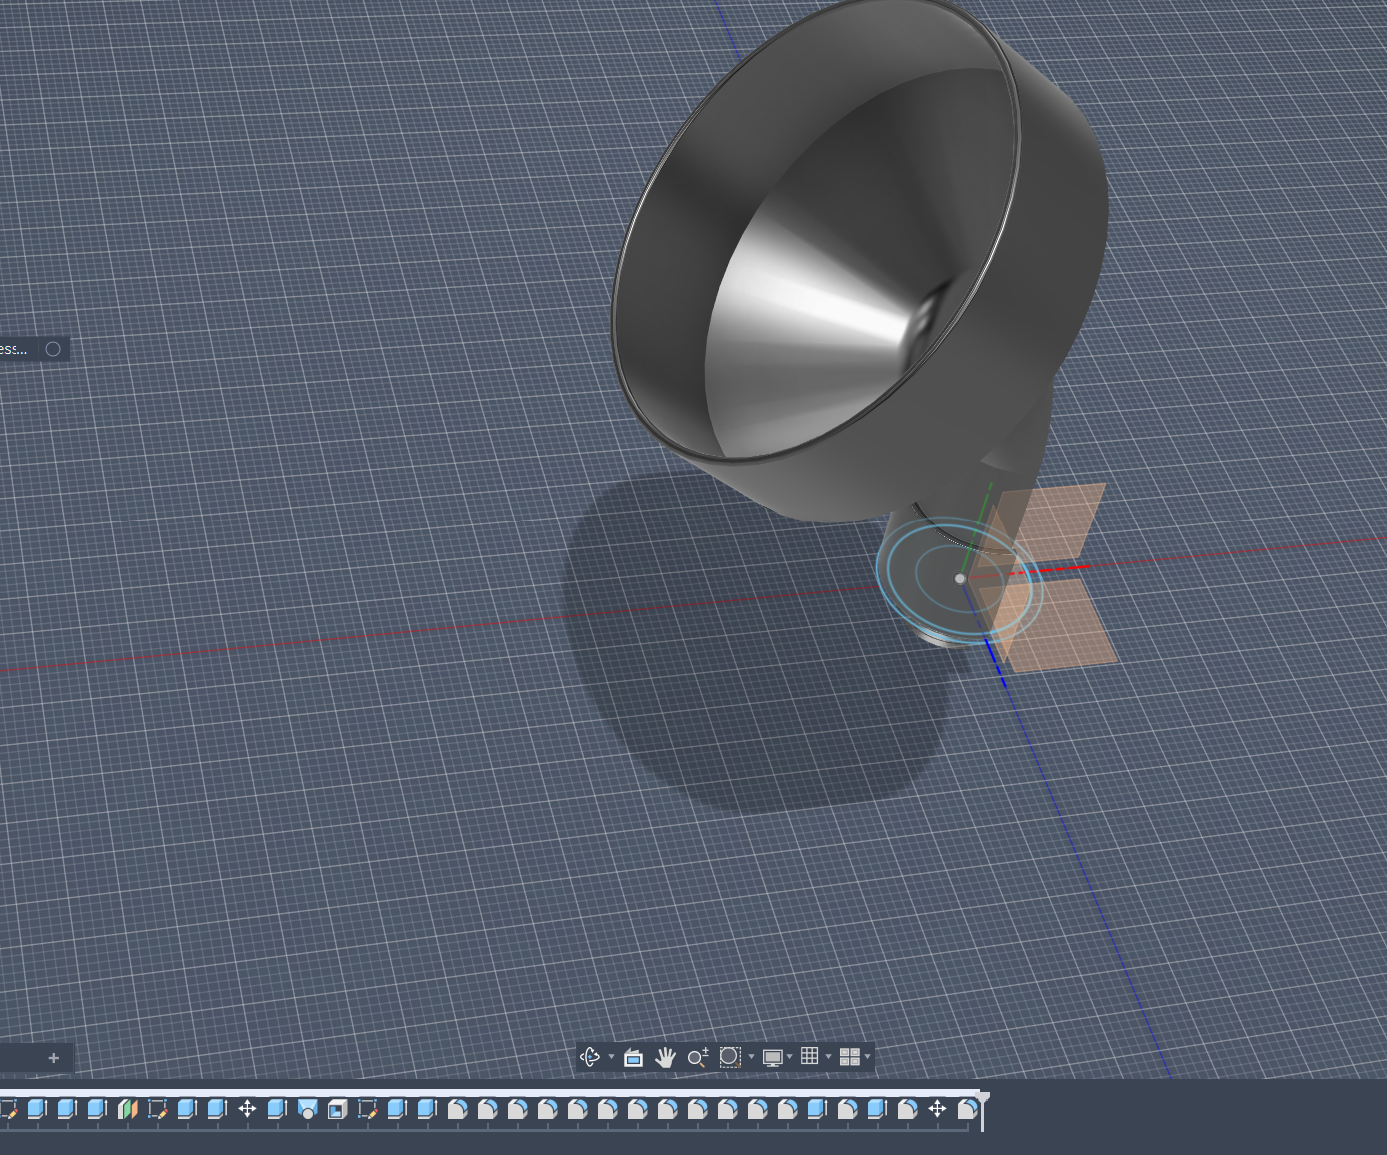 Wide basin, offset neck, and a separate AN-12 ORB base — modeled around the LS BTR valve cover fill location.
 Section view of the interference lip — captive joint with enough clearance for independent rotation.
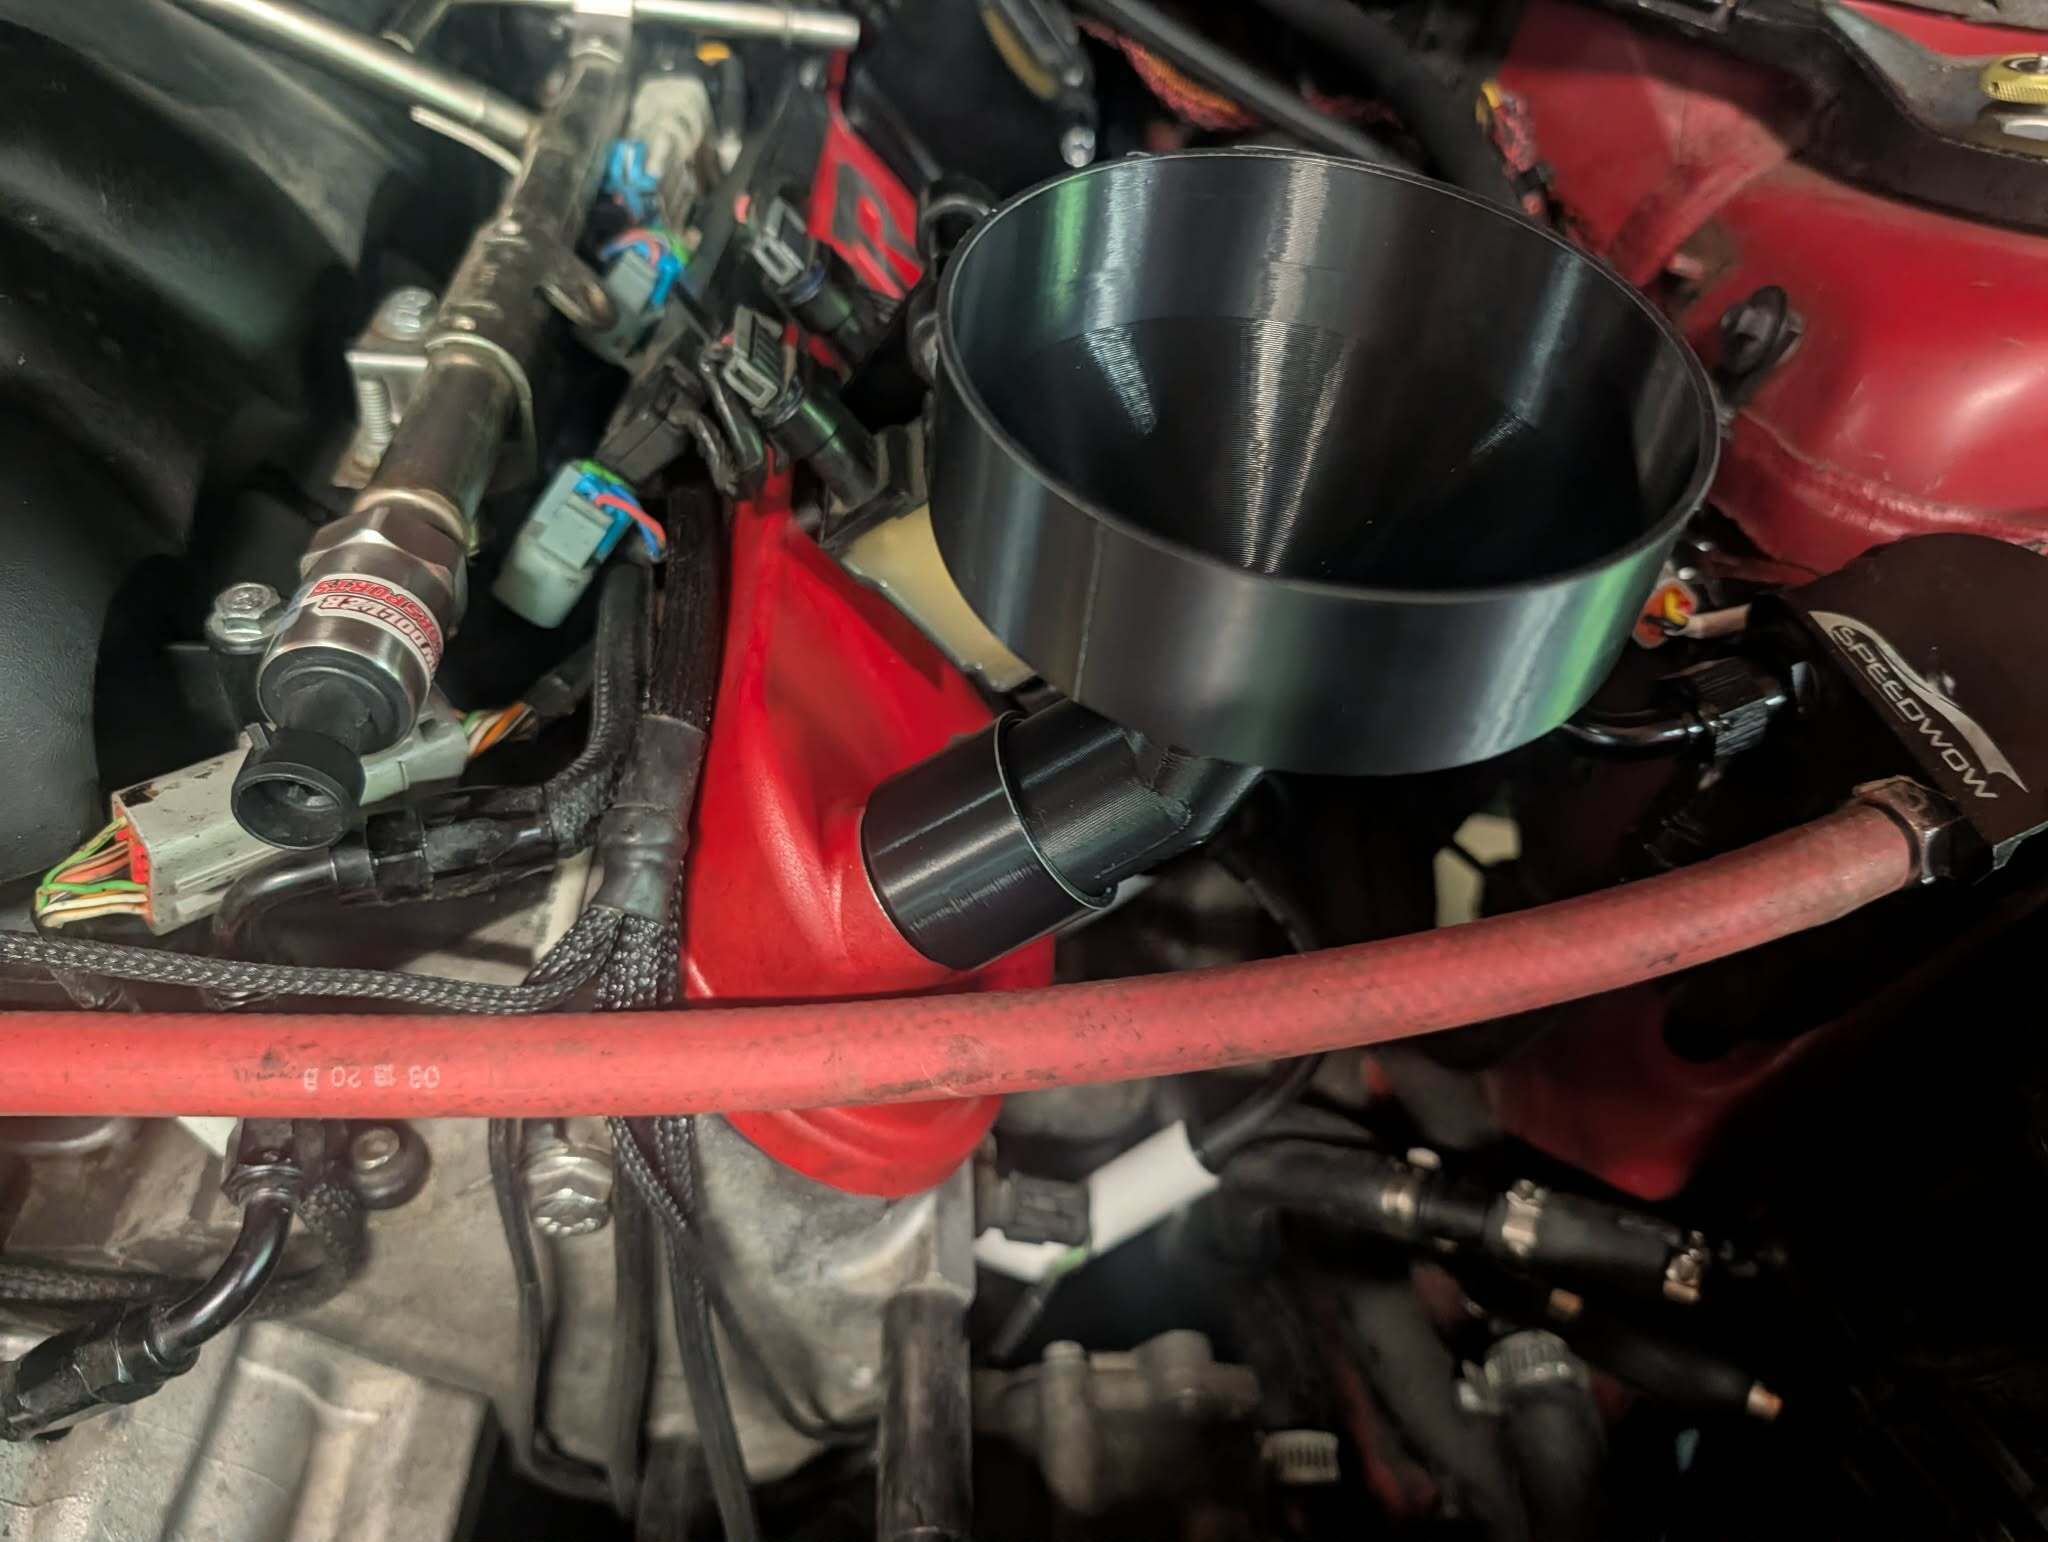 Two-piece funnel on the fill port — basin stays put while the base threads in.
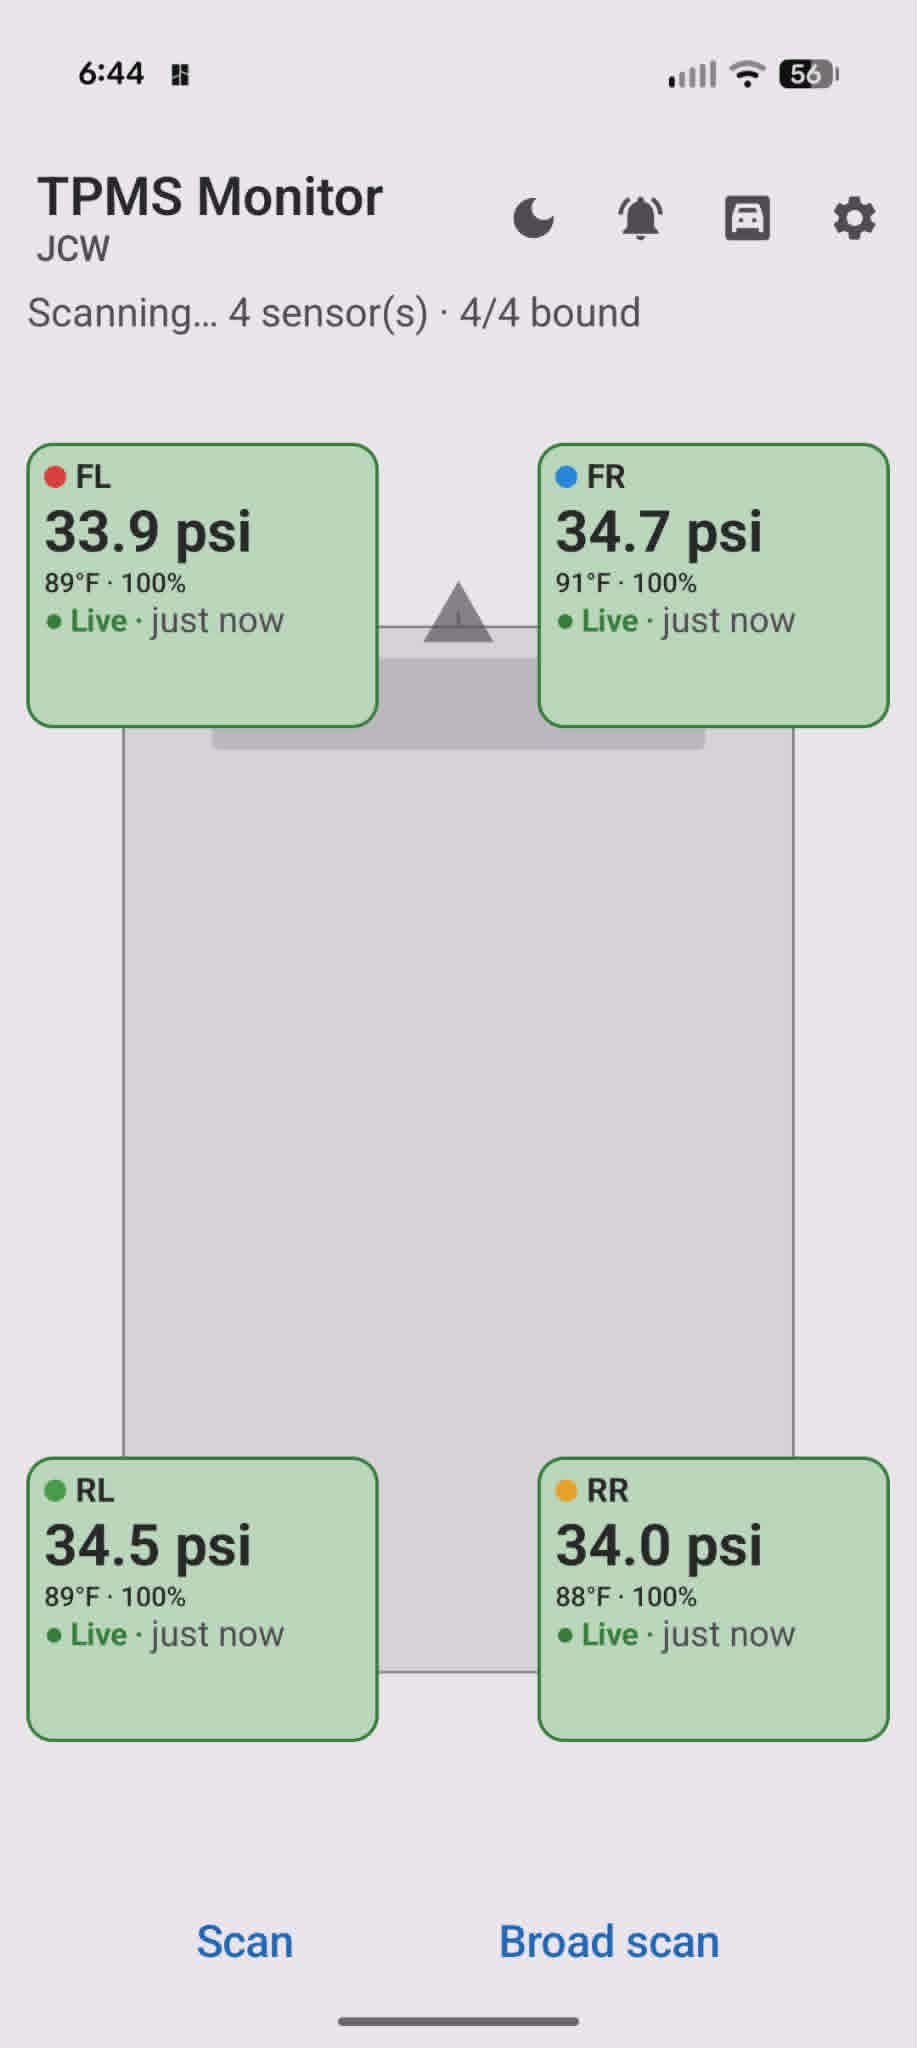 JCW profile — 33.9 / 34.7 / 34.5 / 34.0 psi, all live. Color dots match the paint marks on each valve stem.
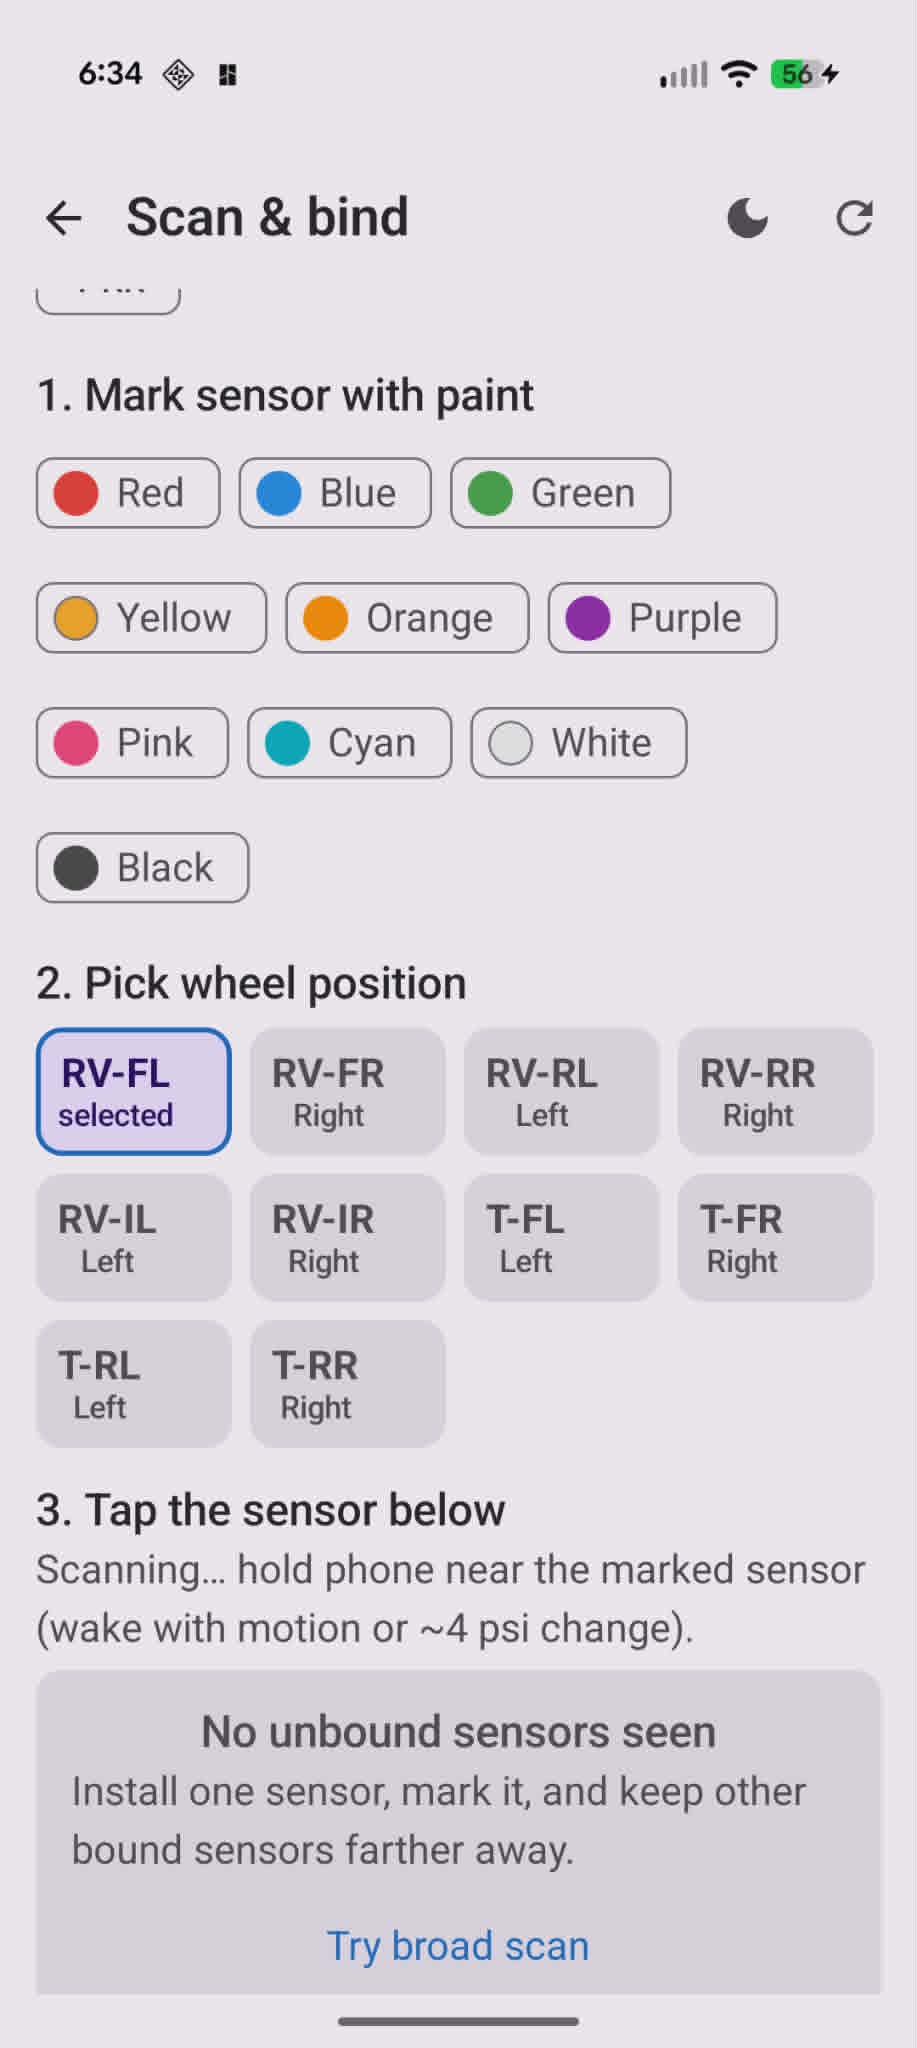 Only unbound sensors show up. Bound ones stay out of the list so you can pair one tire at a time without confusion.
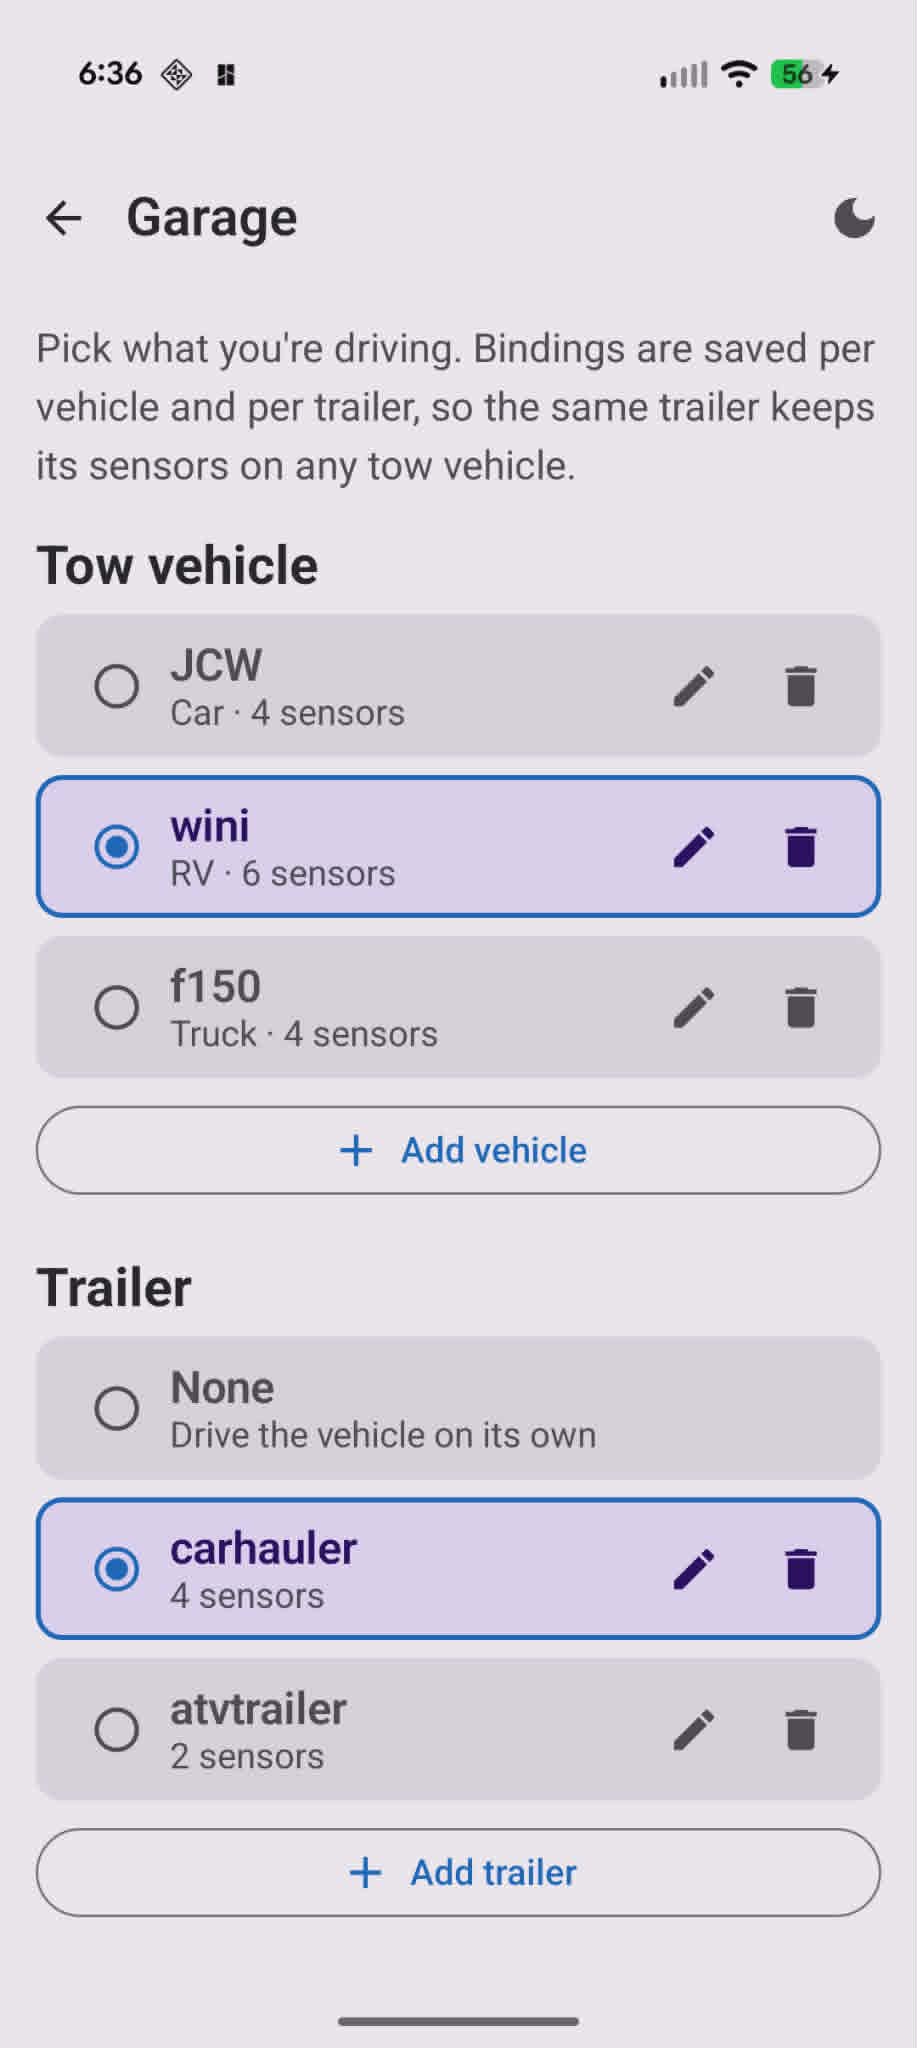 JCW (car, 4 sensors), wini (RV, 6 sensors), f150 (truck, 4 sensors) — plus trailers from none up to a 4-wheel carhauler or 2-wheel ATV hauler.
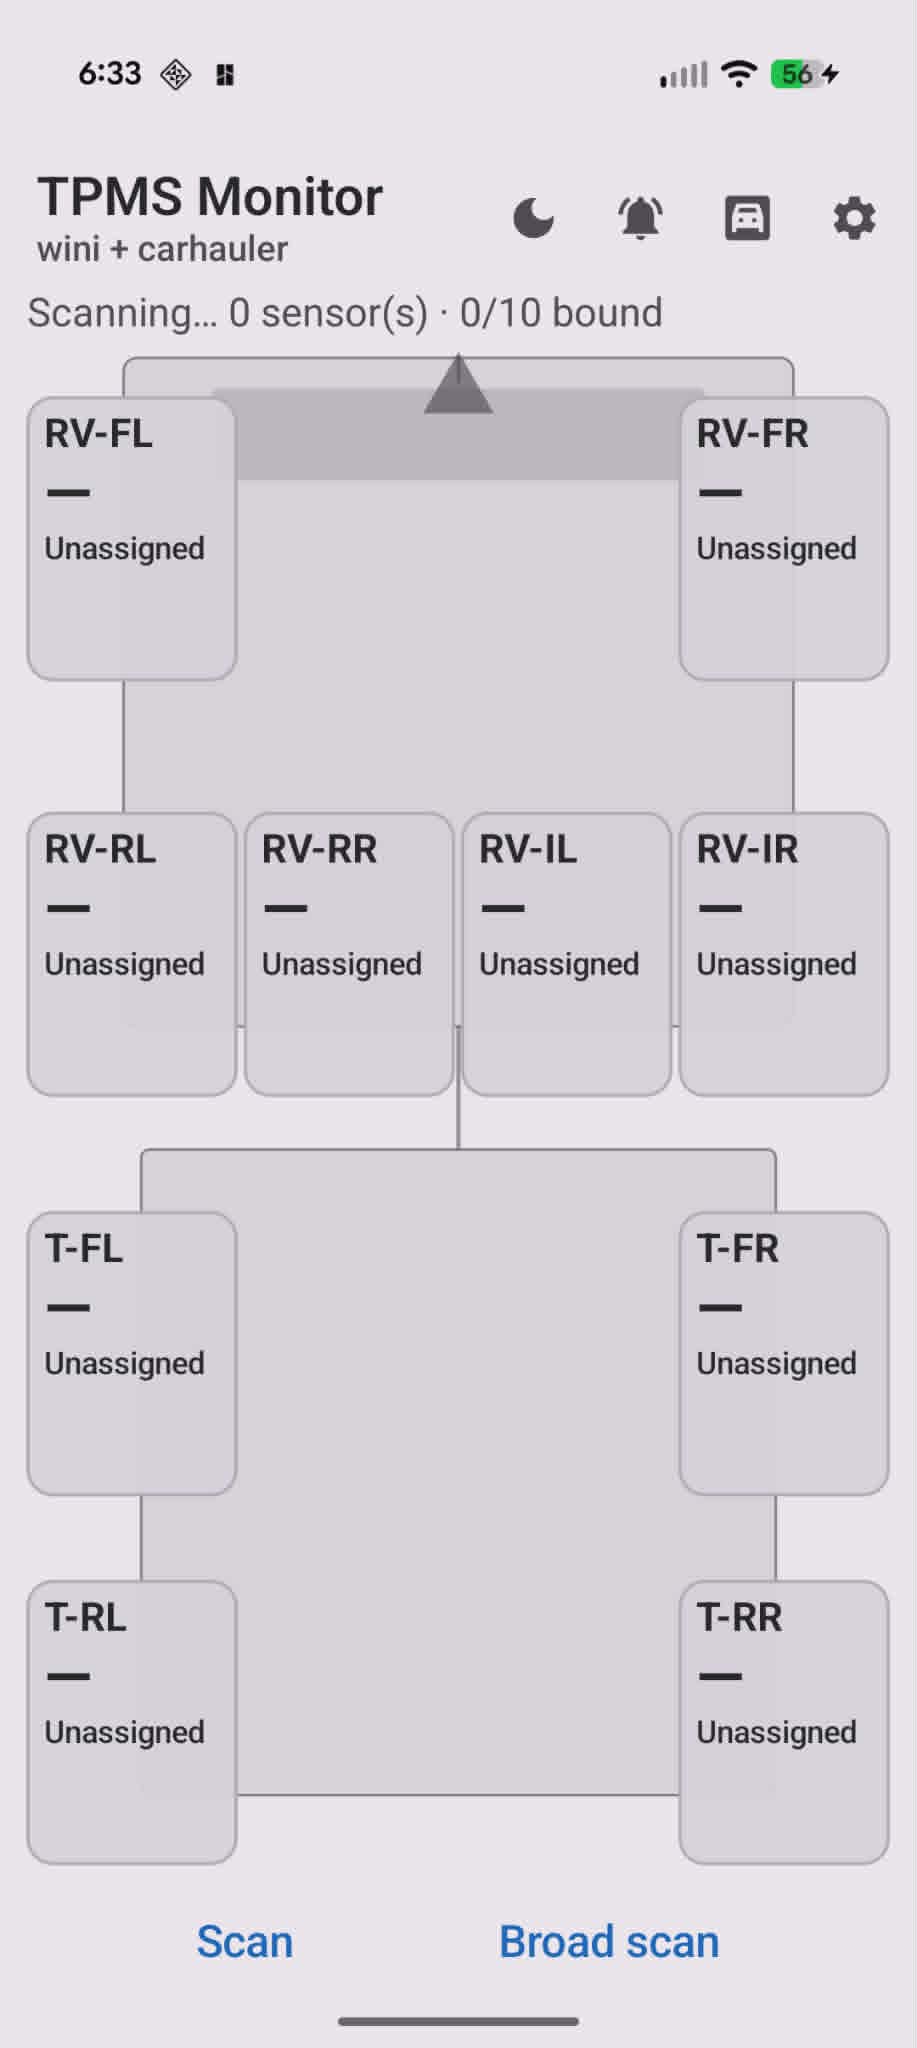 RV-FL through RV-IR up top, T-FL through T-RR on the trailer. Positions show “Unassigned” until each sensor is bound.
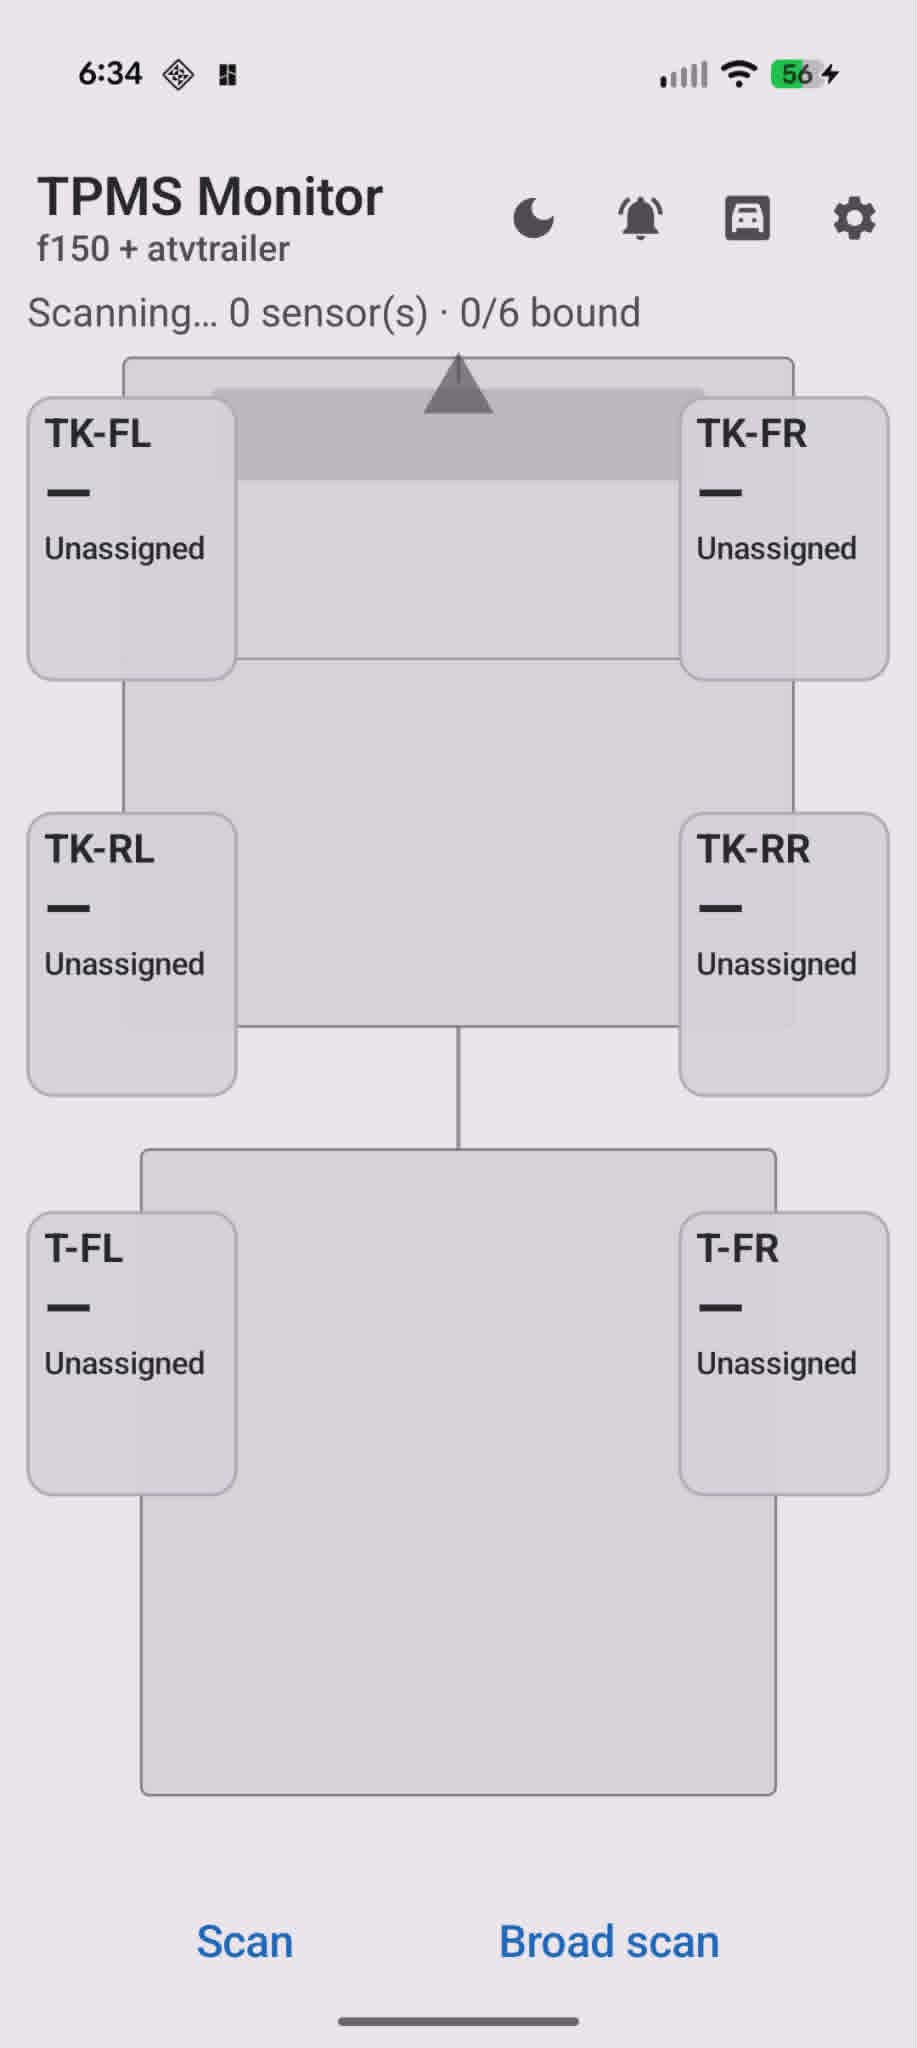 TK-FL/FR/RL/RR for the truck, T-FL/FR for the trailer.
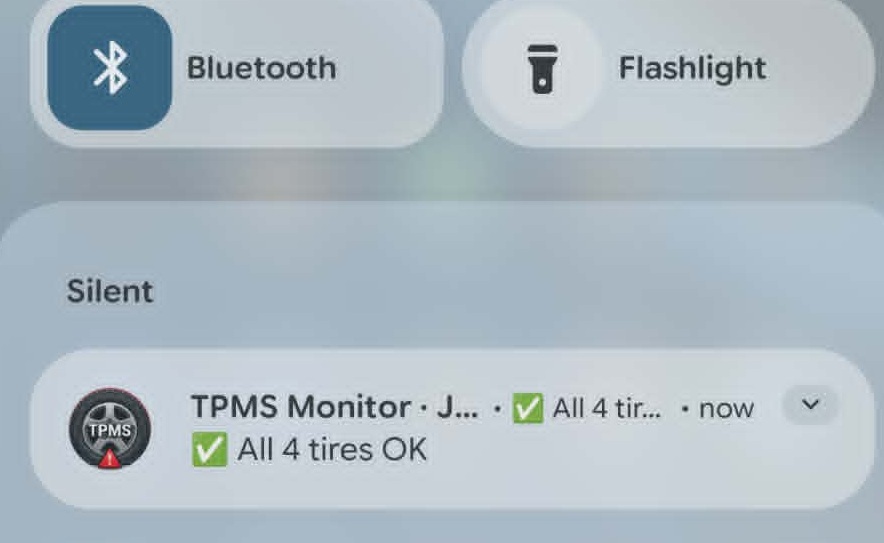 Silent ongoing notification — no sound unless something is wrong.
 34 / 35 / 35 / 34 psi at a glance from the shade.
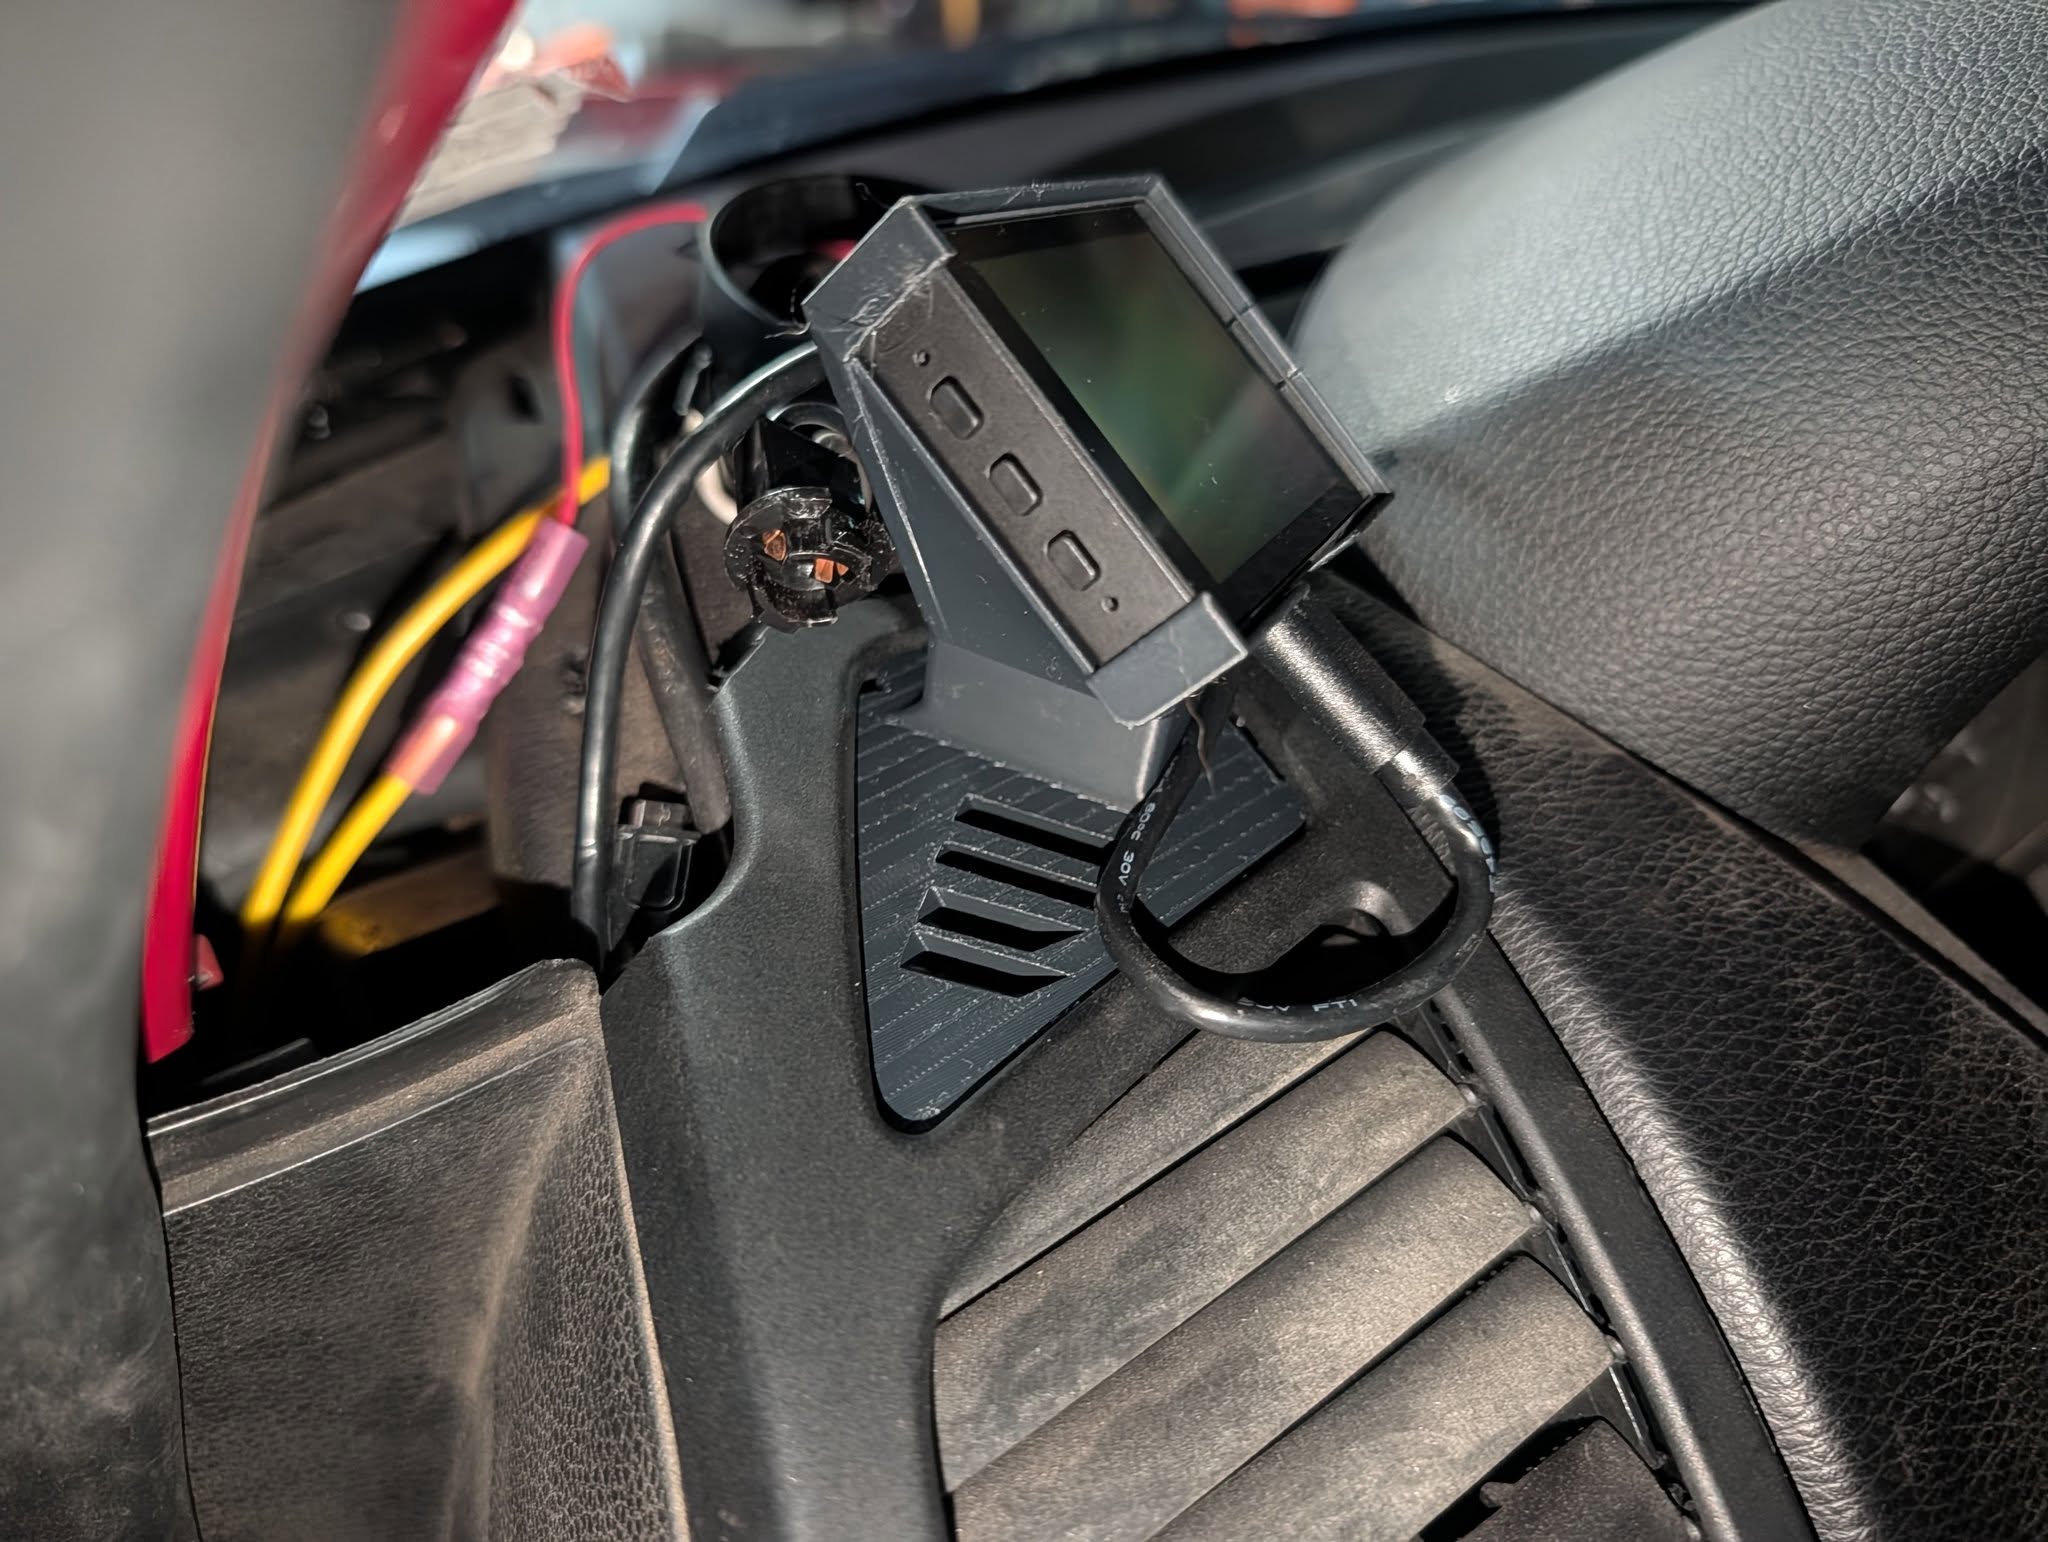 Waveshare 2.41″ AMOLED in the vent gauge pod — USB power routed through the mount.
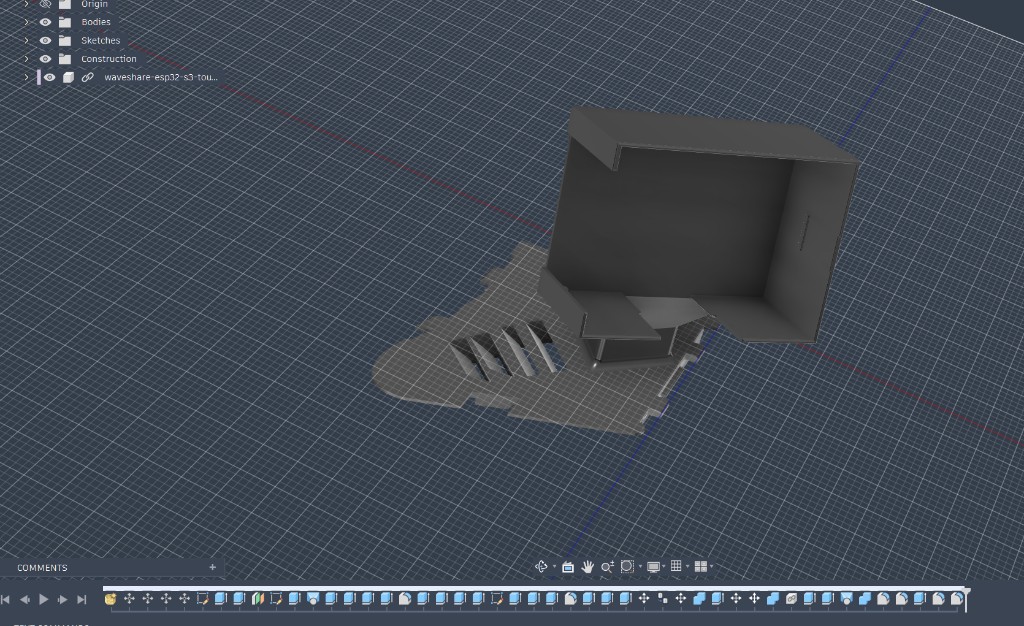 Bracket modeled around the 2.41″ AMOLED module — replaces the vent louver section and keeps airflow slots.
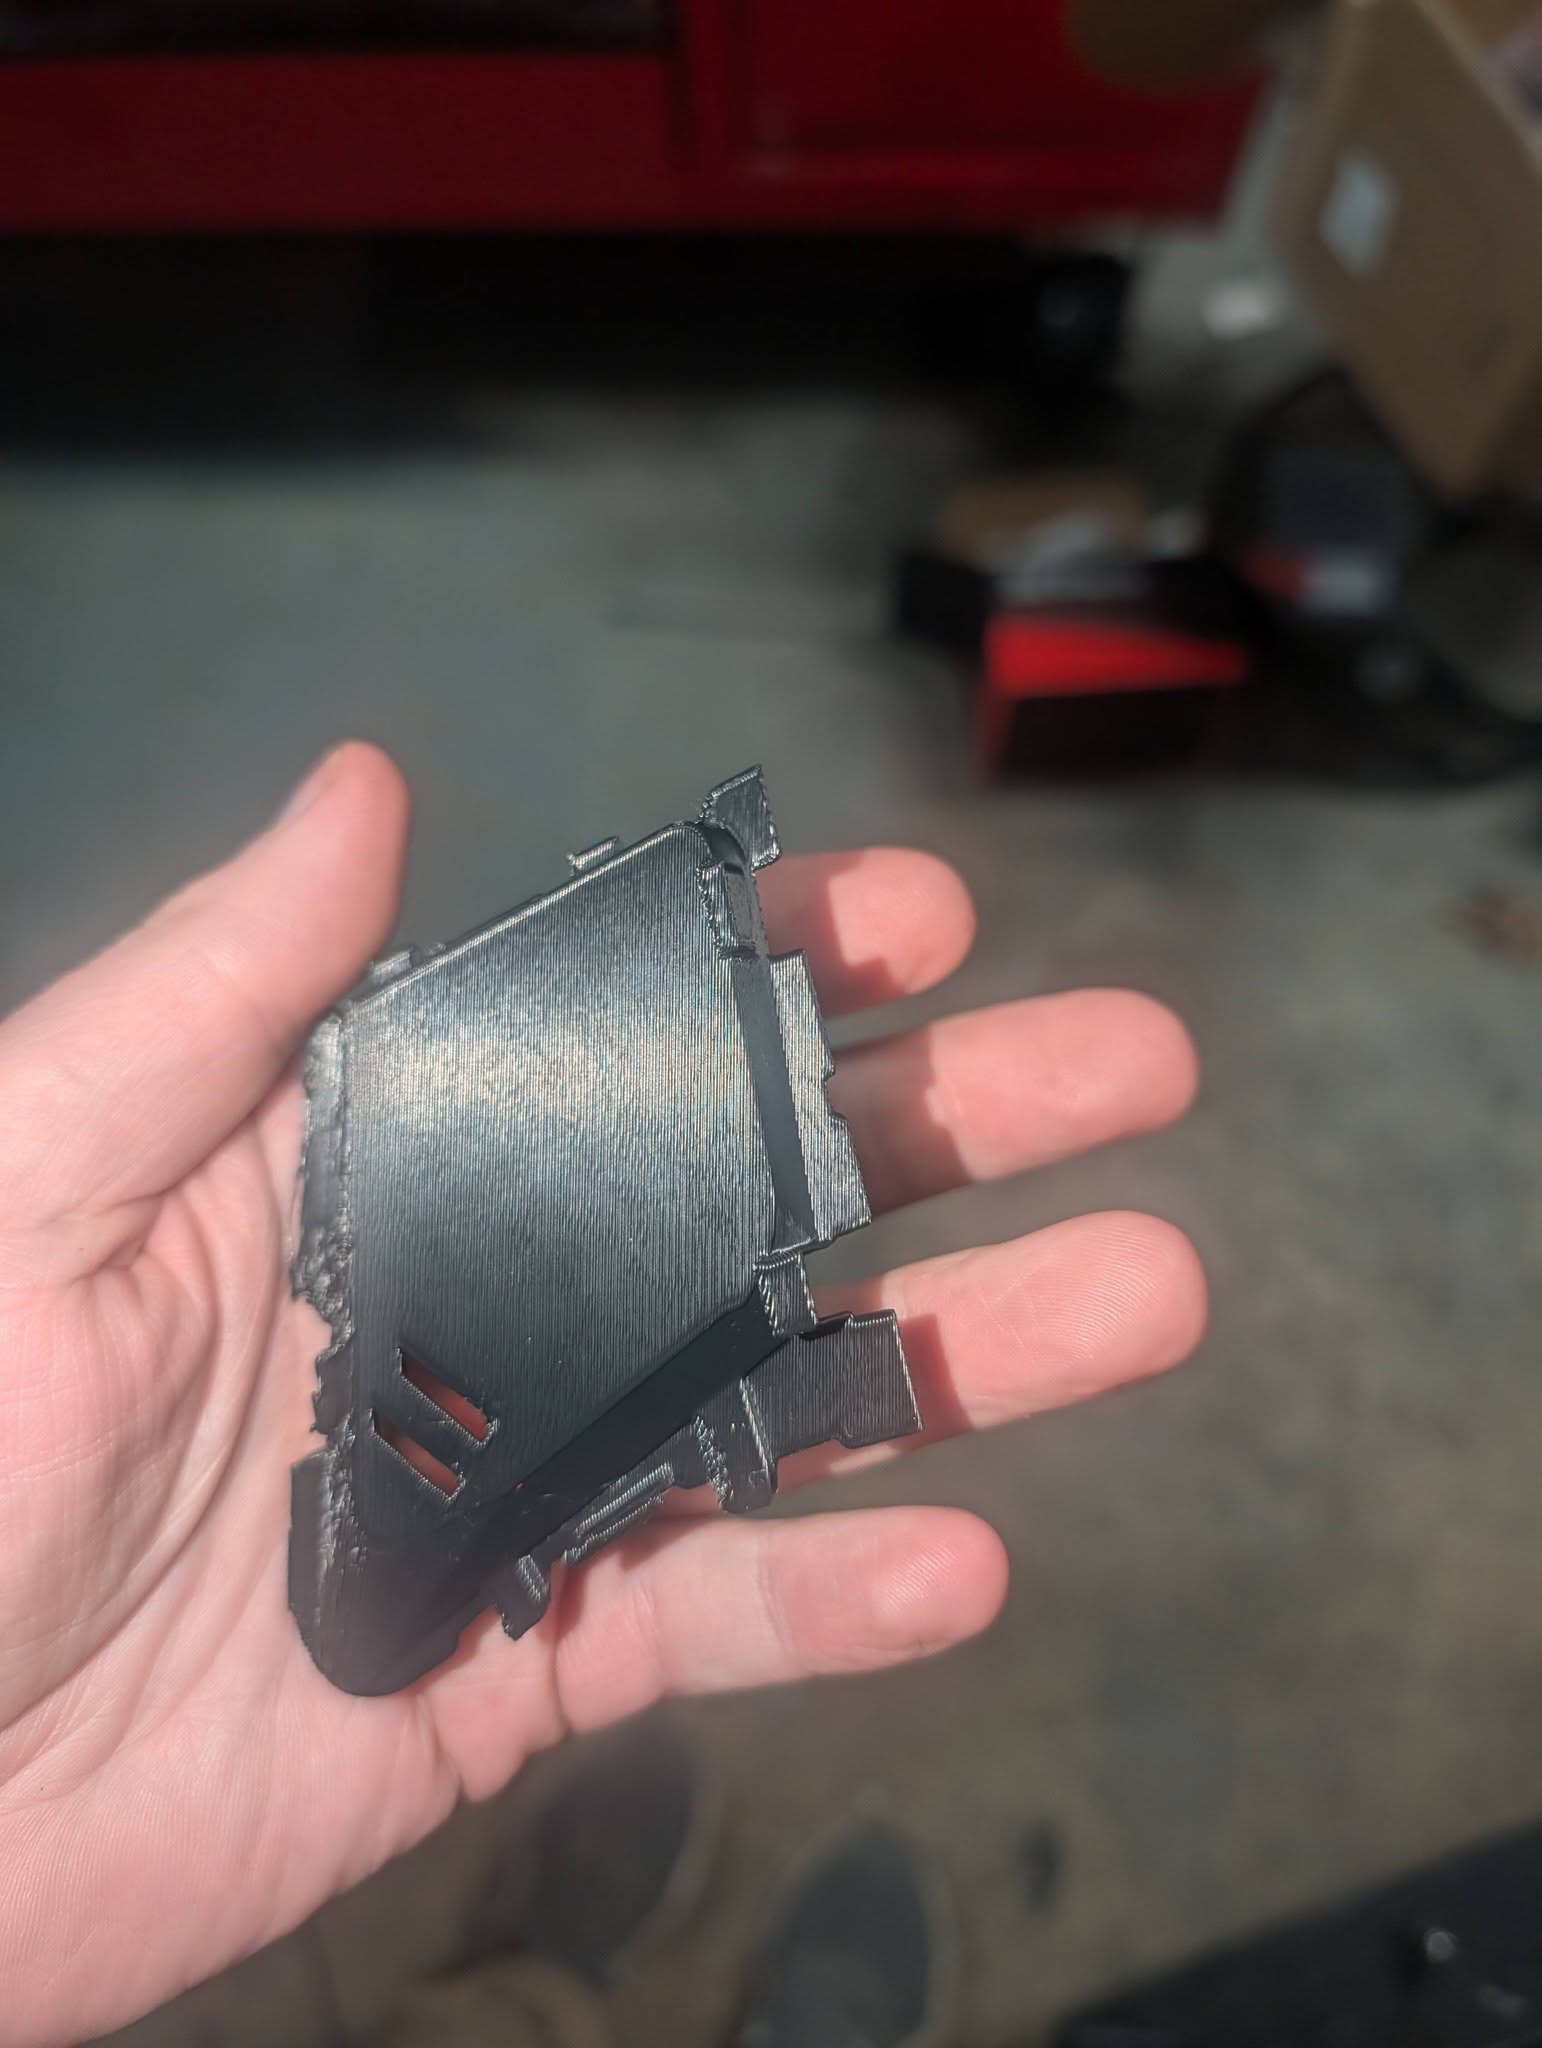 Square gauge pod bracket — snap-fit geometry for the E82 driver-side vent.
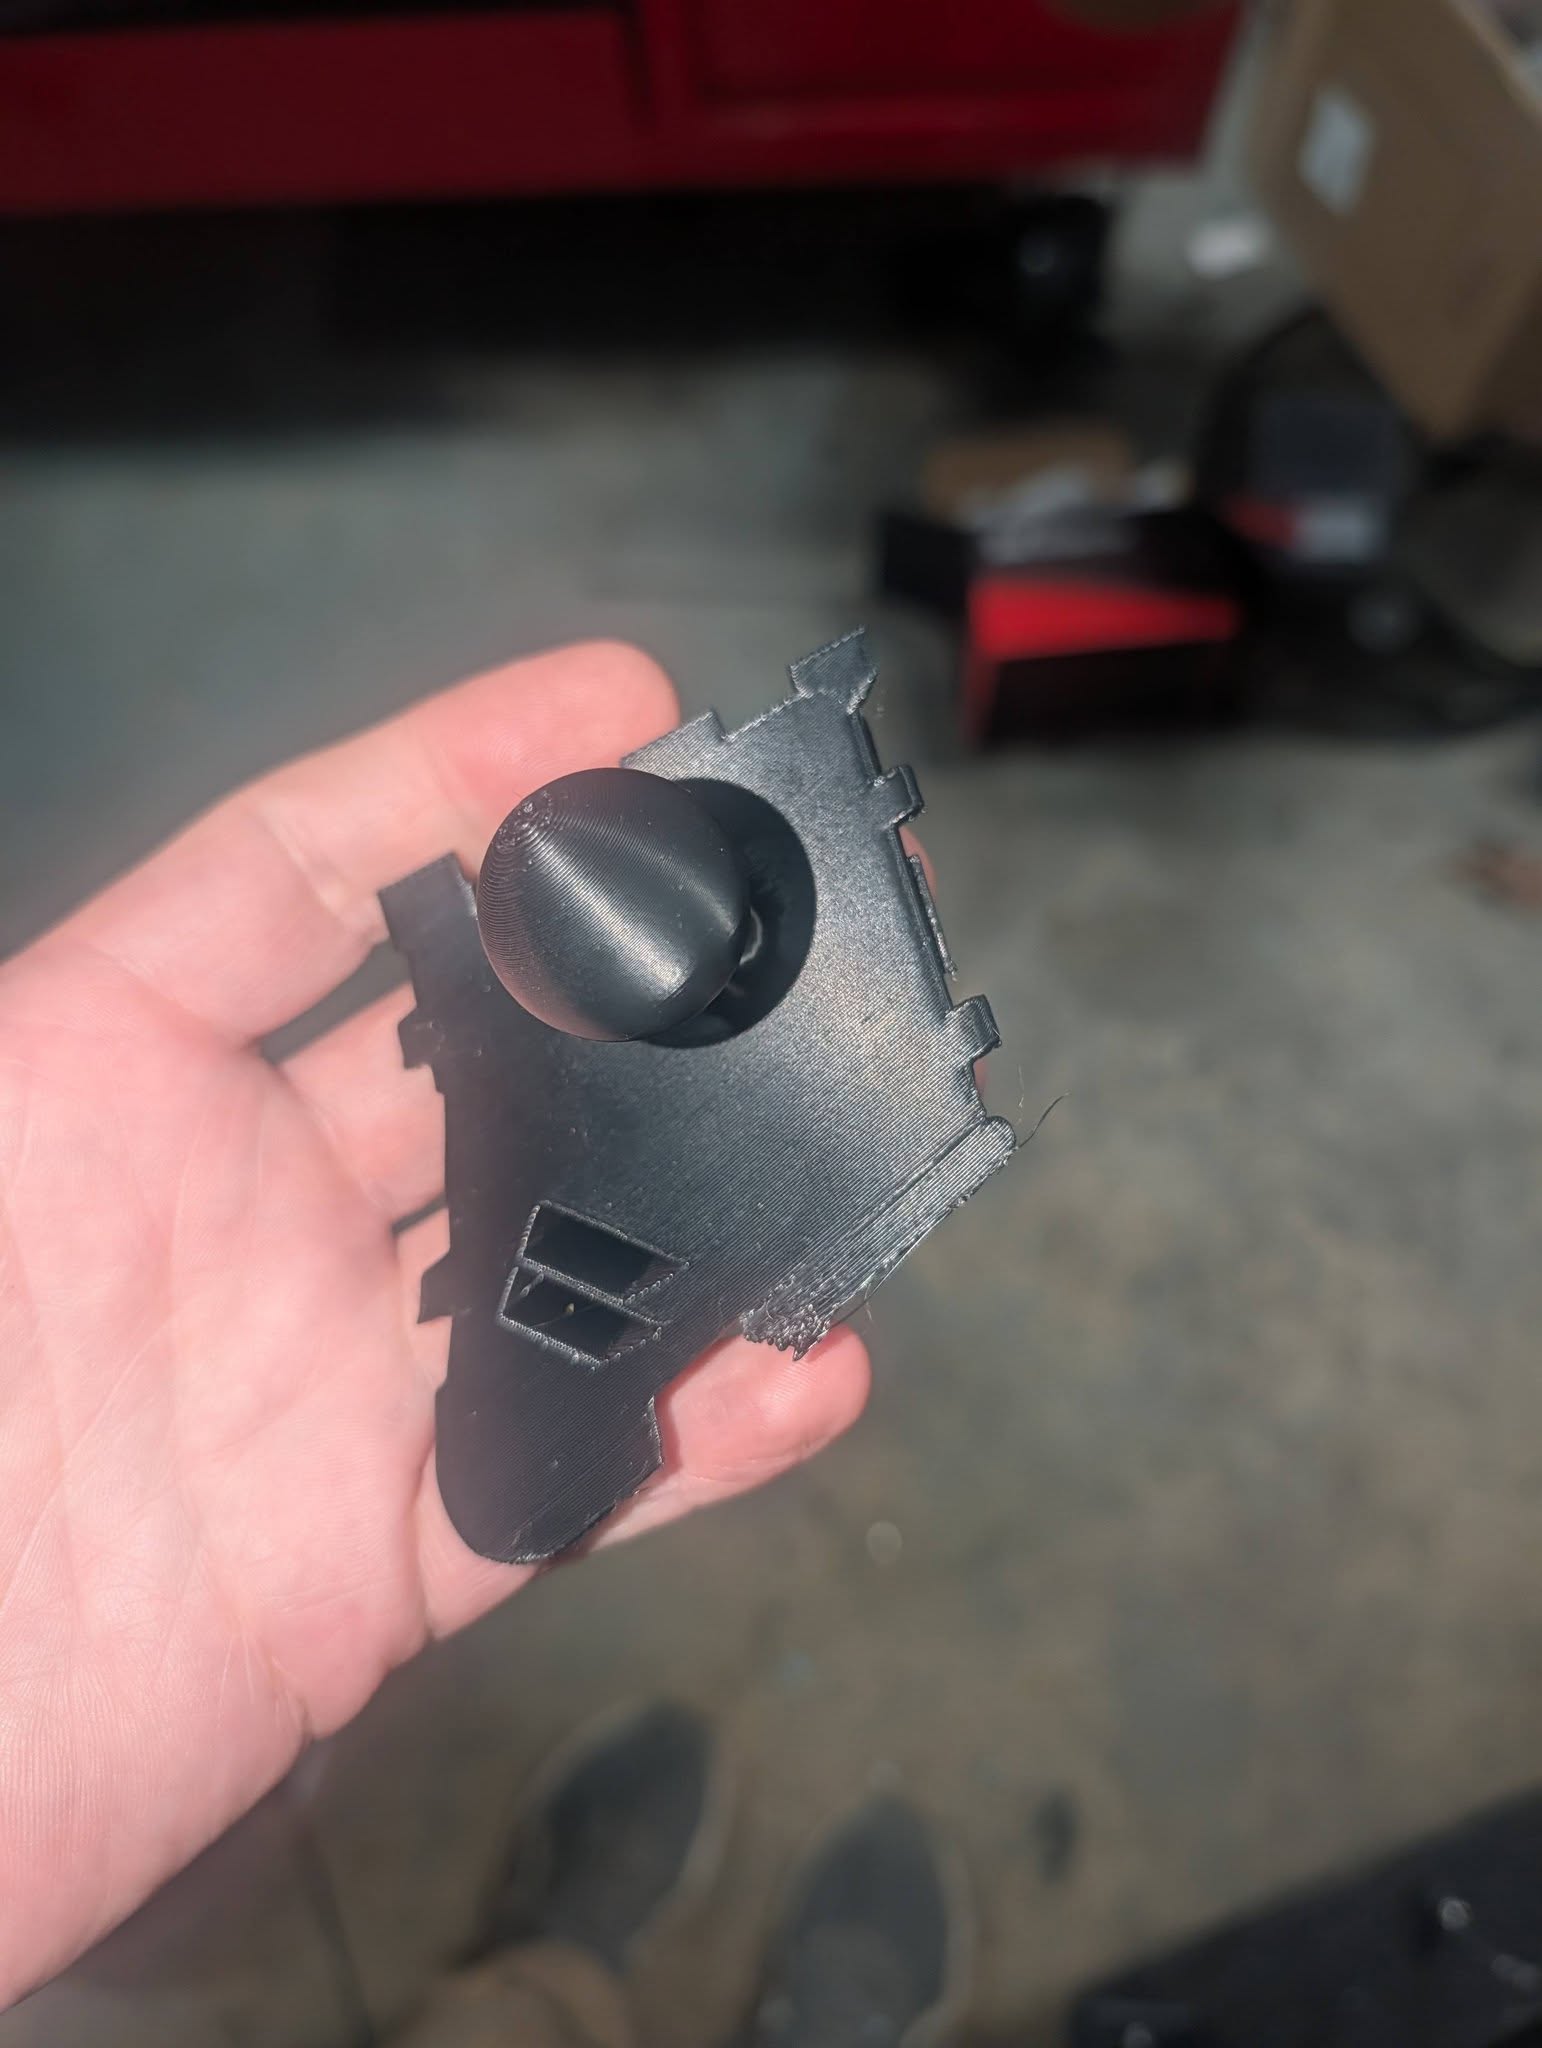 Separate RAM-ball adapter if you want an adjustable arm instead of the fixed pod.
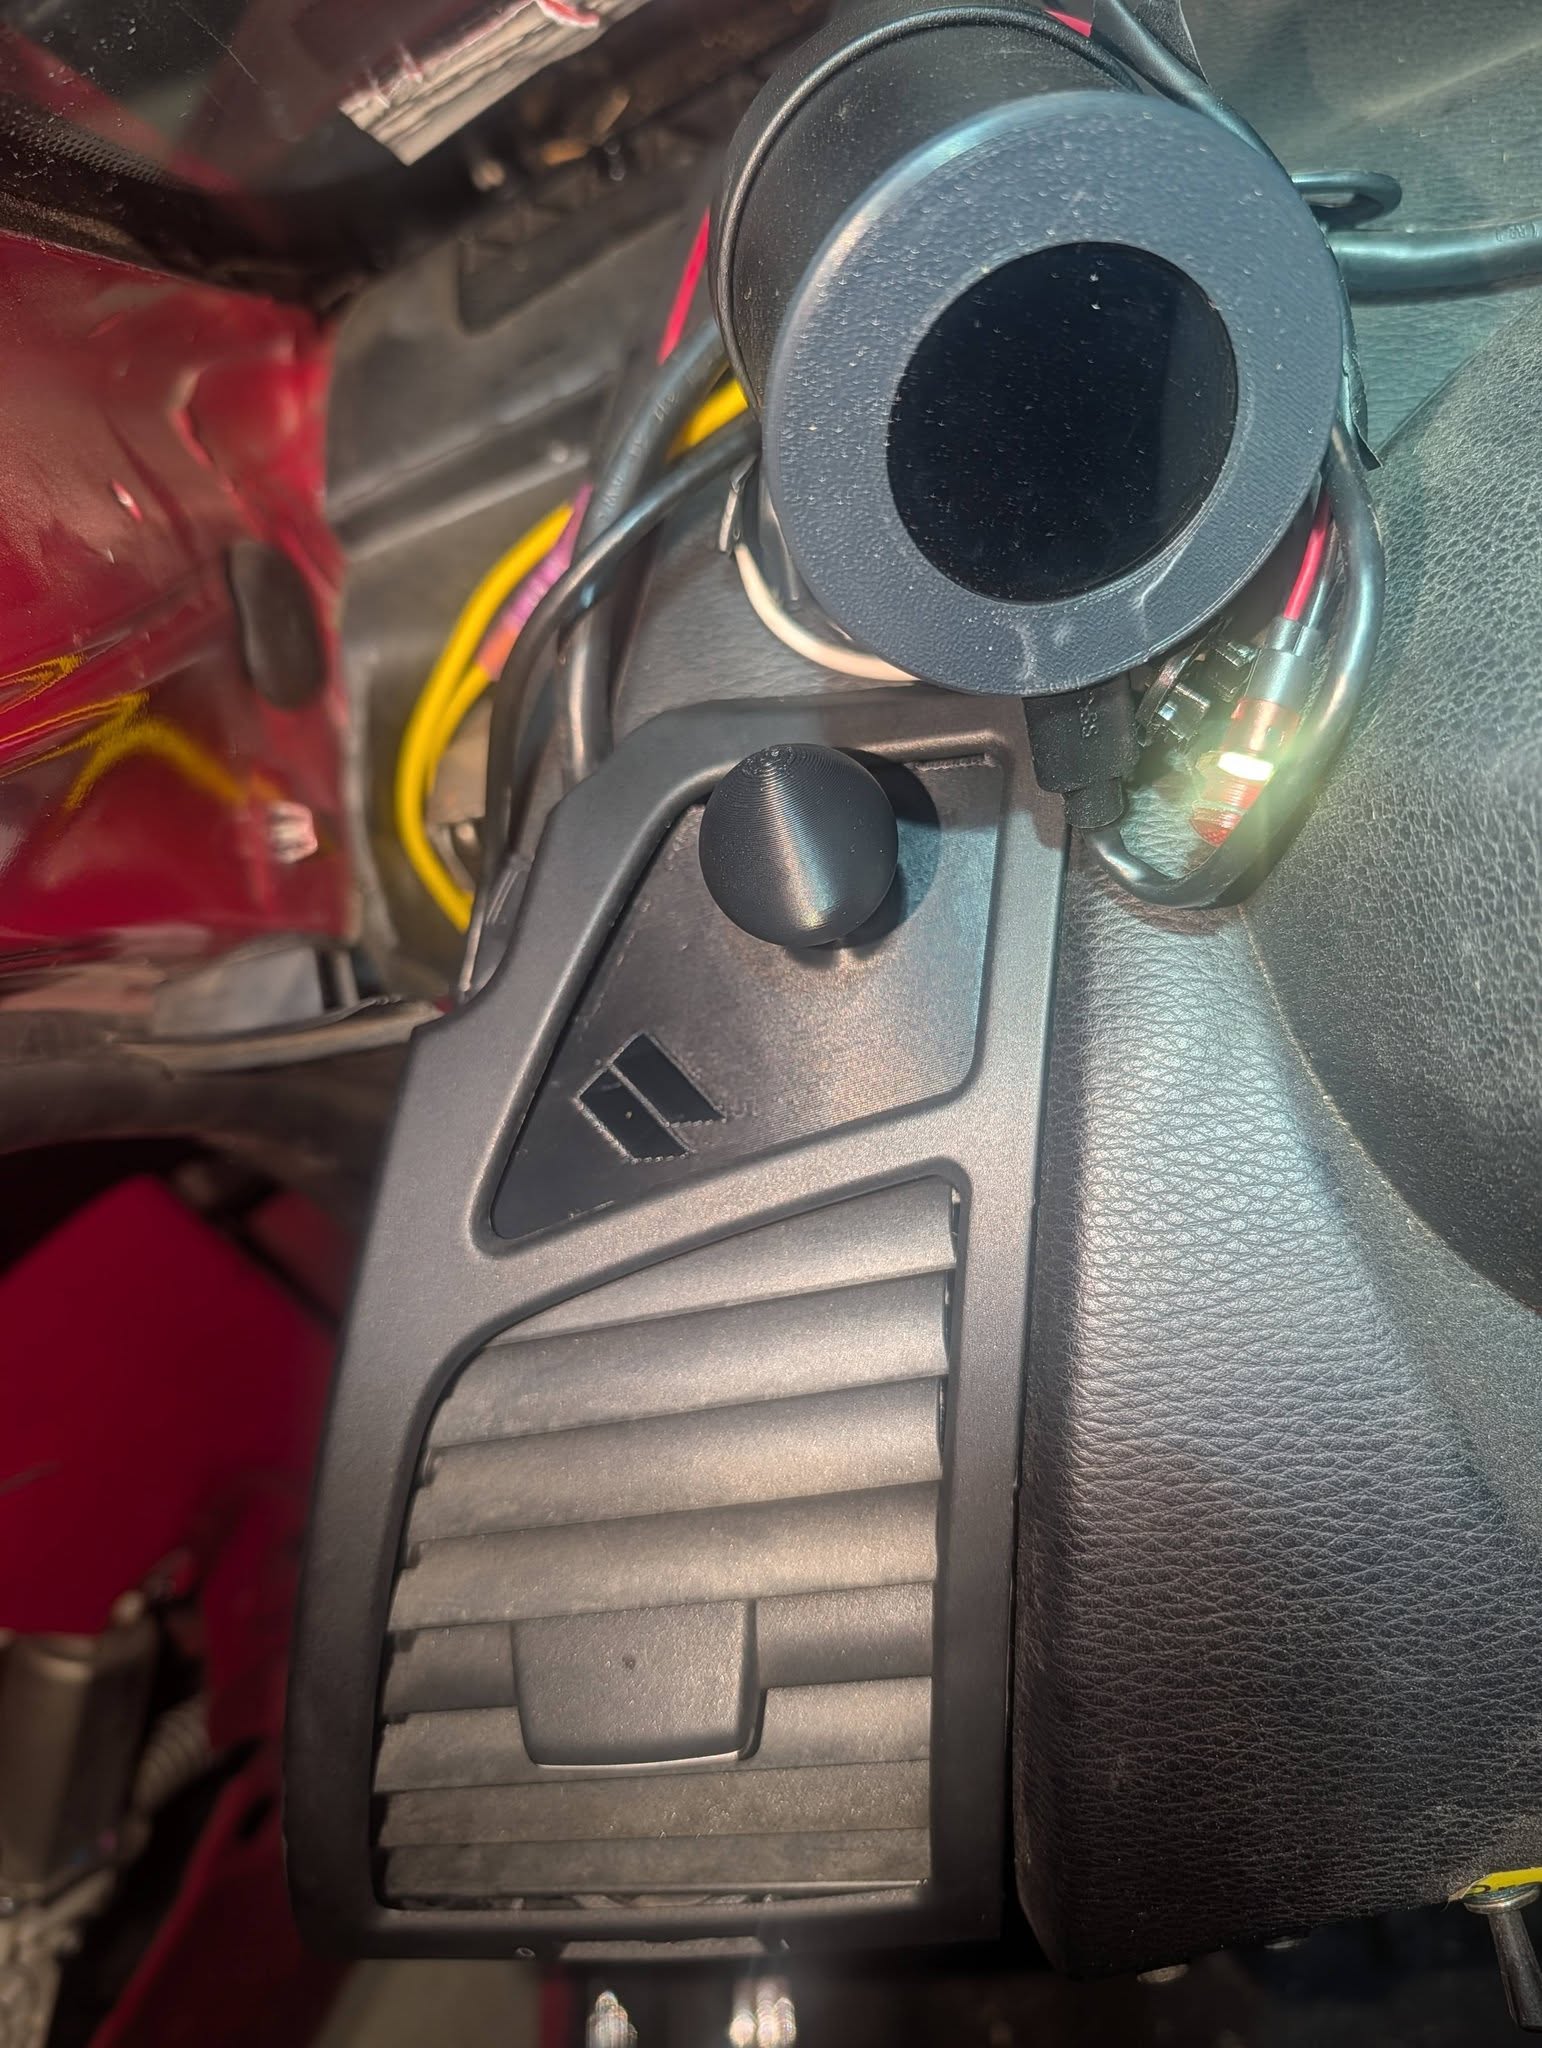 Both mounts fit the E82/128i/135i driver-side top vent. RAM ball for phone or secondary gauge; pod bracket for the Pip-Boy screen.
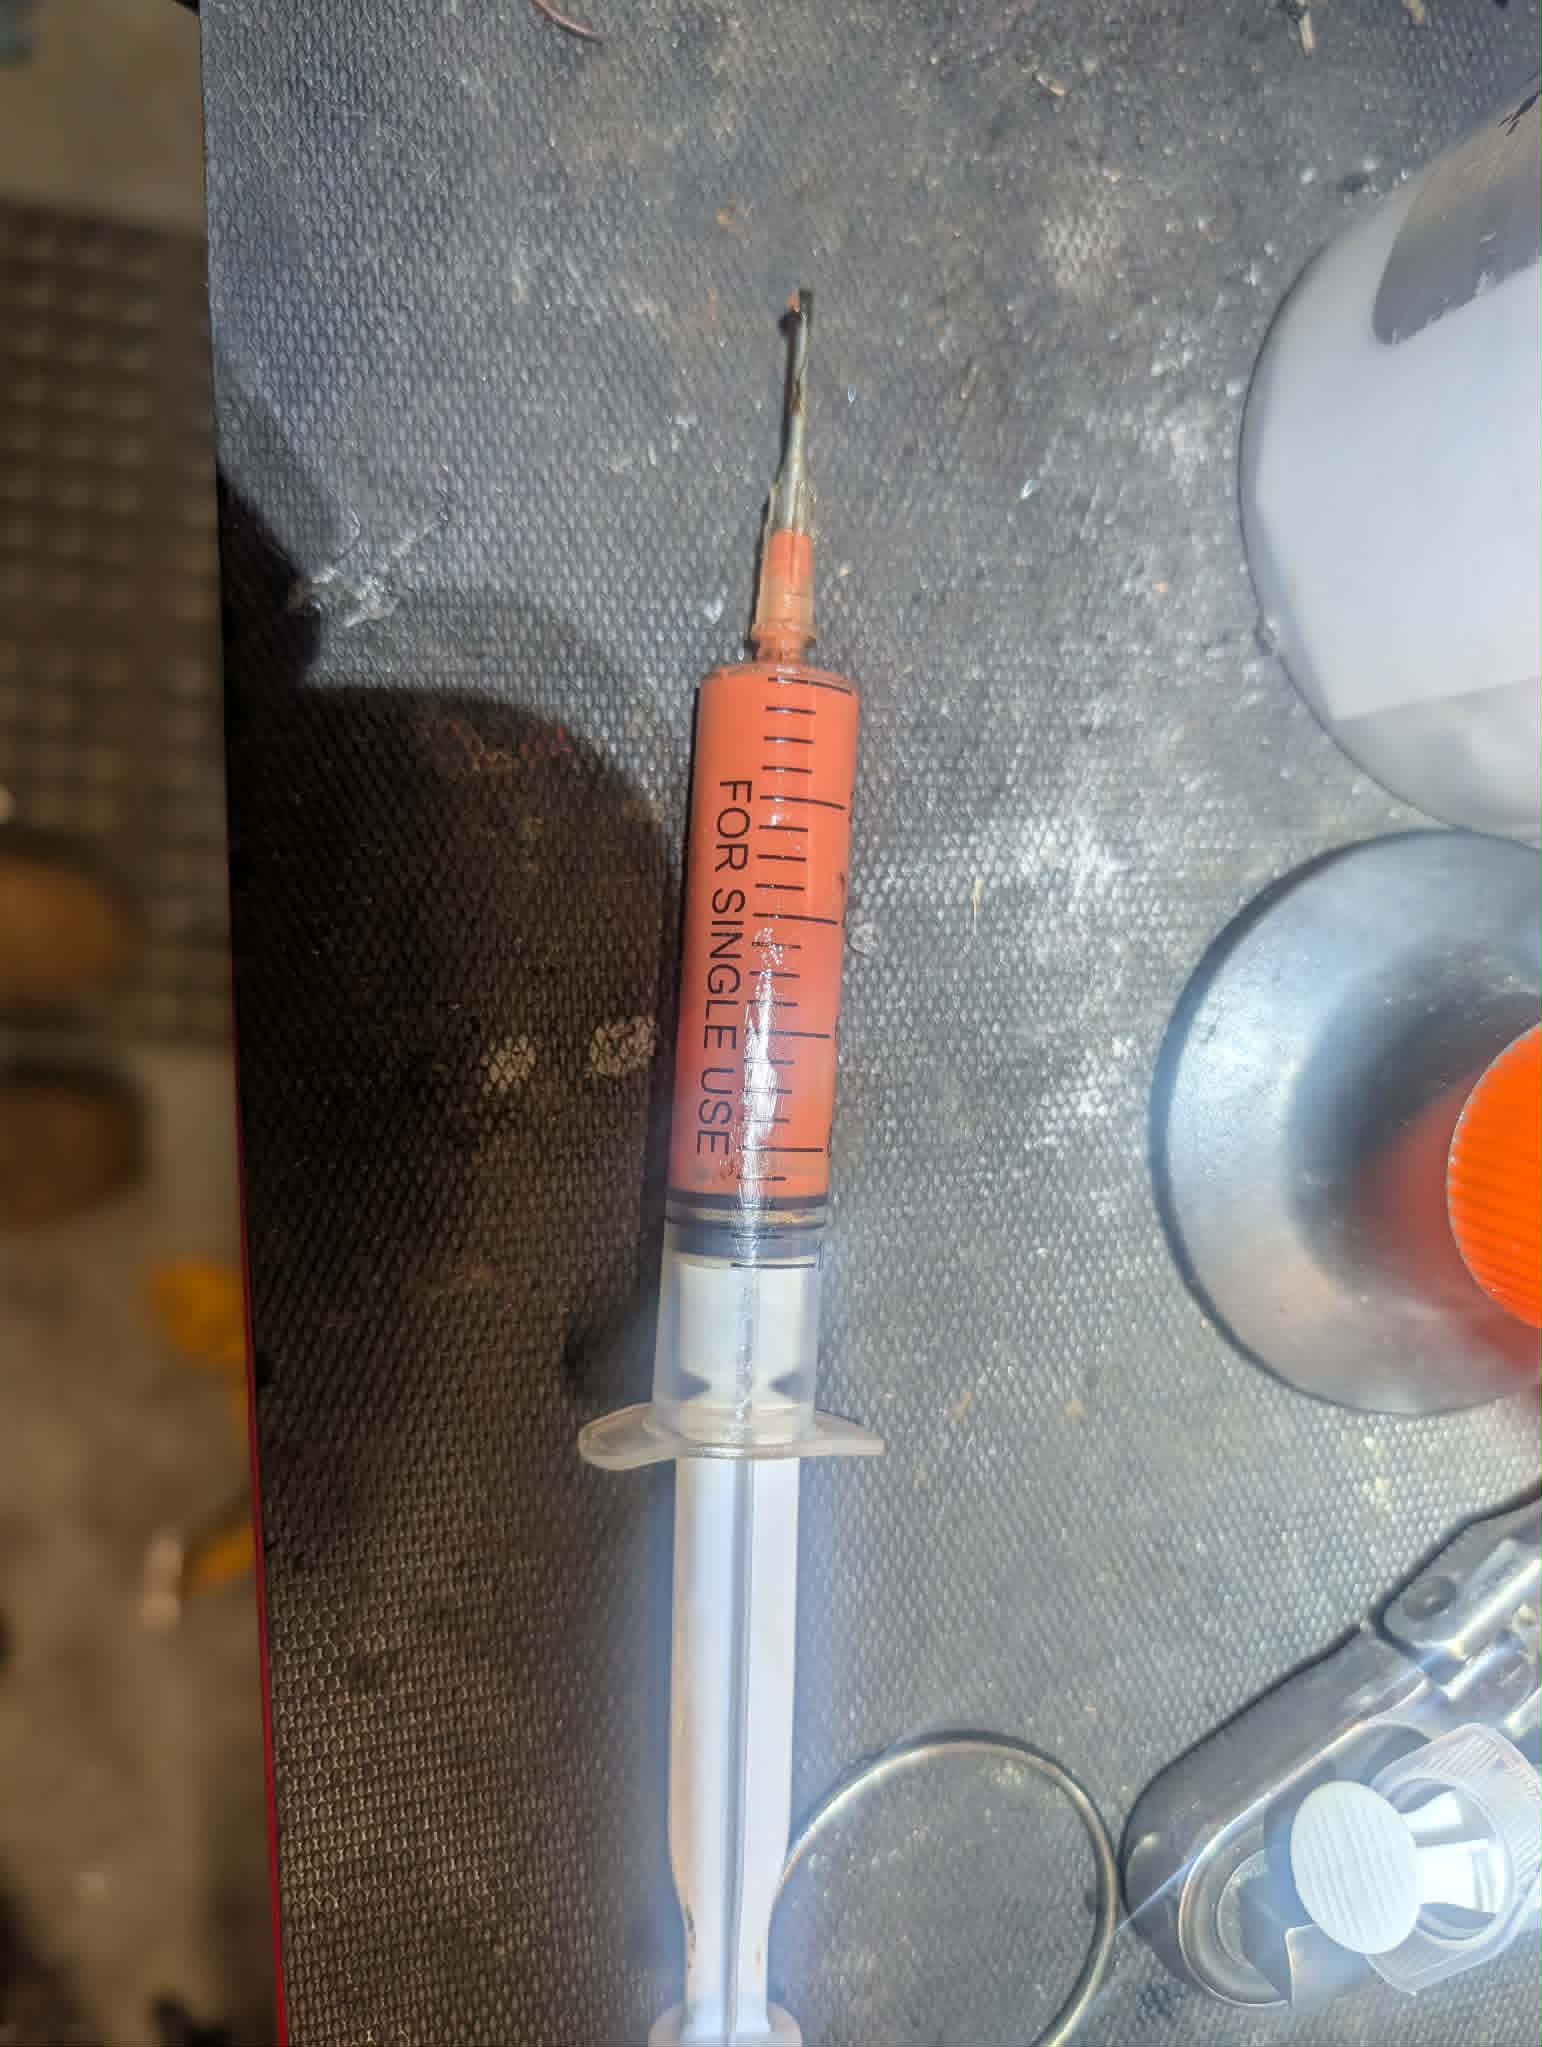 Grease loaded in a syringe for repacking.
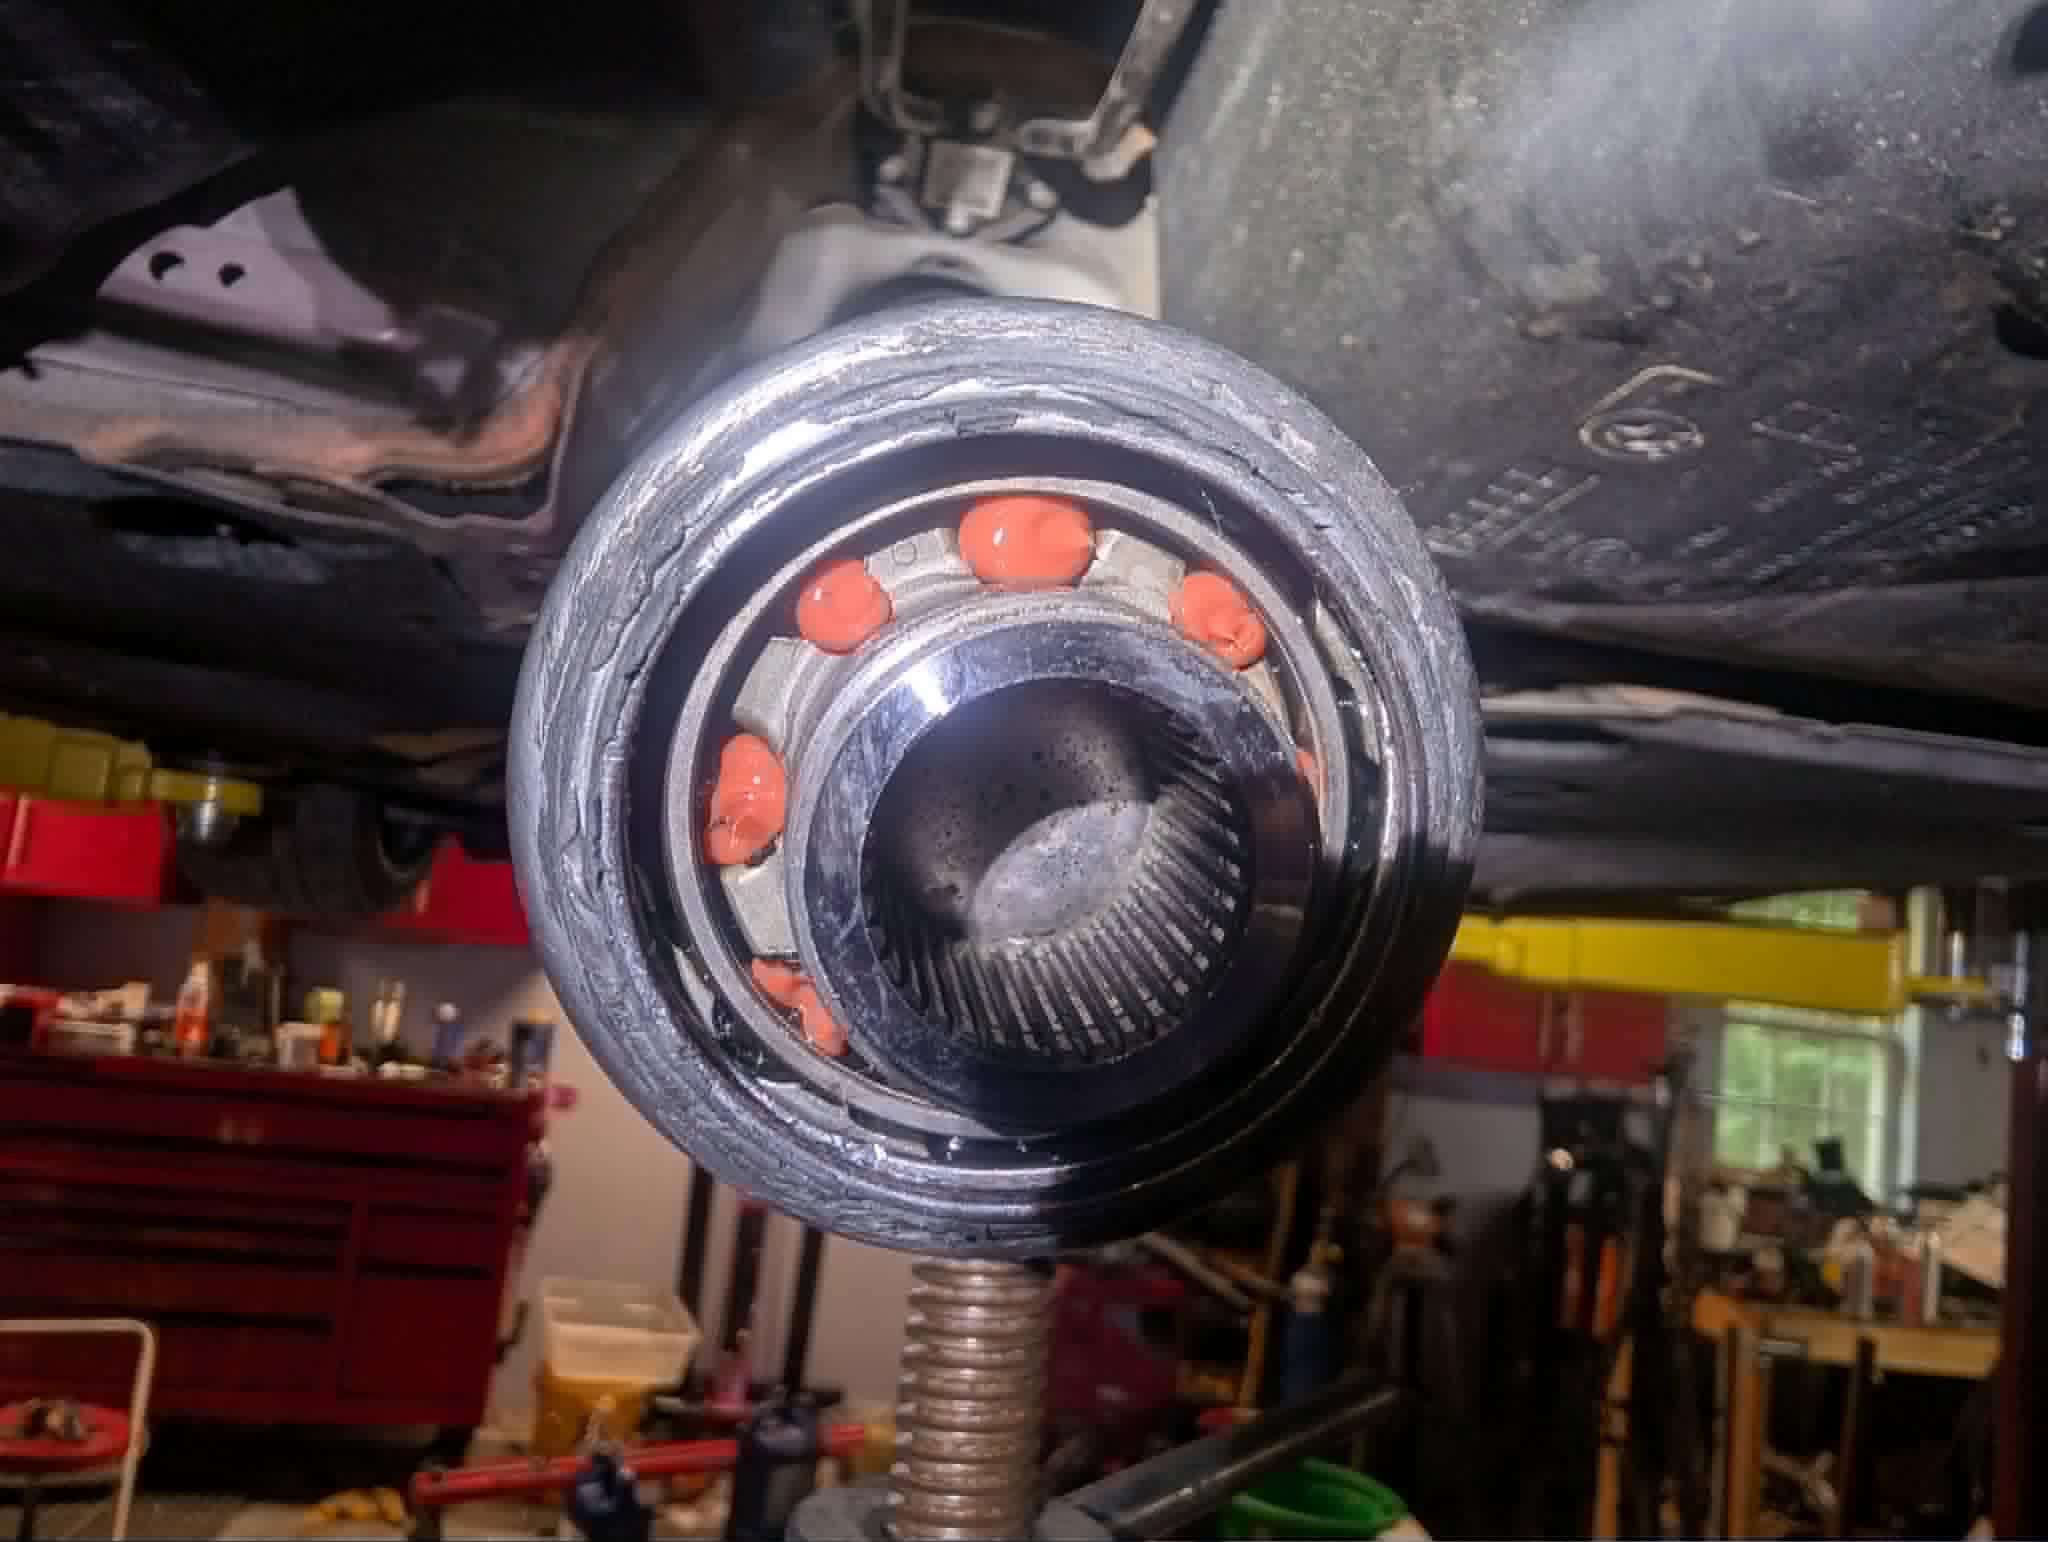 Grease inside the joint and a dab on each ball.
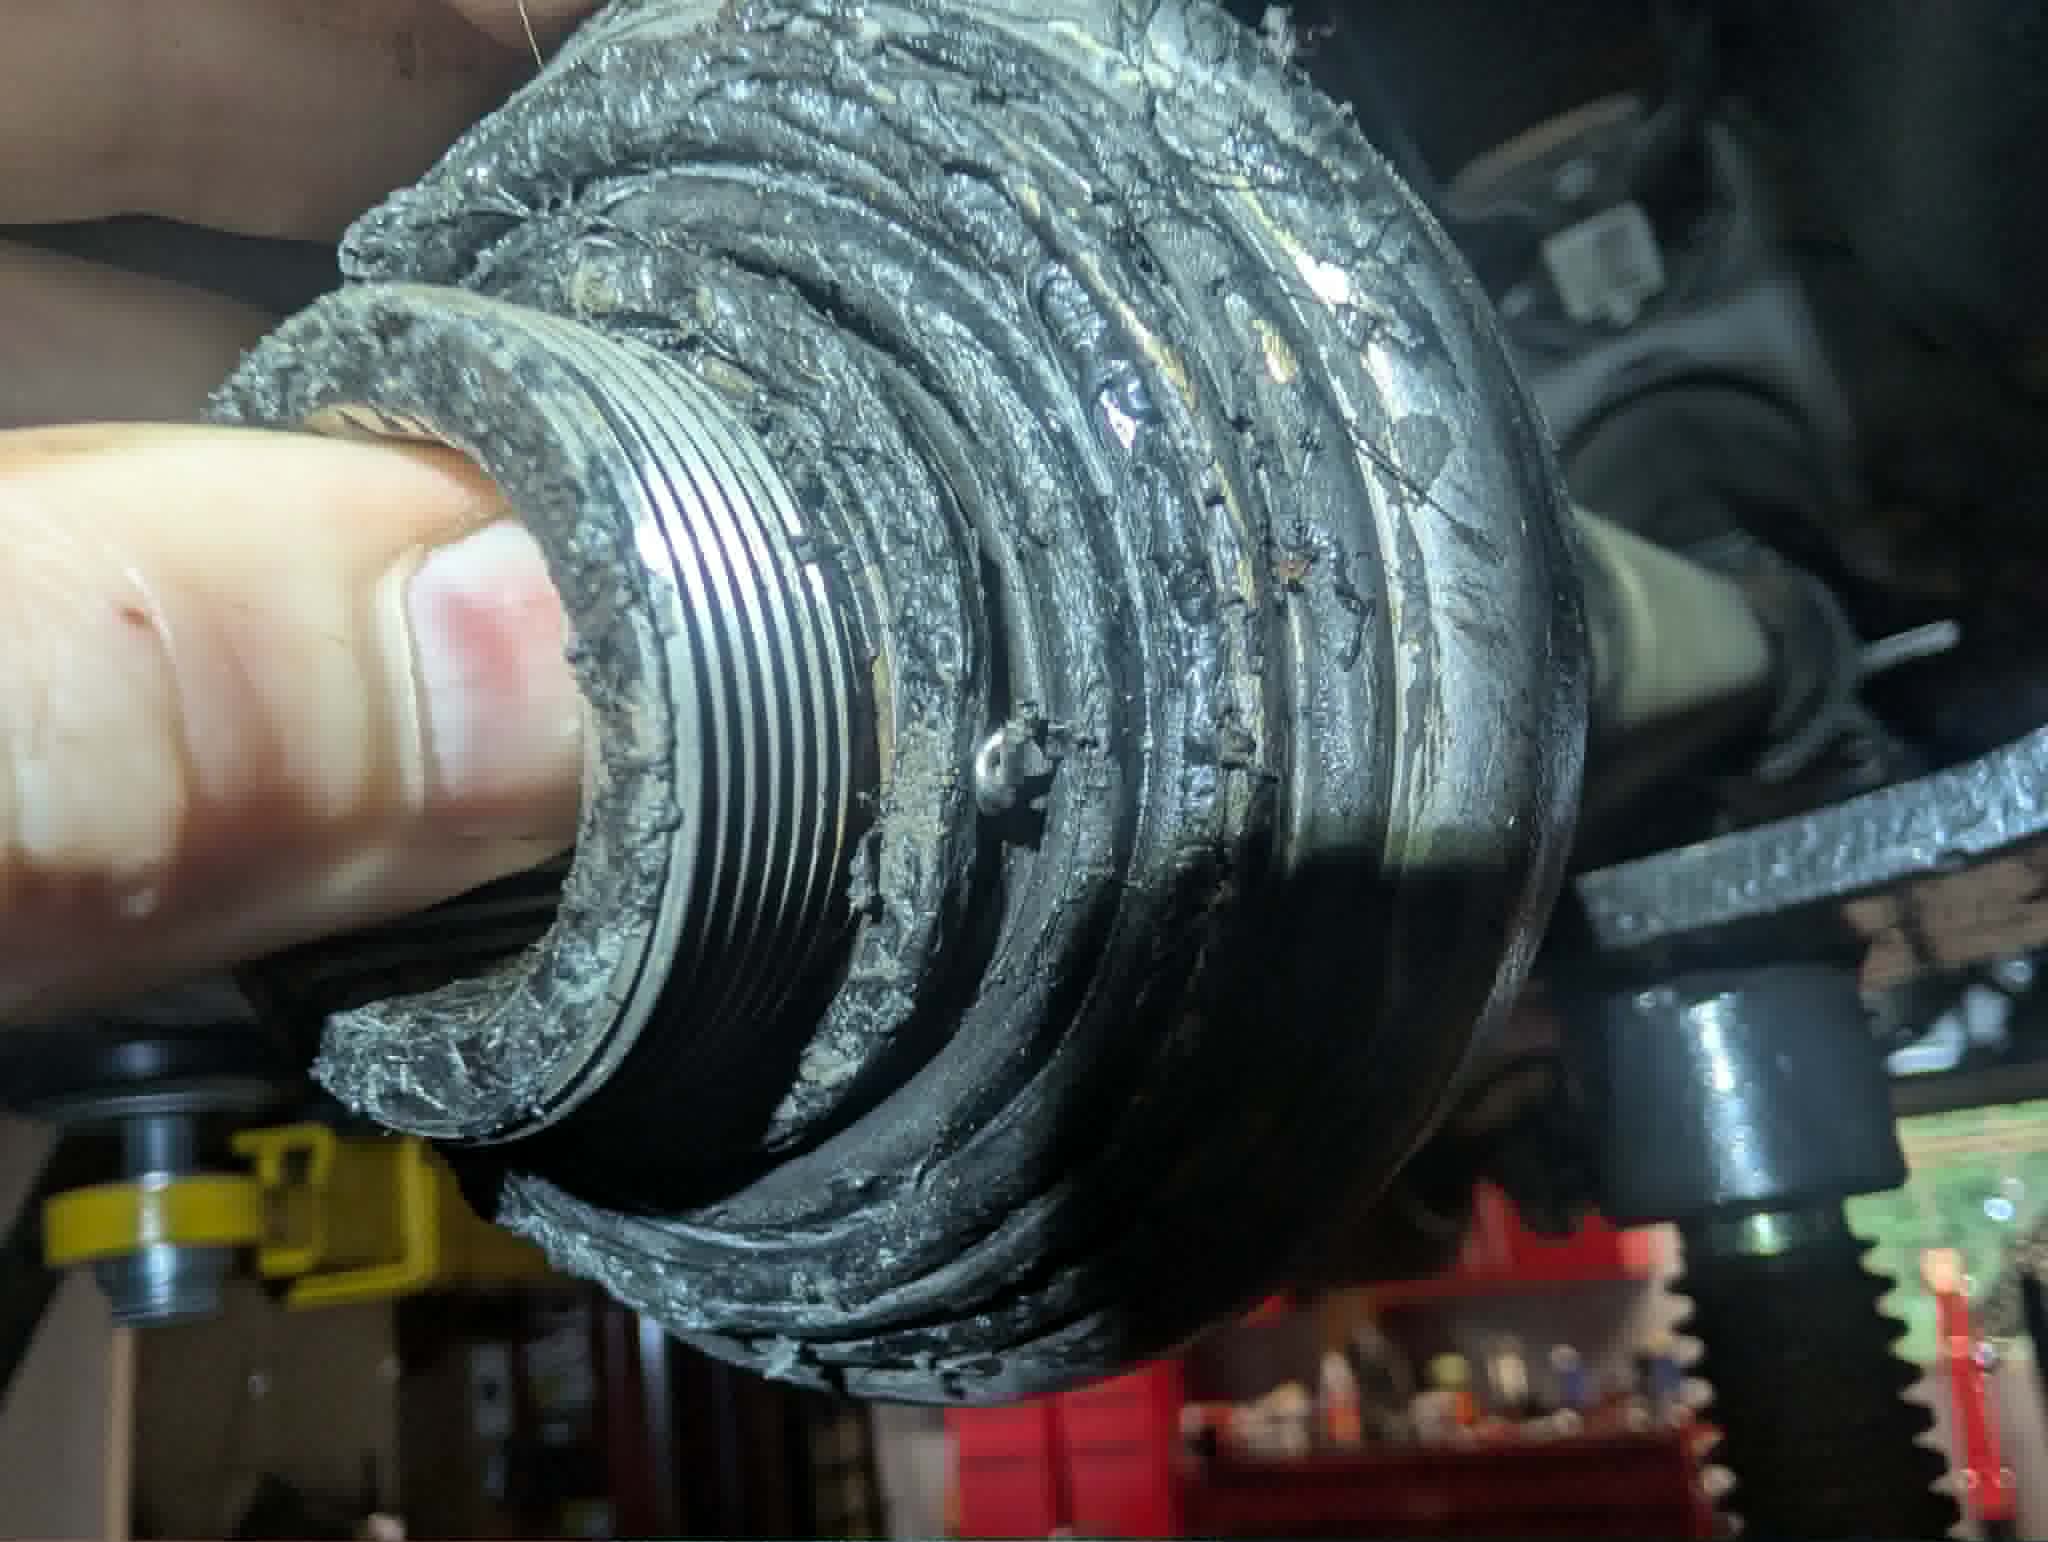 Replacement seal from Shem Group, part 11553453300.
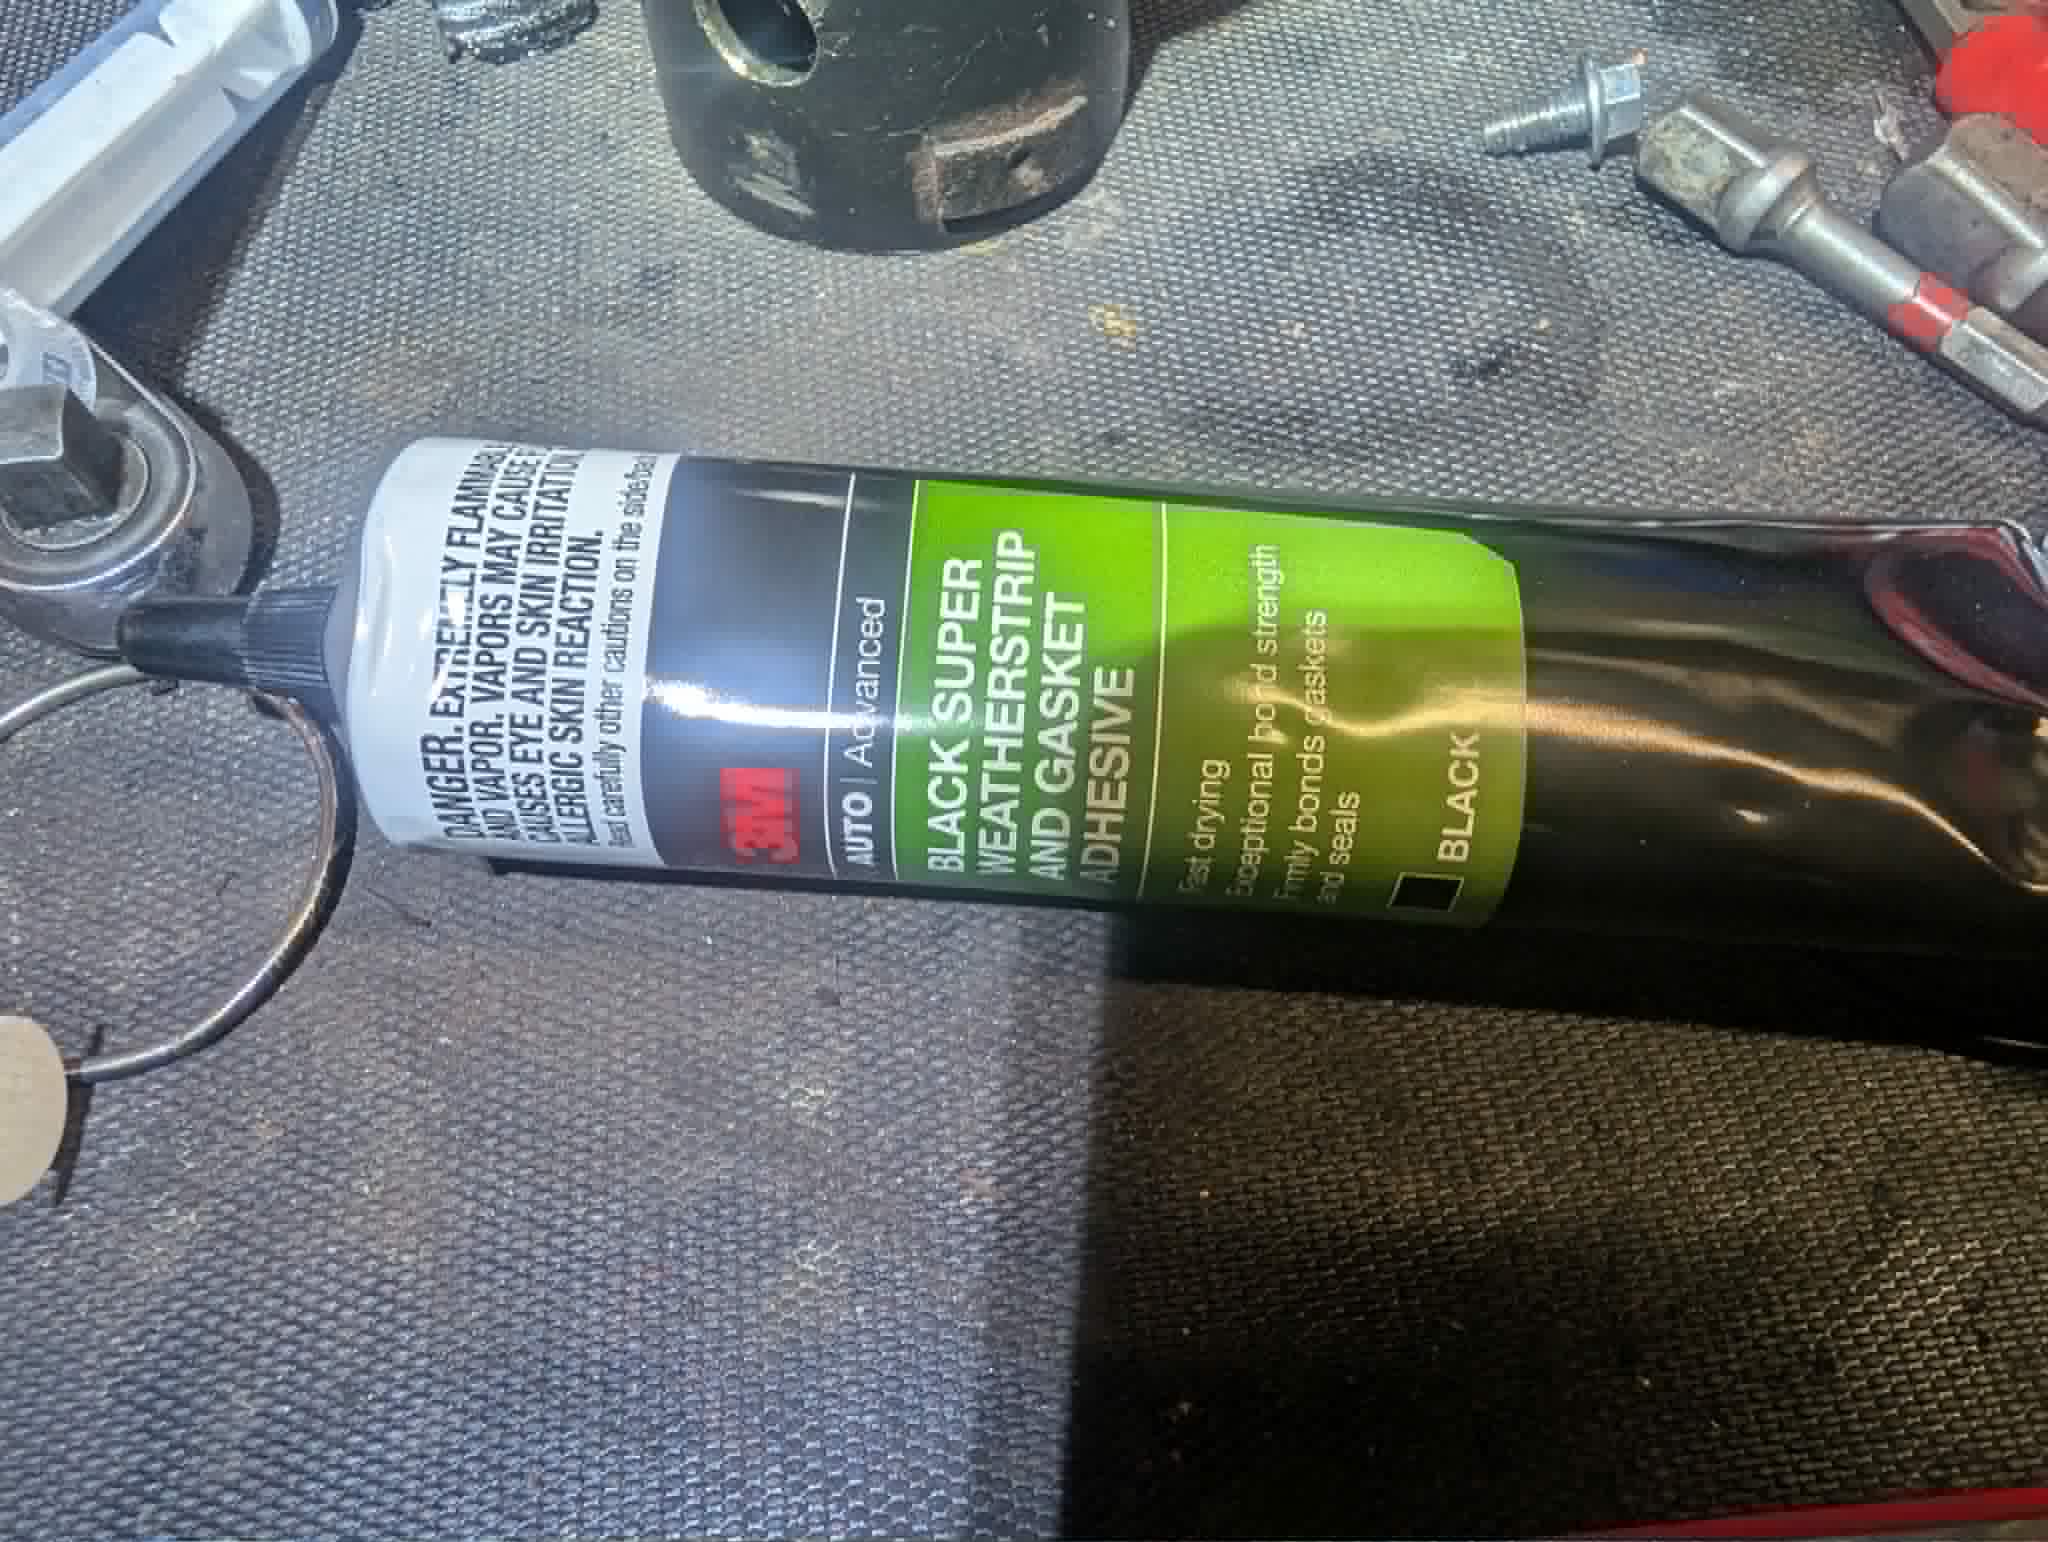 3M Black Super Weatherstrip and Gasket Adhesive (08008).
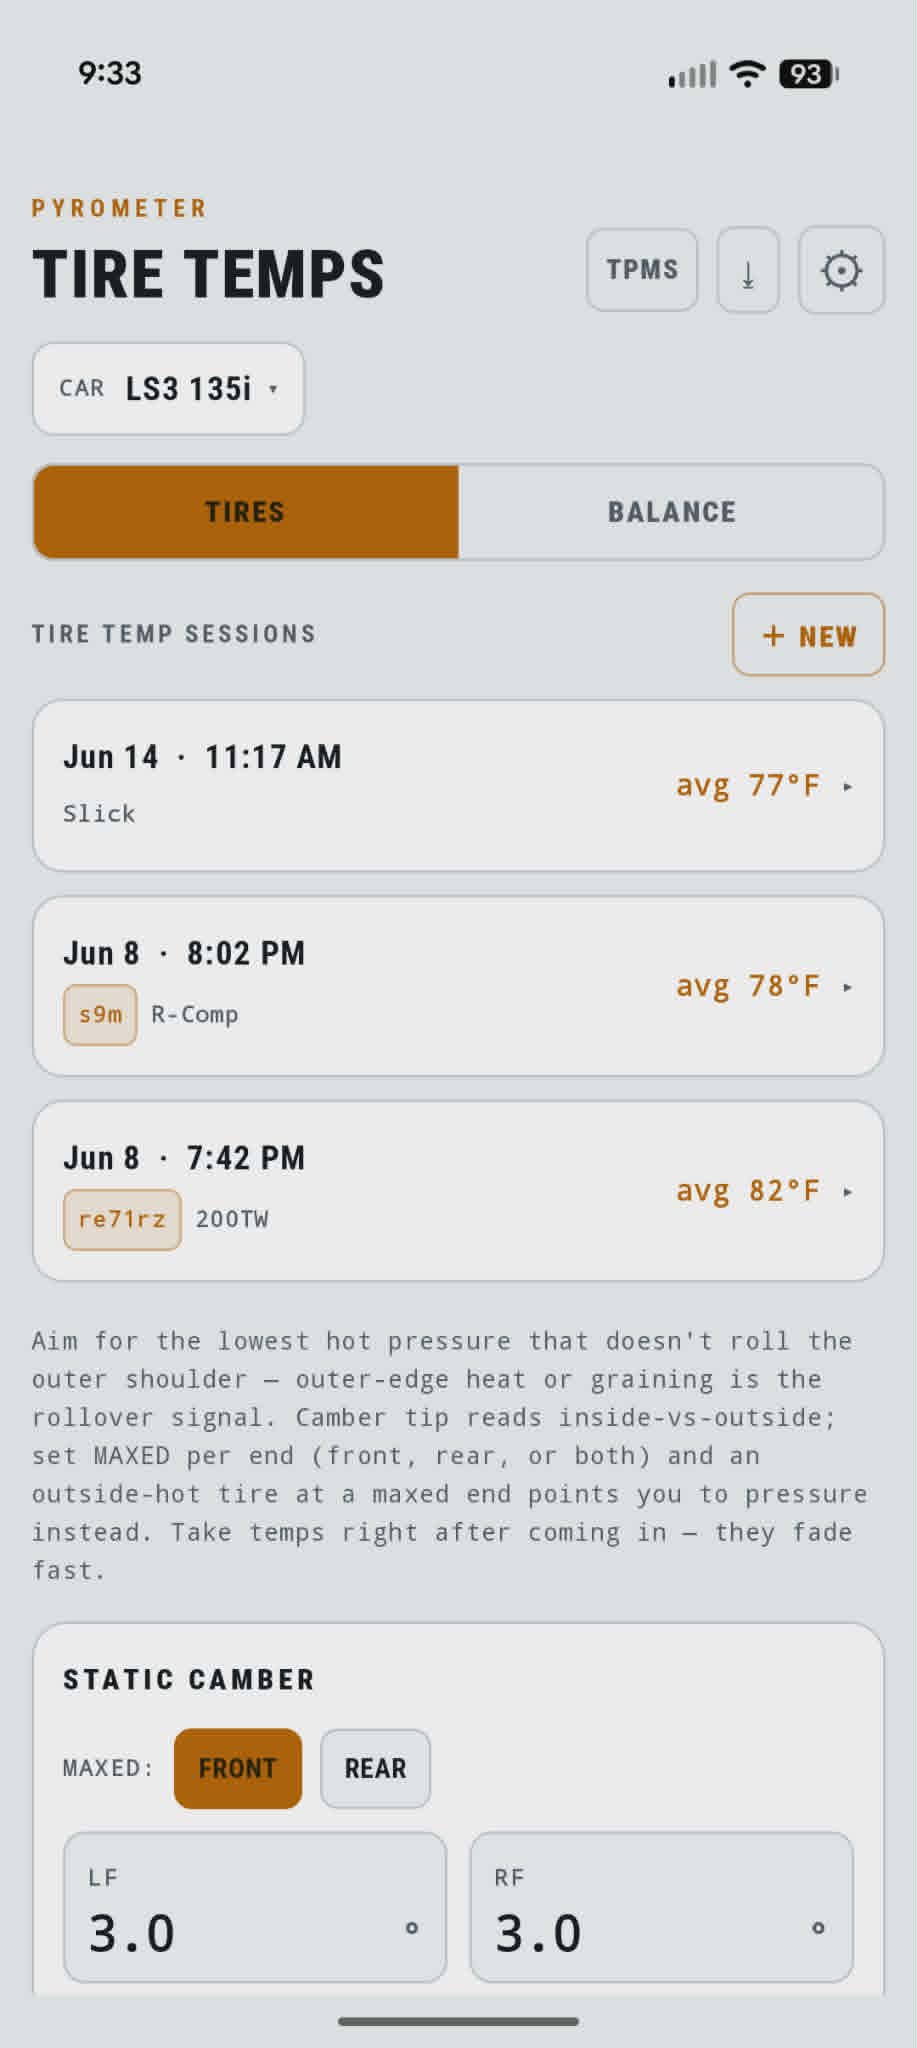 Sessions are timestamped and tagged by compound — slick, R-Comp, RE-71RS, etc.
 OUT / MID / IN per corner, plus sync from the pyrometer and from TPMS for cold and hot PSI.
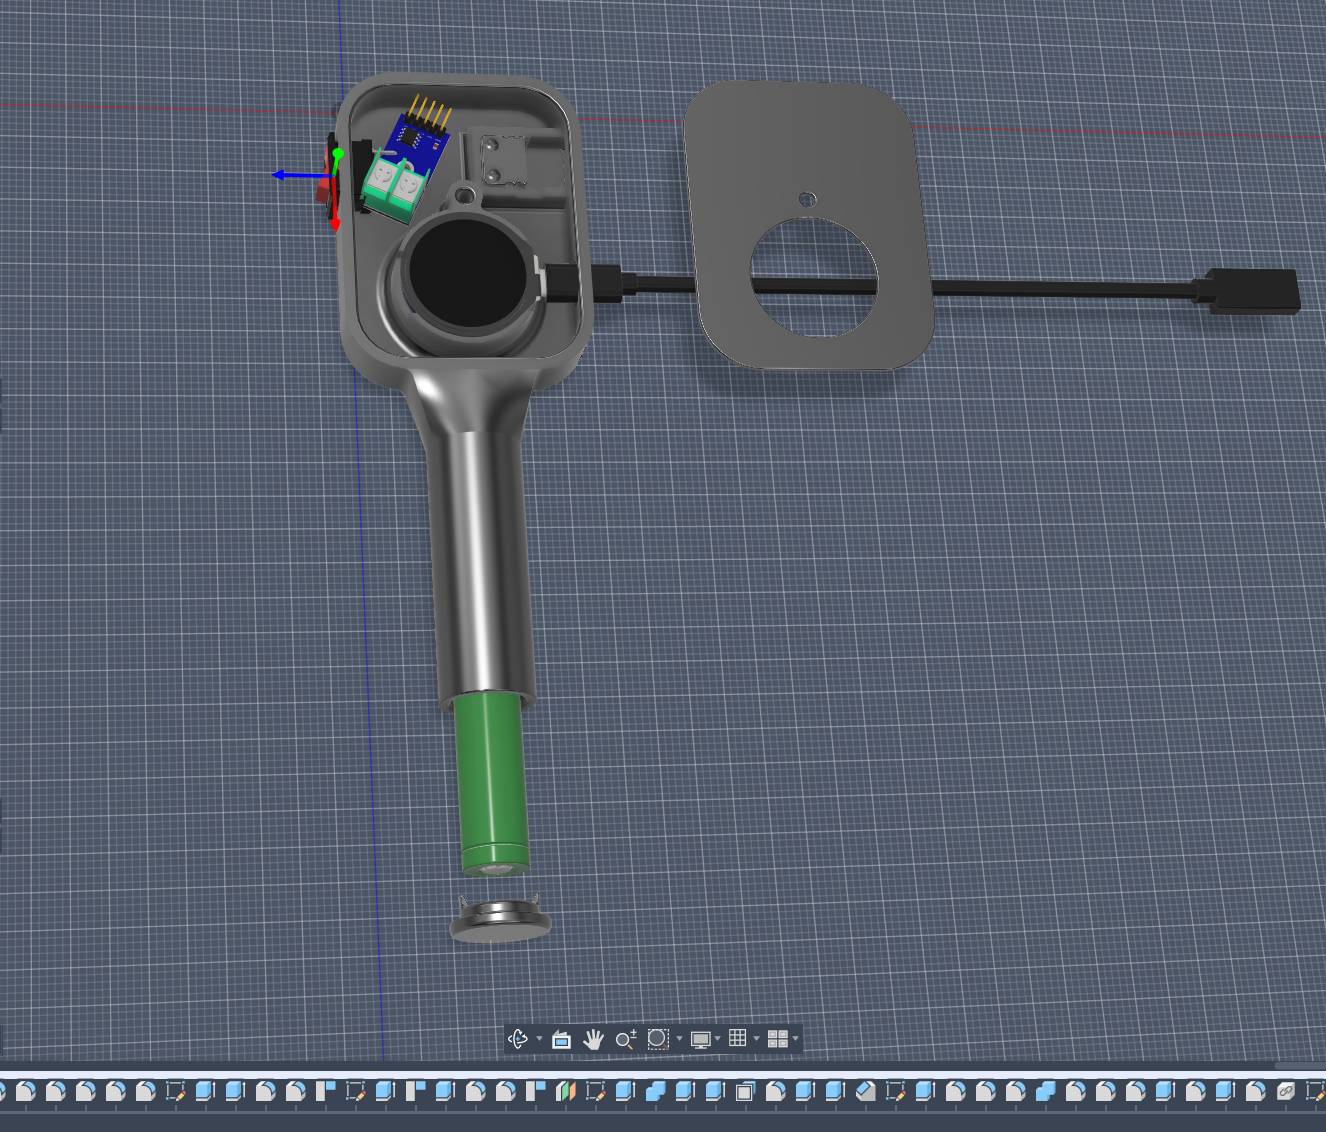 Head, handle, faceplate, and screw-on battery cap — designed around the round display module and an 18650 in the grip.
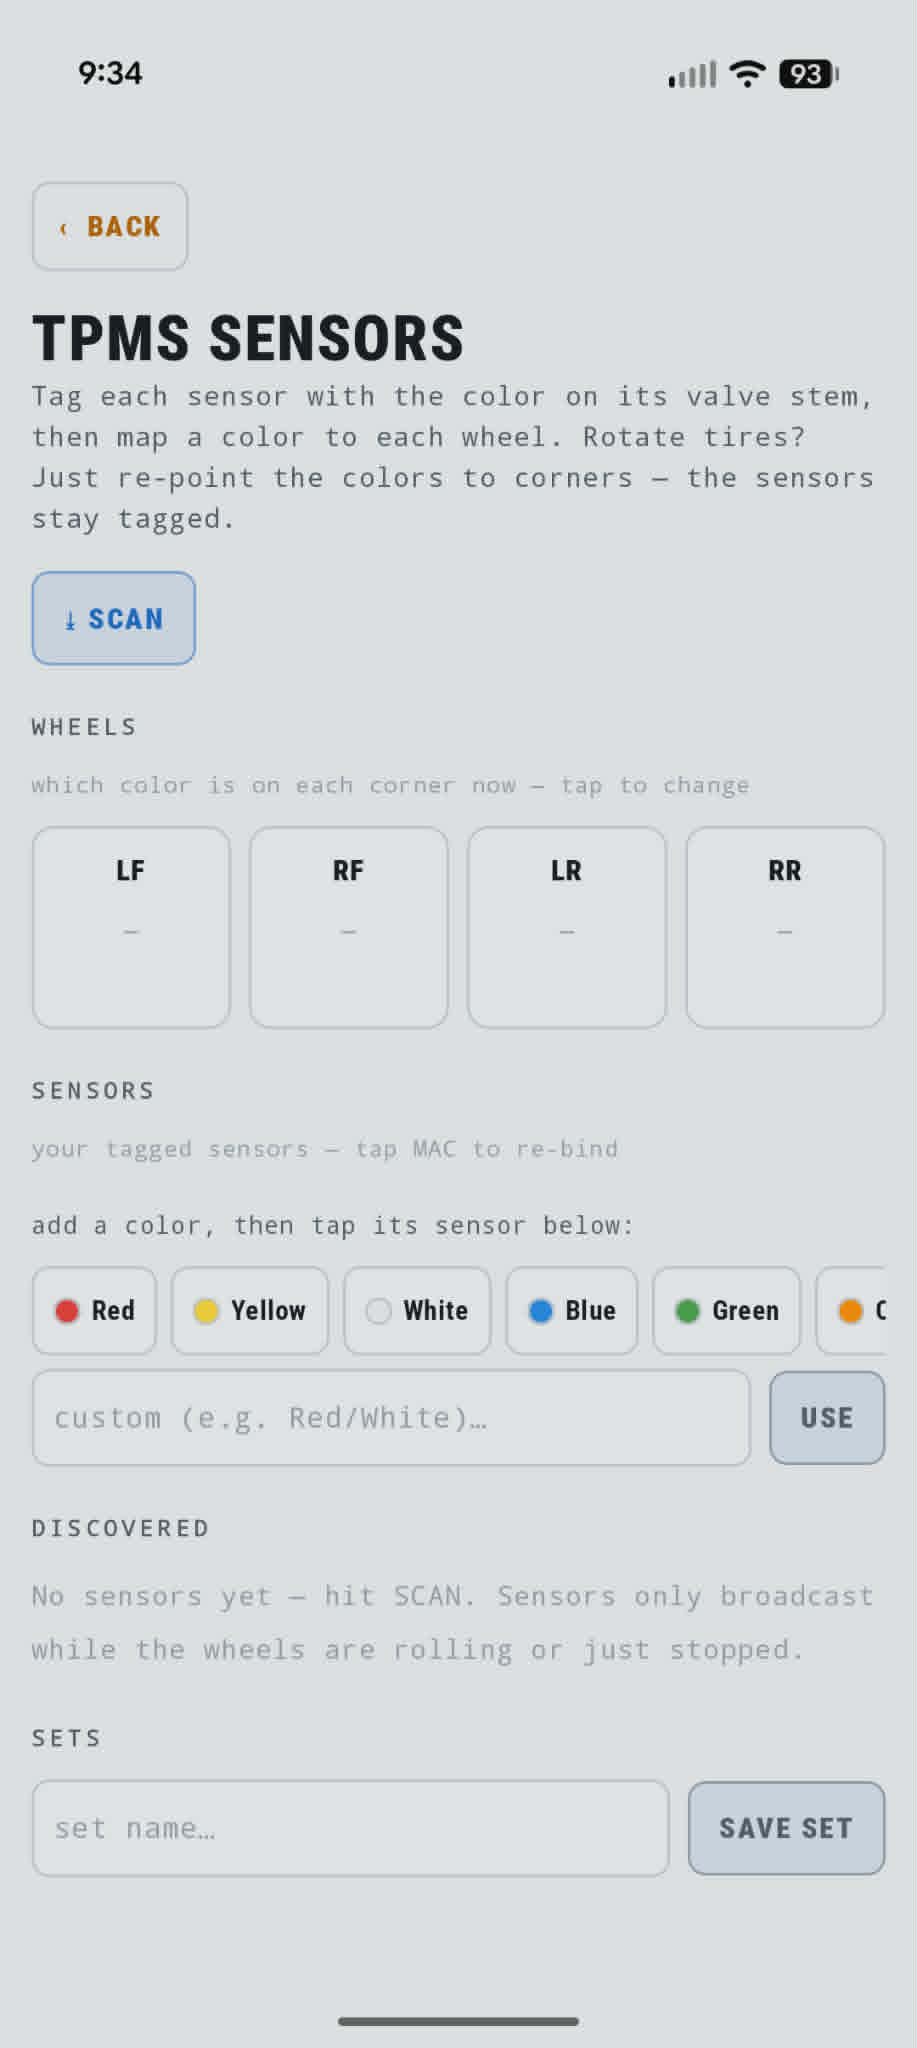 Tag each sensor by valve-stem color, map colors to corners. Rotate tires — re-point colors, not MAC addresses.
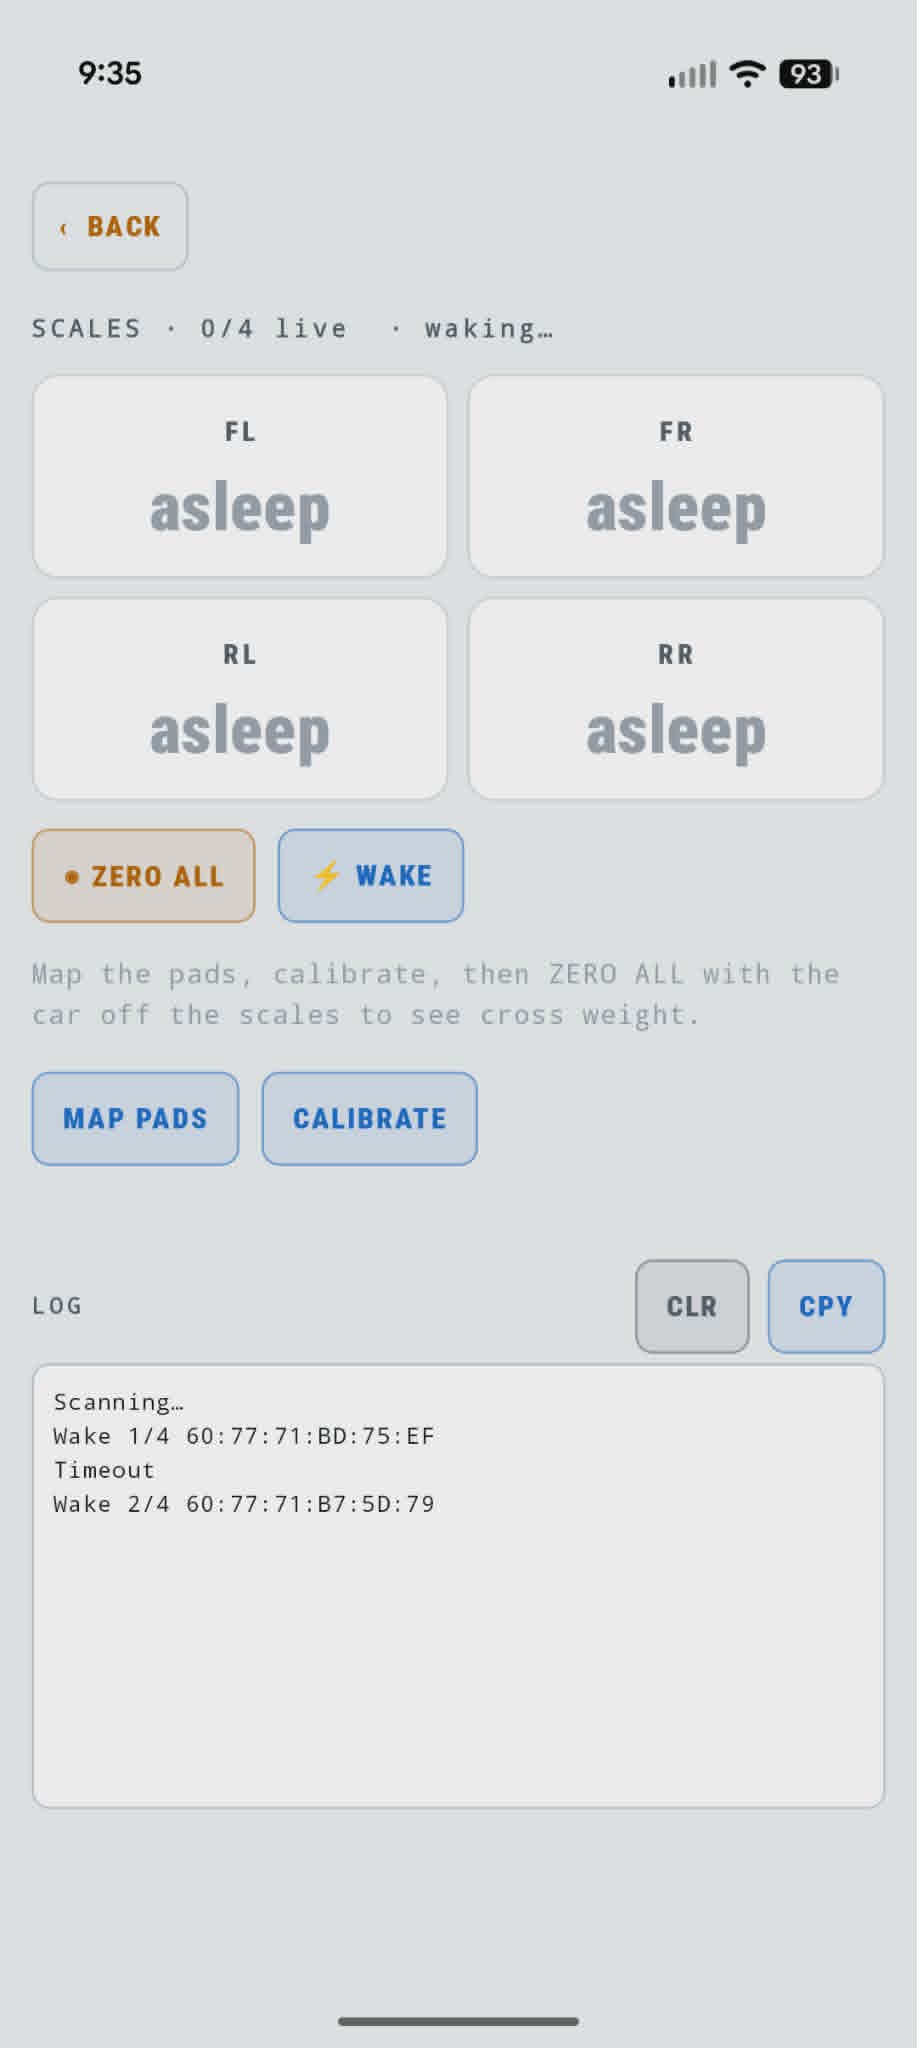 Wake each pad over BLE, map to a corner, calibrate, then zero with the car off the pads.
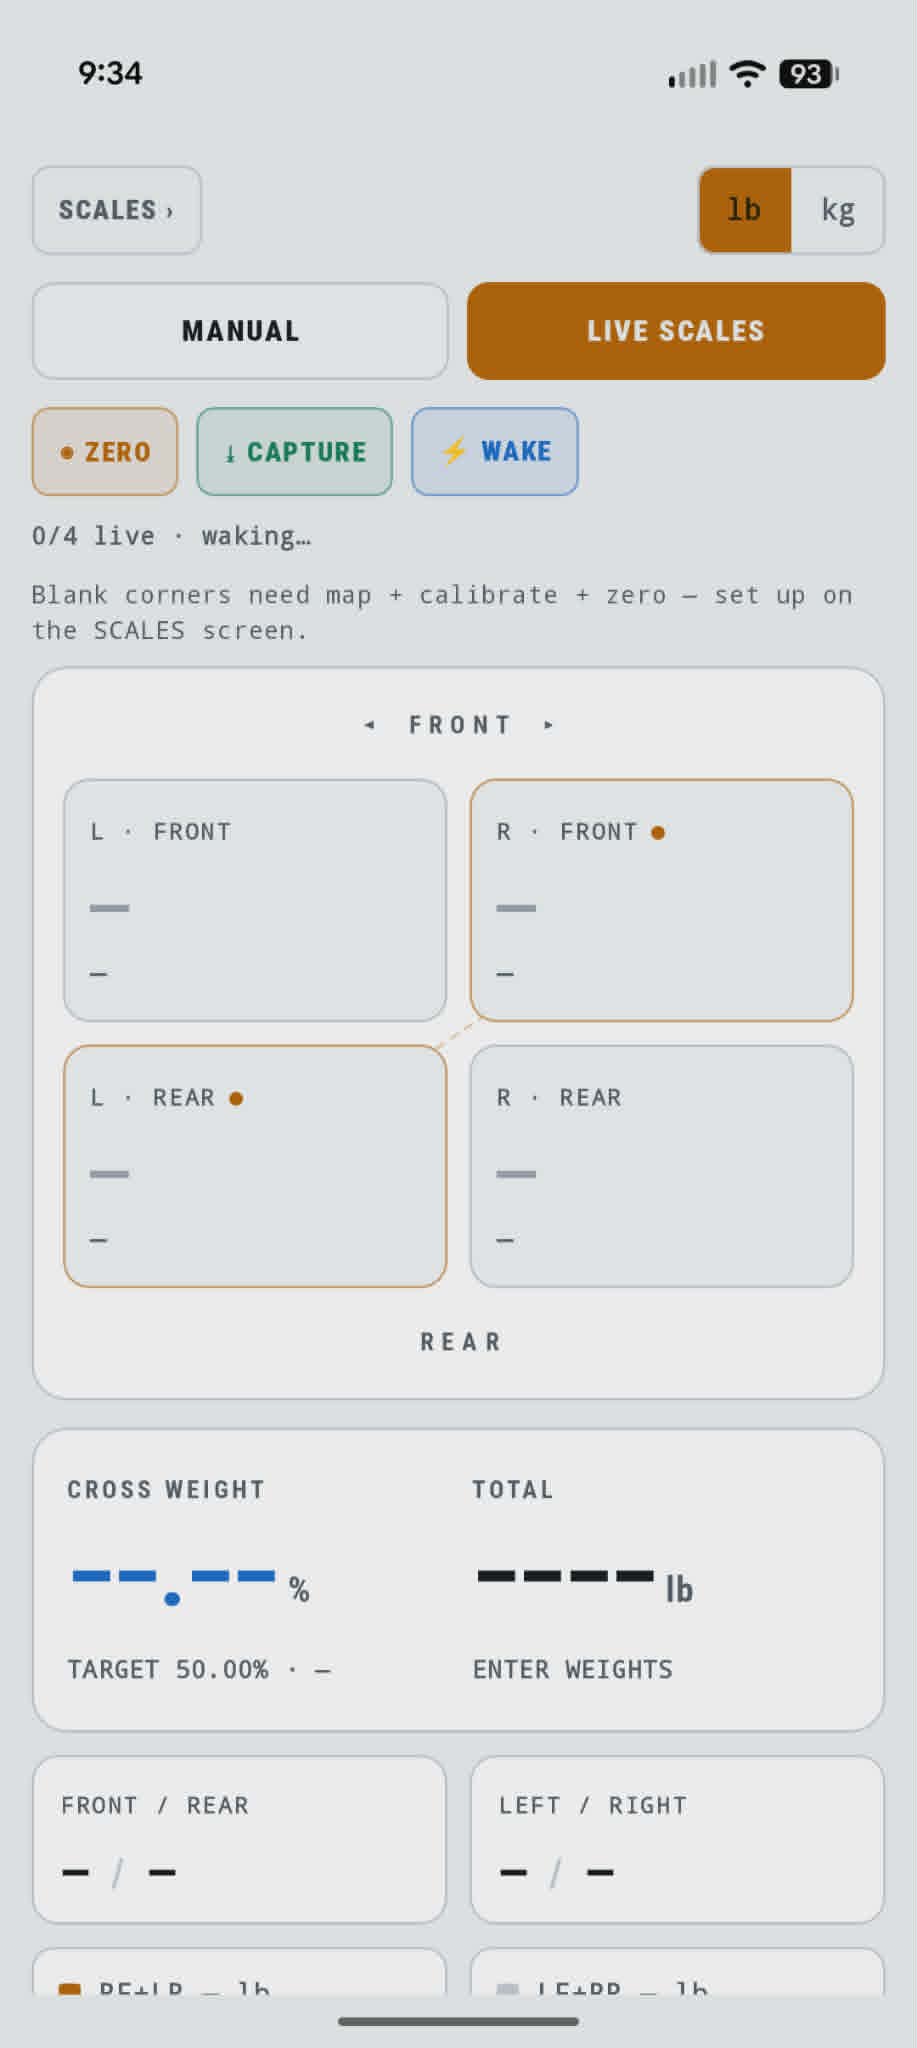 Live mode streams all four corners. Manual entry works when you only have corner numbers from somewhere else.
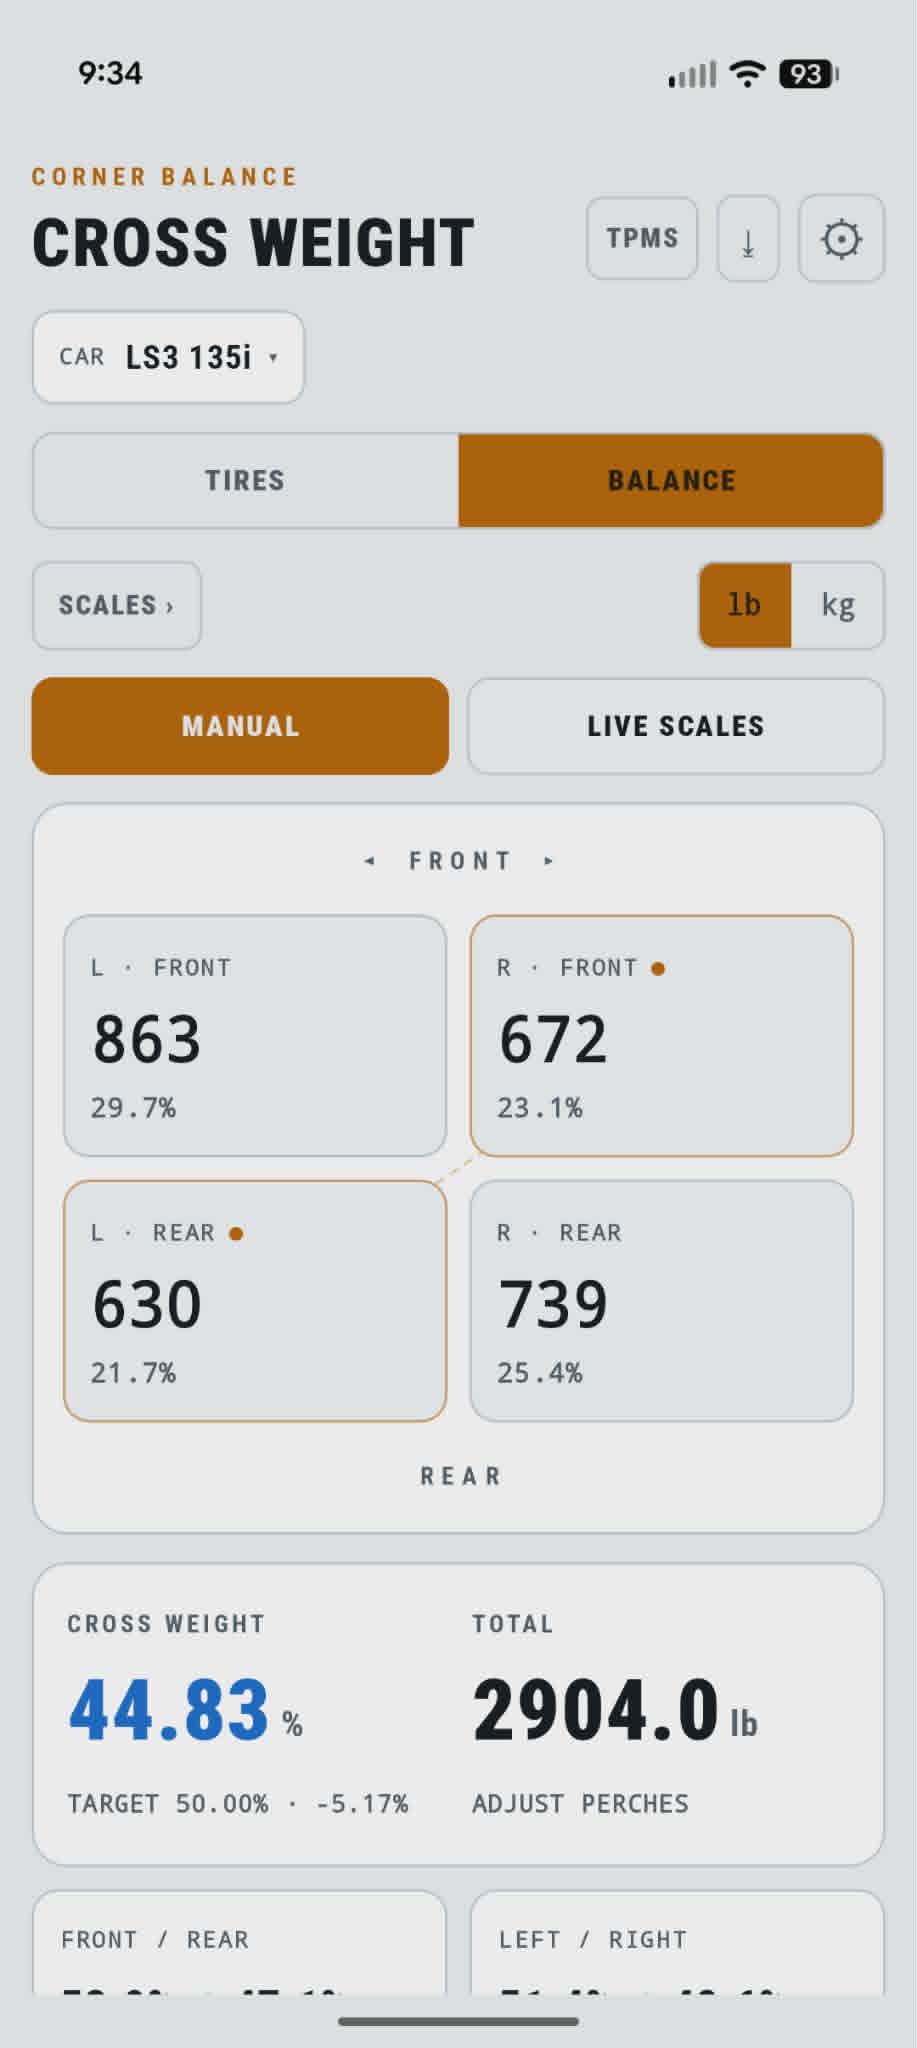 Manual entry still gives you cross weight, diagonal totals, and whether to adjust perches.
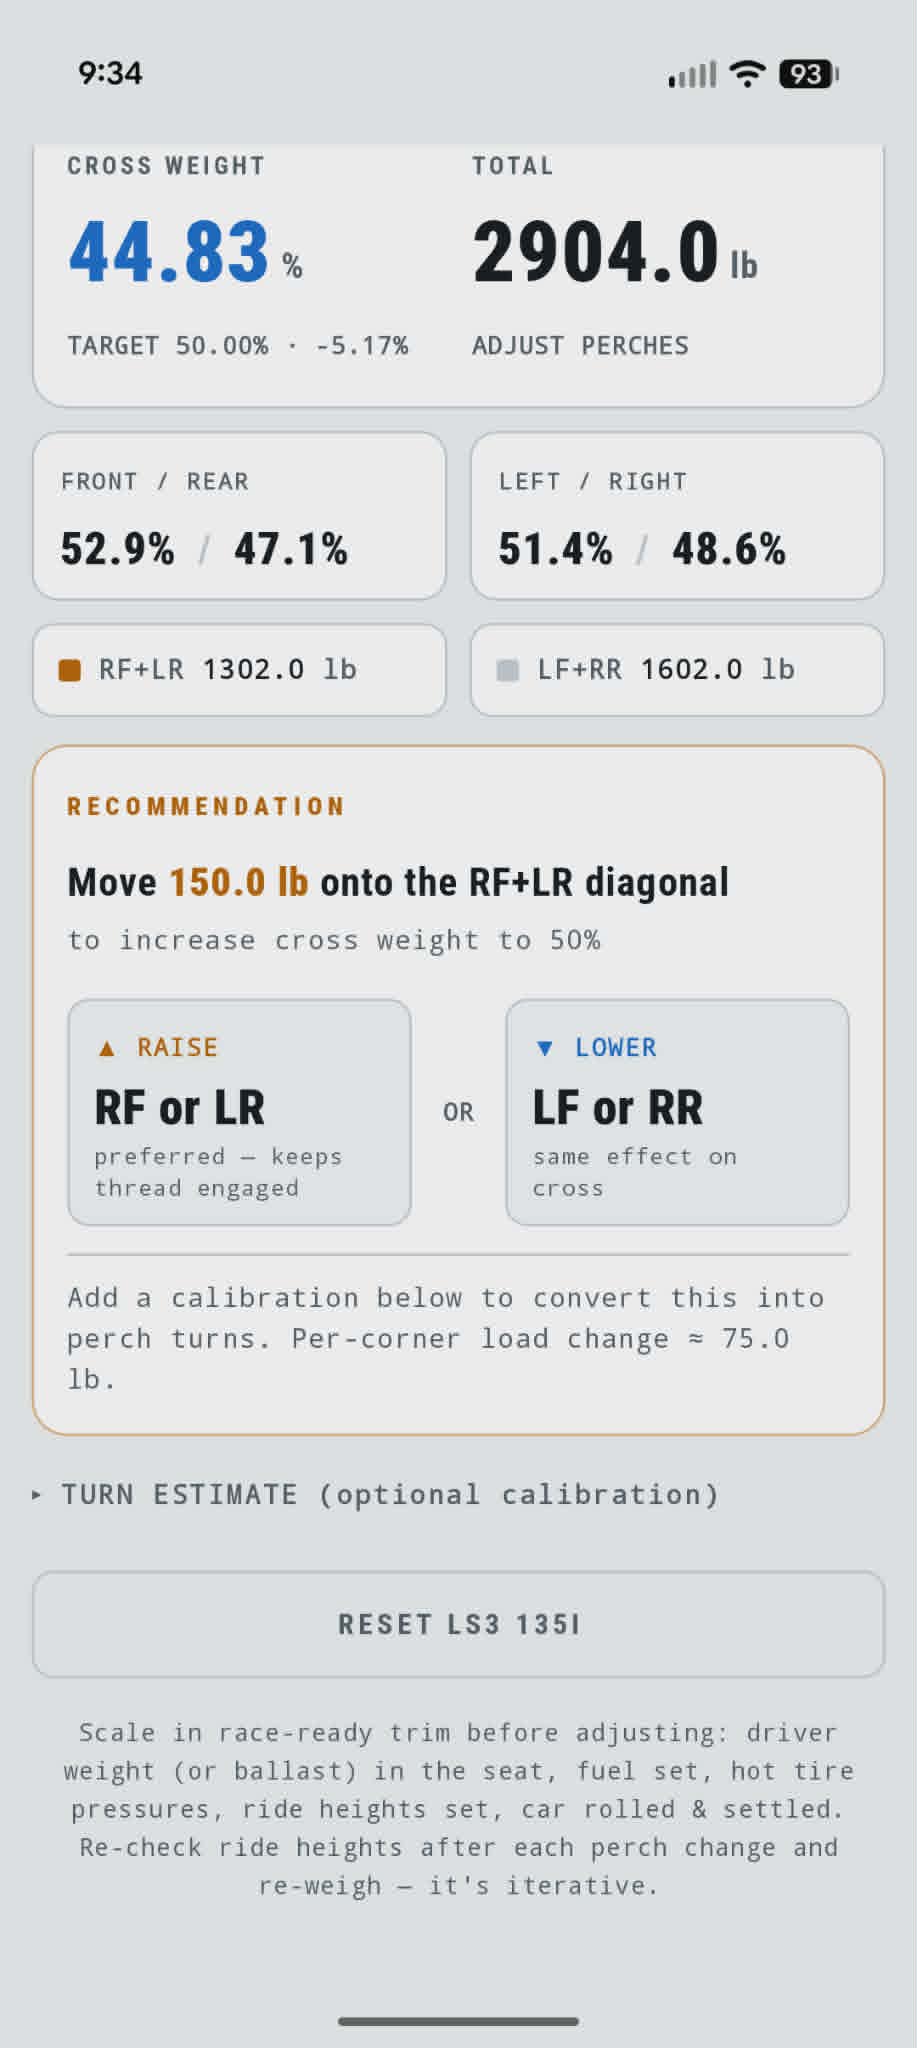 Example: 44.83% cross on 2,904 lb — move 150 lb onto the RF+LR diagonal to hit 50%.
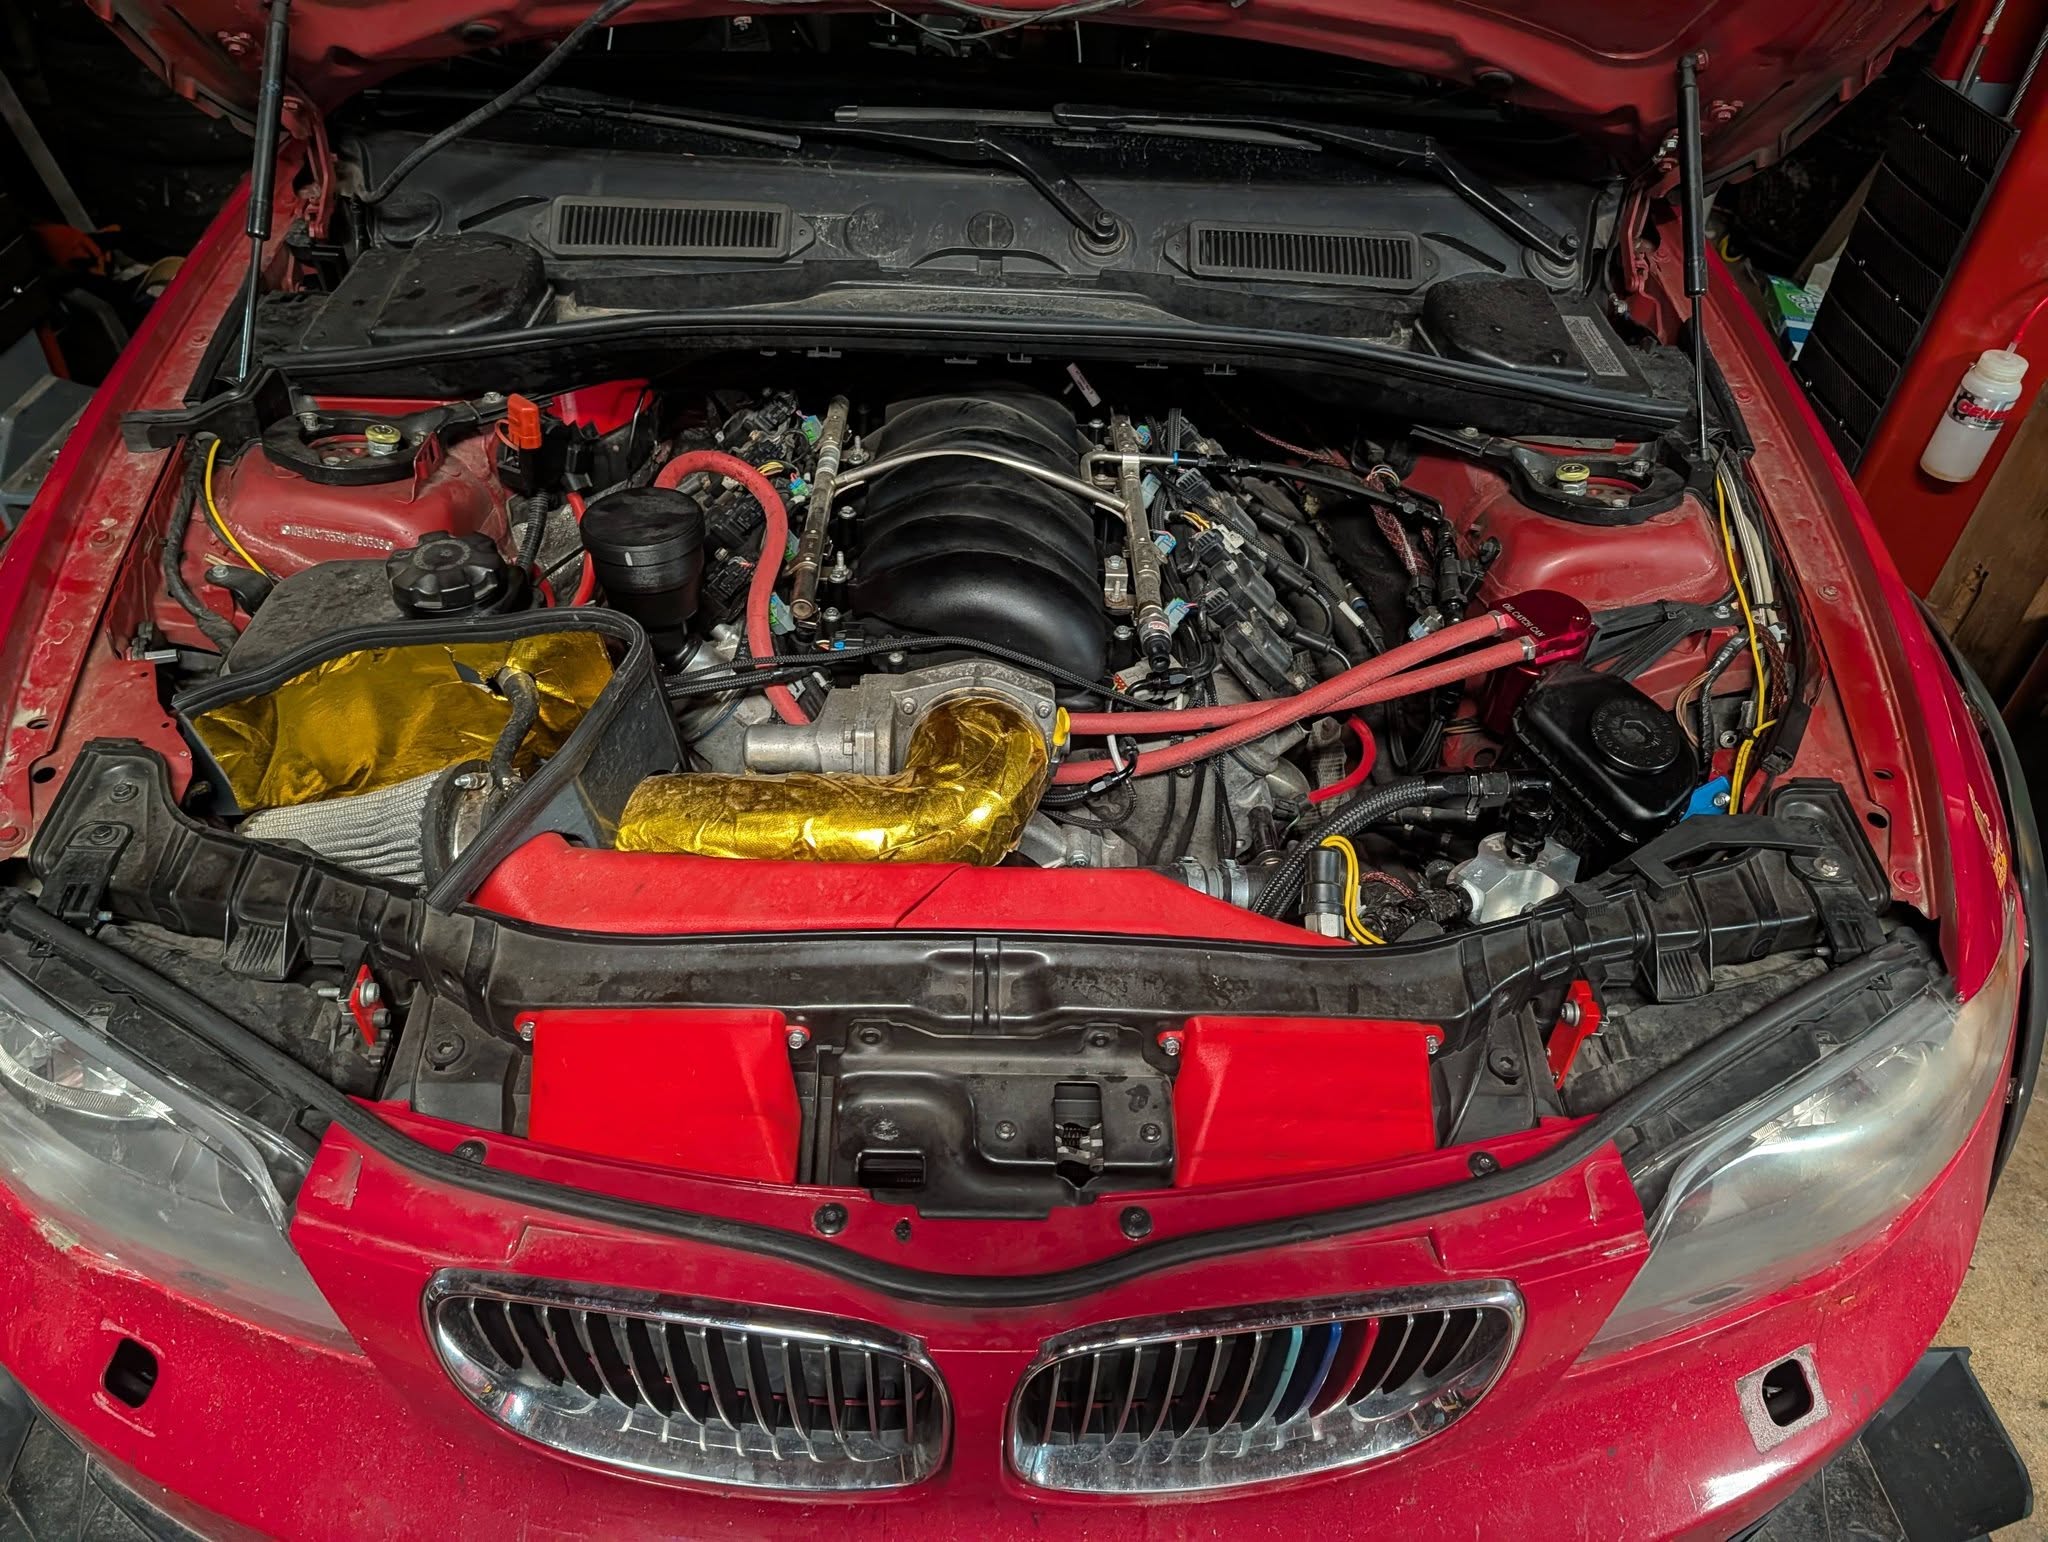 L92 in the 135i bay — heat-wrapped intake, 3D-printed ducting, catch can plumbing.
 Vented hood, splitter, and flares at work.
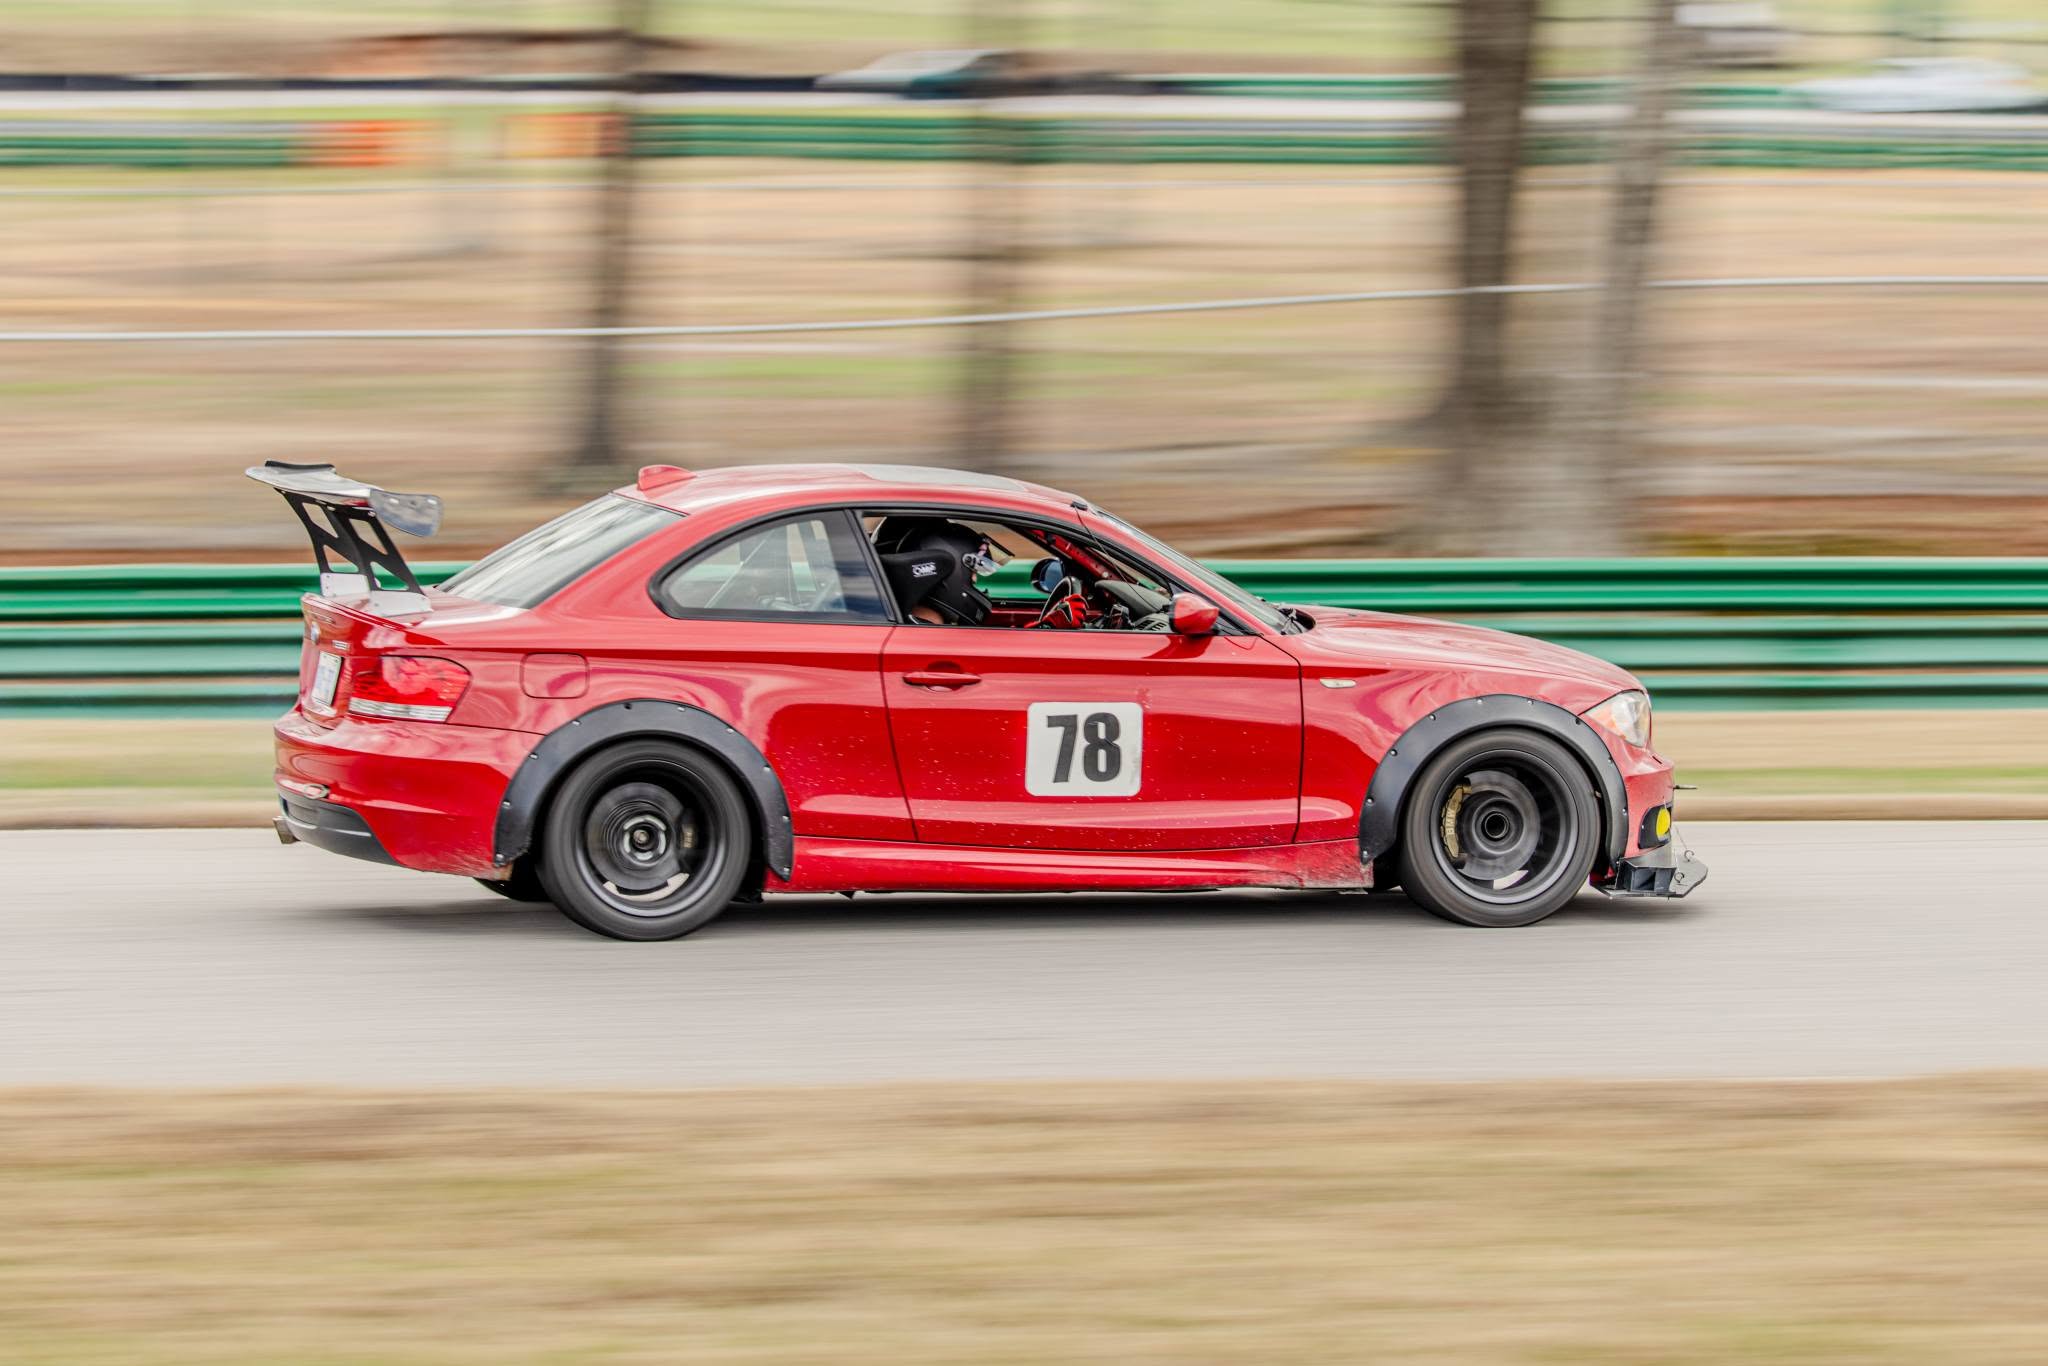 Several weekends in post-swap.